
HMT's own A6/Z6 mini-me writeup using TurboEDIT 1-wire VTEC. **Pics**

Thread Starter
3.0 BAR
Joined: Nov 2004
Posts: 1,608
This project was supposed to be put off until this winter, but unfortunately we bent a valve in the A6 head and we already had all of the mini-me parts laying around so we did it now.
This writeup will be no different than any other aside from it staying OBD0 and using TurboEDIT 1-wire Vtec.
Make sure you have all of your parts before you begin.
Parts list **note, this list is what is required only if you are staying OBD0, switching to OBD1 requires more than this**:
Z6 head **Before you put this on it would be a good idea to take it to a machine shop for a valve job, new valve seals, and a new cam seal, and to just check it over**
Z6 valve cover
Z6 timing belt
Z6 intake manifold gasket
Z6 exhaust manifold gasket
Y8 head gasket
Z6 ARP head studs
Z6 vtec solenoid
Z6 spark plug wires (yes, they are different than the others)
TurboEDIT chipped/basemapped PM6 (others can be used, but that is what I am using) and the newest version of TurboEDIT on your computer.
New spark plugs for a Z6 **NGK BCPR7ES, stock #3330 work just fine and are cheaper than Z6 one range colder plugs. The are the stock NGK plugs for older SAAB 900 Turbos and are already one step colder**
$100 for little ---- here and there
**Not all parts are pictured**

To start off, pull your car in the garage and drain all of your oil and coolant. If you are a dumbass like me make sure that you spill at least half of it on the floor.
Pull the negative terminal from the battery and start unbolting everything from the head. The only problem I ran into while unbolting things from the head was the intake manifold, it has a bracket underneith the center of it that bolts between the manifold and the block, once I looked at my helms manual and learned about the bracket, it was off in a couple seconds. Make sure that everything is unbolted, but don't go to the extreme. Helms suggests that you unbolt a TON more ---- than I did and take the head and intake manifold out as one piece, don't waste your time, just unbolt enough stuff to be able to free the head. Make sure when you are taking bolts out to put them in labeled ziplock bags so you don't lose them, it is also a good idea to mark all vacuum lines, fuel lines, wiring, etc... that you remove. Loosen the alternator bracket and remove the alternator belt. Unbolt the timing belt cover as far as you can. There will still be 2 bolts that sit behind the crank pulley.
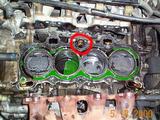
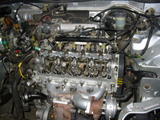
Here are some pics of the head with everything unbolted from it that needs to be:


Now, the horror of the whole project. The crank pulley. I would suggest not even wasting your time trying anything other than a GOOD impact wrench with the proper sized drive (1/2 or 3/4) and a 17mm deep impact socket with the same size drive. To remove the crank pulley, just jack up the front end of the car and remove the driver's side front wheel, remove the inner fender/splash guard, and there is your crank pulley. Impact that bitch off. Remove the pulley, then pull off your timing belt.
Next, unbolt the head and take it off.

Once the head is off scrape the old gasket off the block, but make sure you don't scratch up or gouge the block or your new gasket won't seal properly. Make sure you do a damn good job on this part, since you will be using a metal gasket from now on, this is the only time you will have to do this. After scraping the gasket off GET ALL of the old shitty gasket shavings out of your cylinders and holes that the head studs thread into. Make sure the bolt holes are completely dry or you could crack your block when you torque down the head!!
EDIT!! I forgot to put this in earlier, (but I did do it), before you put the new head on, you MUST pull the oil jet from the block or Vtec will not enable due to an oil pressure issue. To get the jet out, just screw a screw into it and pull. Here is the oil jet (pic from another site).
Since you were smart and got ARP headstuds instead of reusing the old shitty headbolts that have probably been on the car for 15 years now, you put a small ammount of the included lube on the threads of each head stud **on the side that doesn't have the hex wrench hole on top, dumbass** and put all of the head studs in. ONLY TIGHTEN THEM HAND TIGHT. Now put your shiny new metal headgasket on, making sure that it is on the right way.
Now put your new head on the studs **there now, doesn't that look much more pretty than that oil covered nasty mess you took off earlier** Make sure that you put the ARP lube on both sides of the washer and on the nut before putting it onto the head stud, hand tighten each nut down then get out your torque wrench. Tighten the nuts down in a criss cross pattern (if you can't make out the picture, look in a helms!!) in 3 steps, to reach the final torque of 60 lb/ft, I did 20, 40, 60.

Your new head is on, now for the new timing belt. The Z6 is the right belt to use with this setup, if you were to use a Y8 head, then use a Y8 timing belt. Put the timing belt cover back into place **don't bolt it up yet** and put the crank pulley back on. Now line the crank pulley up to TDC, on the inside edge of the pulley there are four marks, one is alone and the other three are next to each other, slightly left of the one that is alone. Turn your crank pulley counter-clockwise until the one that is alone lines up with the mark on the timing belt cover. Now pull the pulley and cover back off, being careful not to move the pulley. Now turn the cam gear until up is facing up **I know it is tough, but I believe in you, you can do it** Now it is time for the belt. Loosen your tensioner pulley as loose as it can get without falling off and unhook the little spring off of it. Slide your belt, it will be TIGHT, but it does go on. Now put the spring back on and tighten your tensioner pulley. **If you think the belt is a bitch to get on, try doing it without unhooking the spring**
Using your new gaskets put everything back on the head in the reverse order of how you took it off, but keep your valve cover off until later. If you want to use the A6 upper radiator hose, you will have to cut it to fit. **See, it was nice to have everything labeled wasn't it?**
Put in new spark plugs, refill your fluids and go smoke a cigarette, you are almost done with the mechanical part.
Putting the distributor back on!!! I reused the A6 distributor and there are a couple ways of doing this. Everyone says to throw some washers on there and make it fit, or you could just use a dremel the holes of the distributor's bracket to widen them then set your timing and bolt it in nice and pretty like that, or you could do what I did and get a slightly smaller bolt, a nut, and a washer, set the timing, then use that bolt/washer/nut combo on the top hole of the distributor then use a very very very small amount of JB Weld **HMT style bitch** on the other holes so it can still be easily broken free if you ever need to reset the timing.
There, done installing!! Now, before you put that valve cover on **yea, the one I told you to leave off, but you still put it back on** make sure you set your valve lash. The intake side of a Z6 is 0.18 mm - 0.22 mm and the exhaust site is 0.23 mm - 0.27 mm. Now you can put your valve cover back on.
There, you could quit at that and have spent 8 hours doing all that work so you can say "My car has mad tyte veetack yo." Or you could do 10 min of wiring and actually have it.
To wire 1-wire Vtec **using your AC clutch line** with turbo edit all you need is some wire and a relay.
Wire your relay like this:
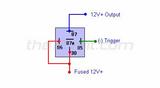
The wires from the relay go like this: The wire from 87 goes to the Vtec solenoid, cut your wire from pin B3 **on the ECU dumbass** and connect 85 to the at least inch or so that you were smart enough to leave coming from the harness on the ECU, and splice 86/30 into A13.
Now, if you were to set your Vtec up in TurboEDIT and run your car, once you hit your enable RPM you would hear your solenoid just click click click click on and off constantly. That is because you have to change some thing with a hex editor. Open your map with your hex editor and change 7FF2 to 15 change 2888 to A3 and change 2882 to 21. Now you have everything setup for Vtec.
Open your hex edited map in TurboEDIT and set up Vtec. I used an enable of 4400 and a disable of 4350 and my signal was from my AC relay **yes, there is a bug in TE version 2.5.5 (maybe other versions as well) where every time you open your properties menu your enable and disable points increase, so keep an eye on that**. Richen out your fuel map ABOVE your engage point by about 20% and fine tune from there. You will also want to re-tune your ignition map above your engage point.
As soon as I finish fine tuning my maps I will post the .bin file in Xenocron's directory so everyone can just mooch off of my work to an extent.
And the last and most important step, make sure you pay a buddy $40 to polish your new sweet Veetack valve cover so your car can be bling blingin on race day then get it dirty as ---- while doing the install, rendering the polishing job useless and you with $40 less in your pocket.
This writeup will be no different than any other aside from it staying OBD0 and using TurboEDIT 1-wire Vtec.
Make sure you have all of your parts before you begin.
Parts list **note, this list is what is required only if you are staying OBD0, switching to OBD1 requires more than this**:
Z6 head **Before you put this on it would be a good idea to take it to a machine shop for a valve job, new valve seals, and a new cam seal, and to just check it over**
Z6 valve cover
Z6 timing belt
Z6 intake manifold gasket
Z6 exhaust manifold gasket
Y8 head gasket
Z6 ARP head studs
Z6 vtec solenoid
Z6 spark plug wires (yes, they are different than the others)
TurboEDIT chipped/basemapped PM6 (others can be used, but that is what I am using) and the newest version of TurboEDIT on your computer.
New spark plugs for a Z6 **NGK BCPR7ES, stock #3330 work just fine and are cheaper than Z6 one range colder plugs. The are the stock NGK plugs for older SAAB 900 Turbos and are already one step colder**
$100 for little ---- here and there
**Not all parts are pictured**

To start off, pull your car in the garage and drain all of your oil and coolant. If you are a dumbass like me make sure that you spill at least half of it on the floor.
Pull the negative terminal from the battery and start unbolting everything from the head. The only problem I ran into while unbolting things from the head was the intake manifold, it has a bracket underneith the center of it that bolts between the manifold and the block, once I looked at my helms manual and learned about the bracket, it was off in a couple seconds. Make sure that everything is unbolted, but don't go to the extreme. Helms suggests that you unbolt a TON more ---- than I did and take the head and intake manifold out as one piece, don't waste your time, just unbolt enough stuff to be able to free the head. Make sure when you are taking bolts out to put them in labeled ziplock bags so you don't lose them, it is also a good idea to mark all vacuum lines, fuel lines, wiring, etc... that you remove.
Loosen the alternator bracket and remove the alternator belt. Unbolt the timing belt cover as far as you can. There will still be 2 bolts that sit behind the crank pulley. Here are some pics of the head with everything unbolted from it that needs to be:


Now, the horror of the whole project. The crank pulley. I would suggest not even wasting your time trying anything other than a GOOD impact wrench with the proper sized drive (1/2 or 3/4) and a 17mm deep impact socket with the same size drive. To remove the crank pulley, just jack up the front end of the car and remove the driver's side front wheel, remove the inner fender/splash guard, and there is your crank pulley. Impact that bitch off. Remove the pulley, then pull off your timing belt.
Next, unbolt the head and take it off.

Once the head is off scrape the old gasket off the block, but make sure you don't scratch up or gouge the block or your new gasket won't seal properly. Make sure you do a damn good job on this part, since you will be using a metal gasket from now on, this is the only time you will have to do this. After scraping the gasket off GET ALL of the old shitty gasket shavings out of your cylinders and holes that the head studs thread into. Make sure the bolt holes are completely dry or you could crack your block when you torque down the head!!
EDIT!! I forgot to put this in earlier, (but I did do it), before you put the new head on, you MUST pull the oil jet from the block or Vtec will not enable due to an oil pressure issue. To get the jet out, just screw a screw into it and pull. Here is the oil jet (pic from another site).

Since you were smart and got ARP headstuds instead of reusing the old shitty headbolts that have probably been on the car for 15 years now, you put a small ammount of the included lube on the threads of each head stud **on the side that doesn't have the hex wrench hole on top, dumbass** and put all of the head studs in. ONLY TIGHTEN THEM HAND TIGHT. Now put your shiny new metal headgasket on, making sure that it is on the right way.
Now put your new head on the studs **there now, doesn't that look much more pretty than that oil covered nasty mess you took off earlier** Make sure that you put the ARP lube on both sides of the washer and on the nut before putting it onto the head stud, hand tighten each nut down then get out your torque wrench. Tighten the nuts down in a criss cross pattern (if you can't make out the picture, look in a helms!!) in 3 steps, to reach the final torque of 60 lb/ft, I did 20, 40, 60.

Your new head is on, now for the new timing belt. The Z6 is the right belt to use with this setup, if you were to use a Y8 head, then use a Y8 timing belt. Put the timing belt cover back into place **don't bolt it up yet** and put the crank pulley back on. Now line the crank pulley up to TDC, on the inside edge of the pulley there are four marks, one is alone and the other three are next to each other, slightly left of the one that is alone. Turn your crank pulley counter-clockwise until the one that is alone lines up with the mark on the timing belt cover. Now pull the pulley and cover back off, being careful not to move the pulley. Now turn the cam gear until up is facing up **I know it is tough, but I believe in you, you can do it** Now it is time for the belt. Loosen your tensioner pulley as loose as it can get without falling off and unhook the little spring off of it. Slide your belt, it will be TIGHT, but it does go on. Now put the spring back on and tighten your tensioner pulley. **If you think the belt is a bitch to get on, try doing it without unhooking the spring**
Using your new gaskets put everything back on the head in the reverse order of how you took it off, but keep your valve cover off until later. If you want to use the A6 upper radiator hose, you will have to cut it to fit. **See, it was nice to have everything labeled wasn't it?**

Put in new spark plugs, refill your fluids and go smoke a cigarette, you are almost done with the mechanical part.
Putting the distributor back on!!! I reused the A6 distributor and there are a couple ways of doing this. Everyone says to throw some washers on there and make it fit, or you could just use a dremel the holes of the distributor's bracket to widen them then set your timing and bolt it in nice and pretty like that, or you could do what I did and get a slightly smaller bolt, a nut, and a washer, set the timing, then use that bolt/washer/nut combo on the top hole of the distributor then use a very very very small amount of JB Weld **HMT style bitch** on the other holes so it can still be easily broken free if you ever need to reset the timing.
There, done installing!! Now, before you put that valve cover on **yea, the one I told you to leave off, but you still put it back on** make sure you set your valve lash. The intake side of a Z6 is 0.18 mm - 0.22 mm and the exhaust site is 0.23 mm - 0.27 mm. Now you can put your valve cover back on.
There, you could quit at that and have spent 8 hours doing all that work so you can say "My car has mad tyte veetack yo." Or you could do 10 min of wiring and actually have it.
To wire 1-wire Vtec **using your AC clutch line** with turbo edit all you need is some wire and a relay.
Wire your relay like this:

The wires from the relay go like this: The wire from 87 goes to the Vtec solenoid, cut your wire from pin B3 **on the ECU dumbass** and connect 85 to the at least inch or so that you were smart enough to leave coming from the harness on the ECU, and splice 86/30 into A13.
Now, if you were to set your Vtec up in TurboEDIT and run your car, once you hit your enable RPM you would hear your solenoid just click click click click on and off constantly. That is because you have to change some thing with a hex editor. Open your map with your hex editor and change 7FF2 to 15 change 2888 to A3 and change 2882 to 21. Now you have everything setup for Vtec.
Open your hex edited map in TurboEDIT and set up Vtec. I used an enable of 4400 and a disable of 4350 and my signal was from my AC relay **yes, there is a bug in TE version 2.5.5 (maybe other versions as well) where every time you open your properties menu your enable and disable points increase, so keep an eye on that**. Richen out your fuel map ABOVE your engage point by about 20% and fine tune from there. You will also want to re-tune your ignition map above your engage point.
As soon as I finish fine tuning my maps I will post the .bin file in Xenocron's directory so everyone can just mooch off of my work to an extent.
And the last and most important step, make sure you pay a buddy $40 to polish your new sweet Veetack valve cover so your car can be bling blingin on race day then get it dirty as ---- while doing the install, rendering the polishing job useless and you with $40 less in your pocket.


Thread
Thread Starter
Forum
Replies
Last Post
Darkelvis
Engine Management
2
Jul 26, 2005 01:01 PM


