Project: SS-Auto Budget GSR
 11-13-2005, 06:47 PM
#1
Administrator

Thread Starter
Join Date: Dec 2002
Posts: 13,991
Heres a project I've been dicking around with the past 2 months or so.. Had a few problems along the way but I'm glad its done. This setup is being done for a 17 year old kid still in highschool. The car is a 98 Civic Hatch with a B18c block and B16a head, GSR trans, and stage 1 act clutch.
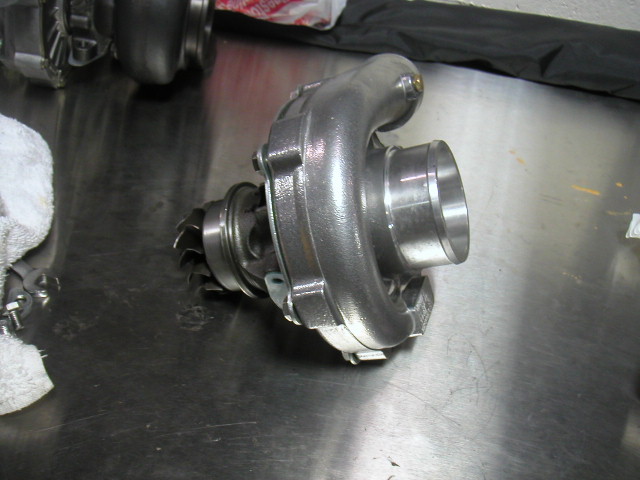
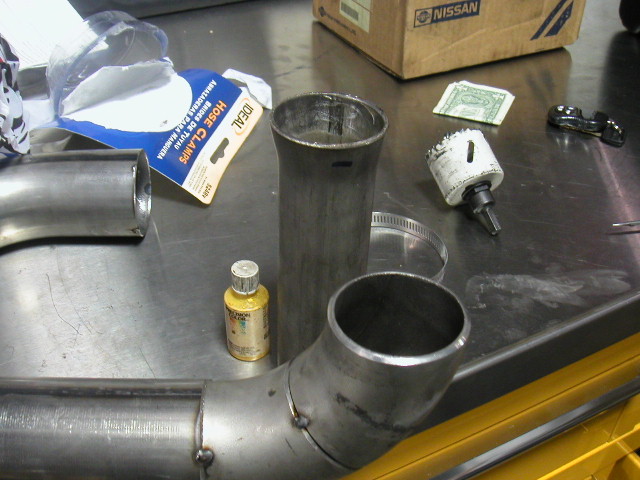
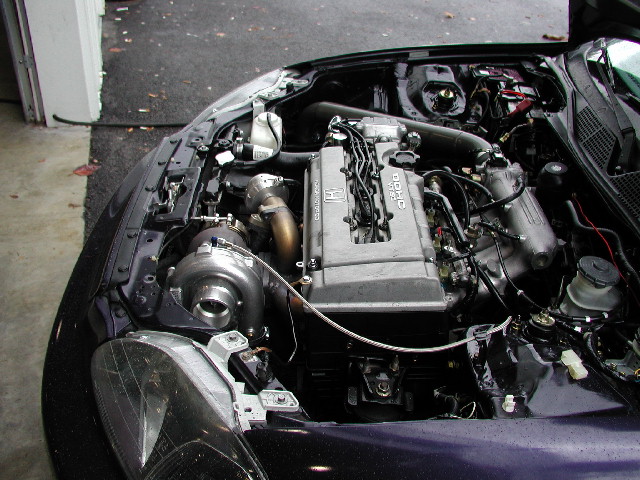
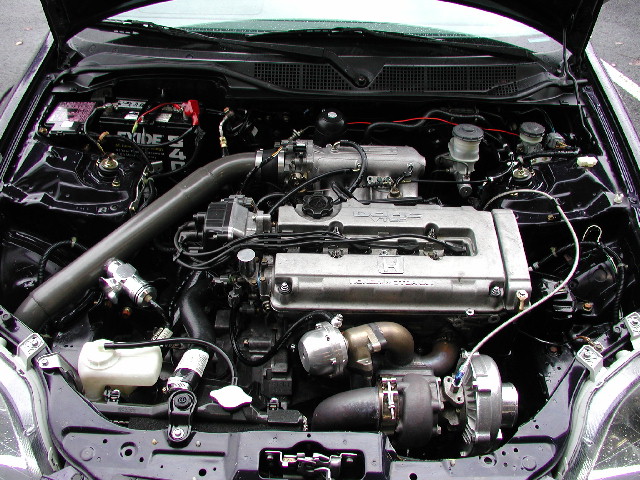
Alot of you know I'm trying out some of SSautochromes products, so I thought it would be perfect to try them out on this car. The snail of choice is a T3/T4 57 trim .50/.63 you can pick these up on Ebay for around 250 bucks new. I dissasembled the turbo just for ***** and giggles and it looked mint.
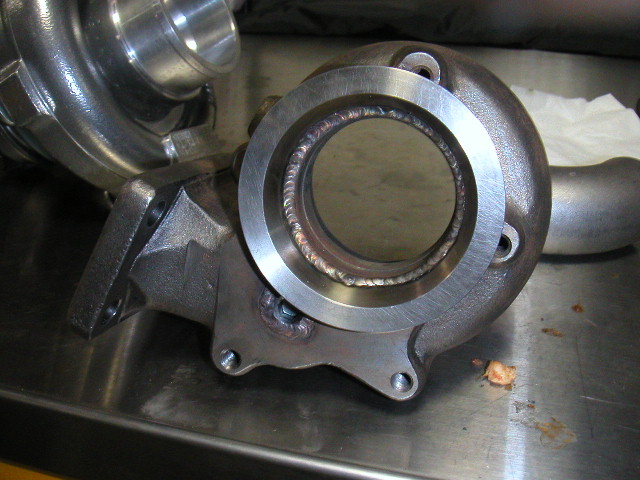
I wanted to use a V-band setup on this setup, Beau welded the Vband directly to the exhaust housing and blocked off the internal gate passage. You can also get these vbands from SSauto, around 30 bucks or so..
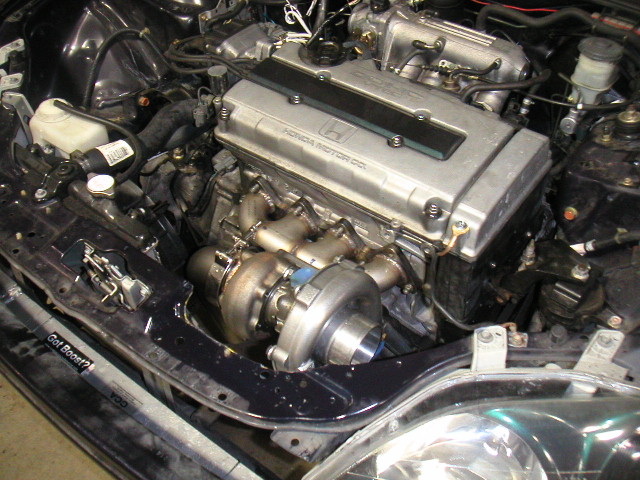
Since this setup was on a "Budget" I went ahead and made a standard log manifold. However I thought it would be fun to angle the turbo straight off insted of down.
Obviously a little bit of notching was done on the front body section, but nothing major.
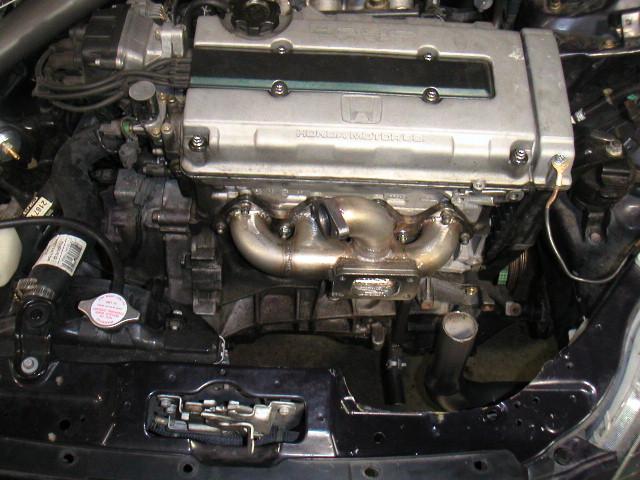
This is actually the first log manifold that I've ever made. Using all mcmaster sch 10 bends, The flanges are from weirRacing. Just a FYI , when you use a GSR block/B16a head, a normal B-series head flange has to be modified on the 2 ends, because it wont sit flush.
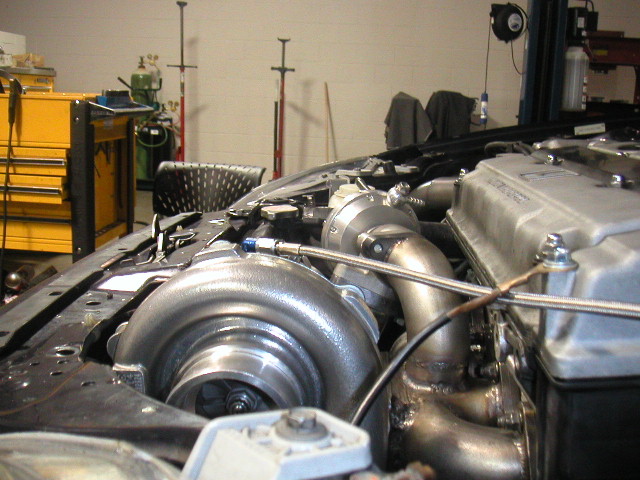
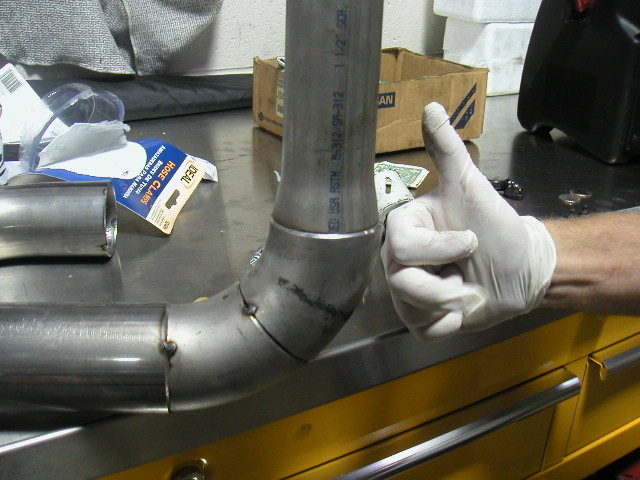
All installed, yes the hood shuts, still has about 1/2 inch clearence.
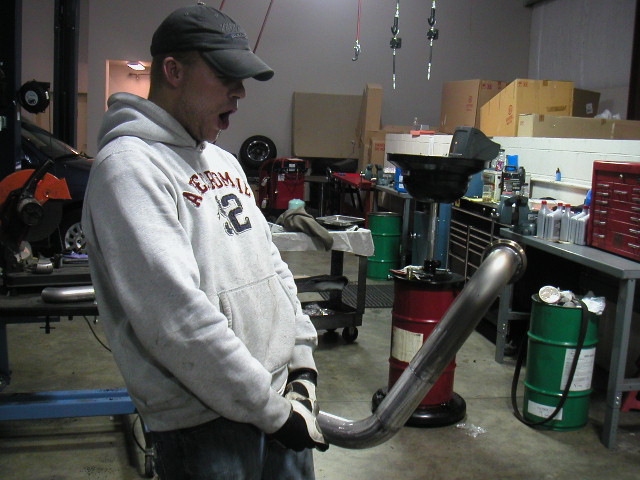
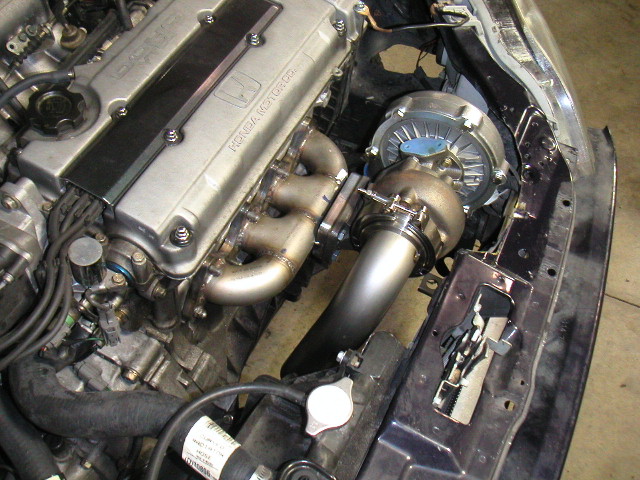
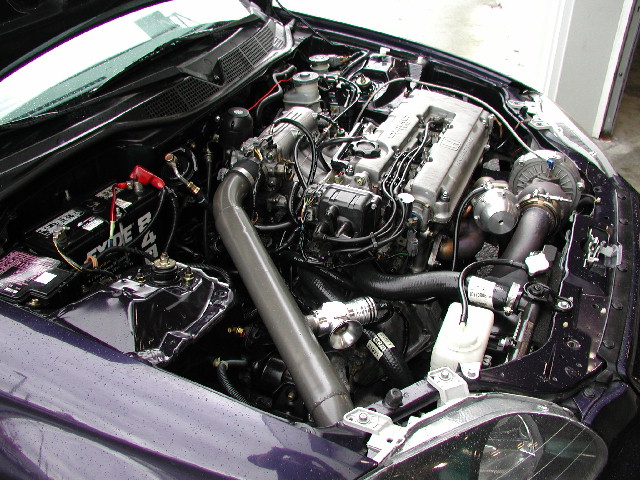
The downpipe, all 2.5in Mandrel bent/Vband. It was really easy to make, and I think from now on I'm going to use Vbands. Definatly the flat-rate of downpipes.
After 2 years, Mike G back in the hmt garage helping out. Mike helped me do all the charge pipes and mounting the intercooler. He did go a little aipshit with the oil return
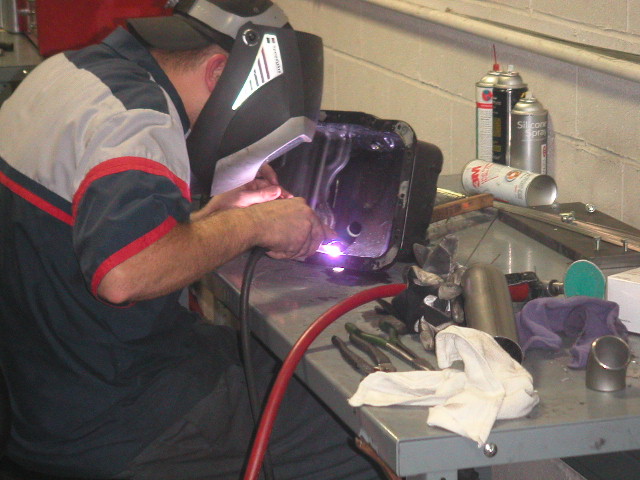
I now have my Tig at work, so everything on this project was tigged, it just made things go very slow, and I would have rather migged everything but I do need the practice. I now feel bad for always making beau tig all my ---- together haha.
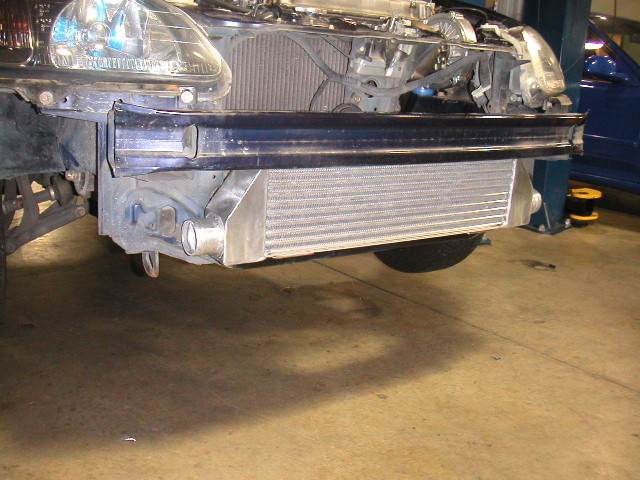
CustomCoach 6in Intercooler, this is the same unit that was in the group buy for 130 shipped. Very nice IC. Fitting these intercoolers are pretty easy. We just made some L brackets and welded them to the body, then bolted the top ones to the body. Basically nobody is going to have a fun time trying to steal this IC

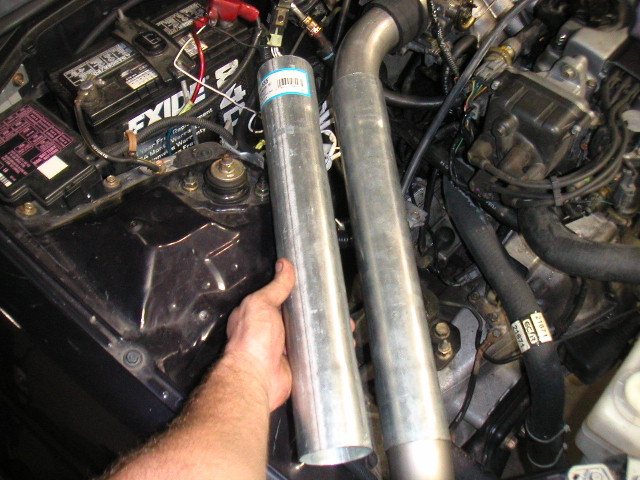
All 2.5in intercooler charge piping was used
Pep Boys had a perfect peice already flared out on both ends for the upper pipe, it made things a sinch, until I started welding it... I didnt know it was galvanized
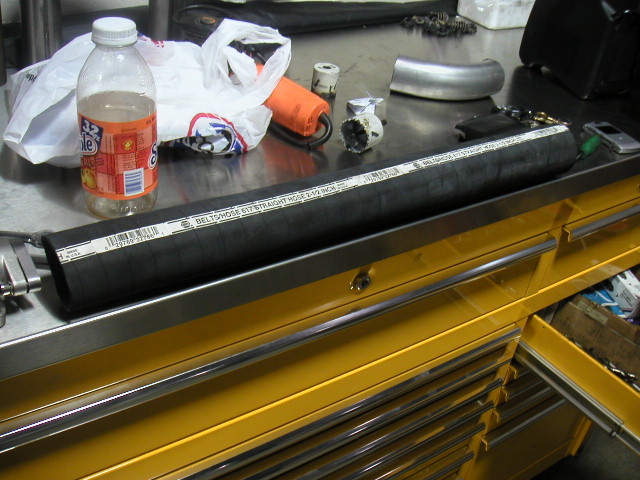
For coupler material I used Napas 2.5in Fuel Tank filler/Dryer hose. It works very good, and costs around 8 bucks a foot. 2 feet is usually more than enough. Just be advised when cutting this stuff in your chop saw you will **** other people off. It smells like a dave lee dirty second on free beef rubber.
For the Driverside IC piping I wanted to try something that I havent done before. Normally I use silicone adapters or some goofy method to make the compressor side (1.8in) go to (2.5in) on the IC.
I used a chunk of mcmaster straight sch 10 and flared it out to 2in in our press, then flared out the 2 1/4 to the 2.5in pipe.
Came out pretty sexy

I asked Jared (the owner of the car) what color pipes he wanted, and he said he didnt care.. Now with a guy owning a purple car, I thought it would have been funny to do purple charge pipes, but I decided not to, and go with Cast Iron Grey.
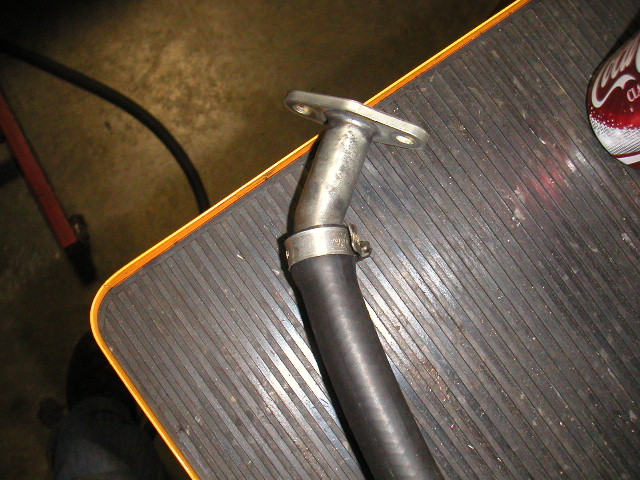
I usually use those nice CNC'd fittings from tuner toys, but I couldnt find any, so I just used a factory Saab oil return chopped, then with Heater hose attached to it.
Mike J stopped by as well, he installed the Stealthmode feed line, and Tunertoys Block fitting.

We got a little side tracked and started playing with Mikes dog....
Then went to start the car up... and uhm, someone forgot to put the oil filter back on. I'm not pointing any fingers, but... I think mike left it off hahaha
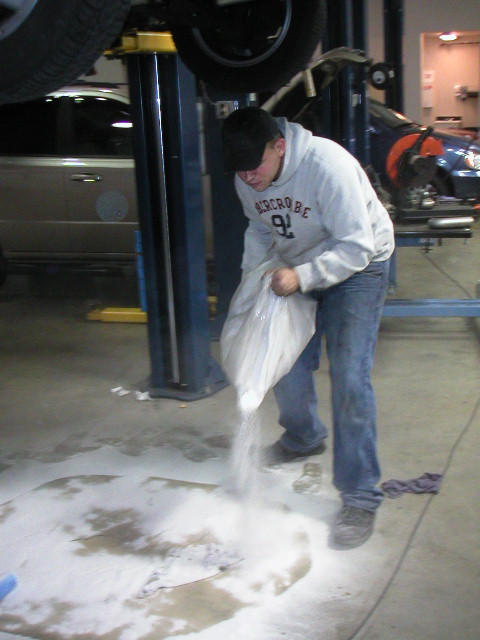
Horhay wasnt availble, so I had to clean up the big mess.
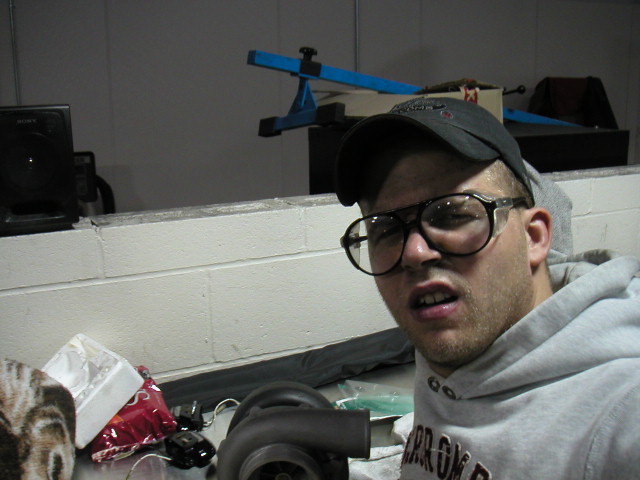
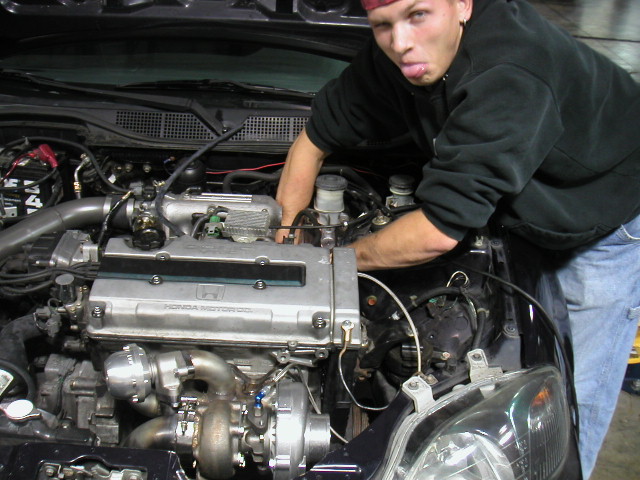
Yes, only real mechanics wear Abercrombie and geek glasses when fabricating. :1
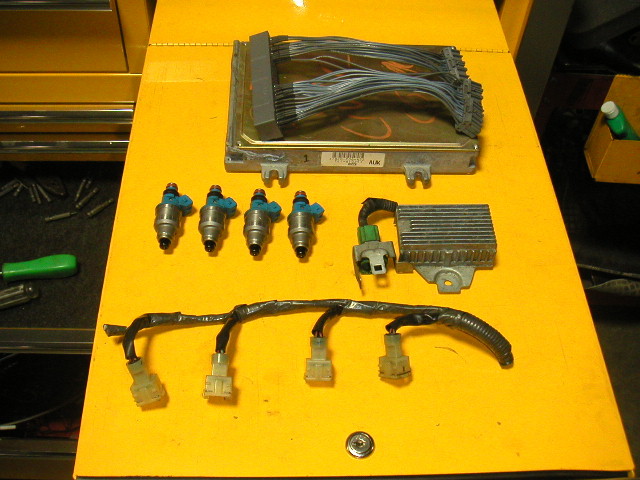
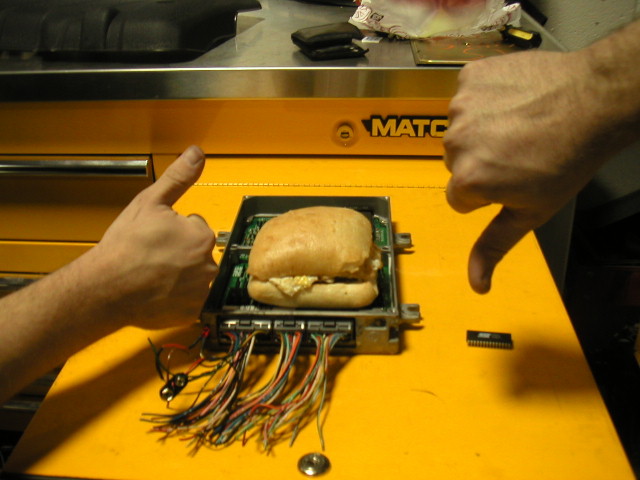
The engine management was pretty simple. The car was OBD2, so we obviously needed a OBD2-1 Jumper Harness and a chipped P06 ECU curtiosy of Xenocron.
Also, used a set of DSM 450cc blue top injectors, obd0 Injector clips, and a obd0 resistor pack.
Splicing in the new clips, be sure to use solder and heatshrink on these badboys. *** connectors look like *** and it just looks way cleaner this way.
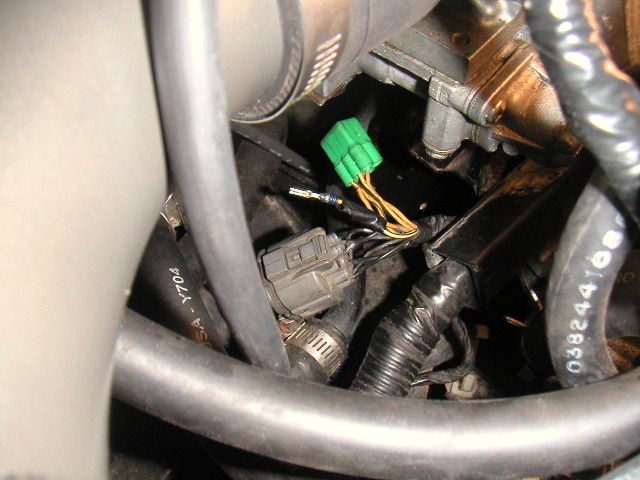
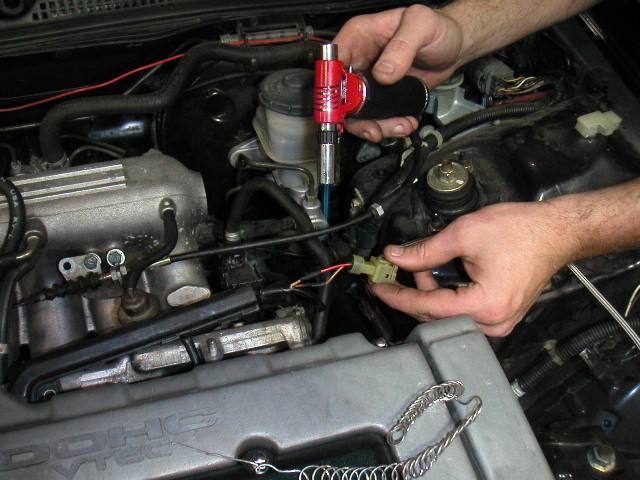
Unlike OBD1 cars the Injector Pins are under the intake manifold on OBD2. So if you want to use the resistor box, you will need to mount it down here. Just de-pin the 4 injectors wires, and 1 12v+ signal wire then use the 5/6 pin connector to attach to the resistor box.
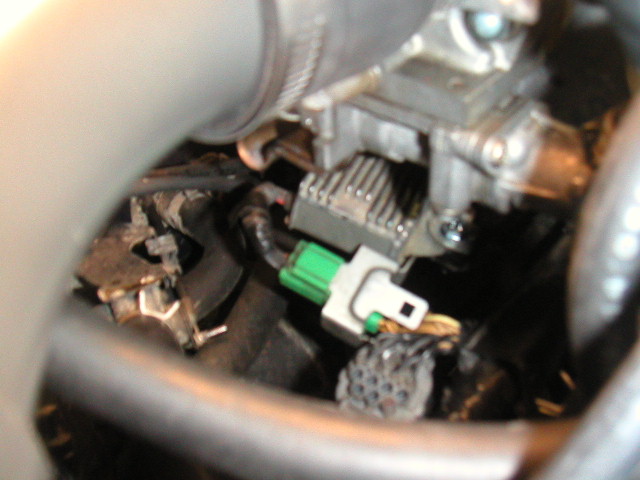
All done, definatly a bit of a pain when its under here, but atleast it looks better than inline resistors.
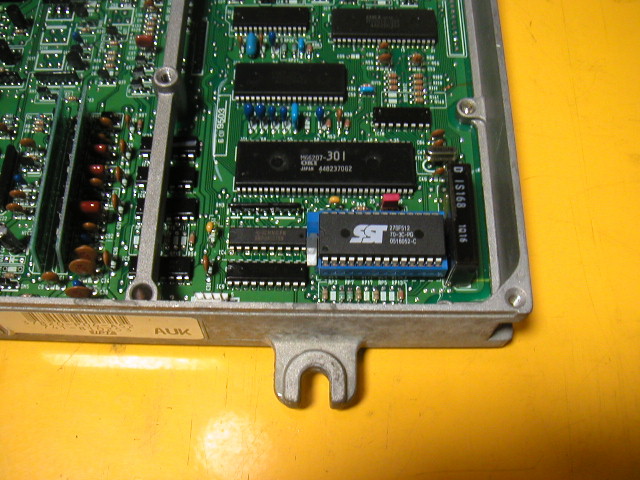
The Xenocron P06 ecu was chipped and had a GSR basemap for 450's However we had a Solid CEL on first start up.
Turbohf (Dustin) gave me a hand figuring out what happened, just looked like it was a bad burn. We used his OBD1 Test harness to make sure we didnt have a solid cel. Just reburnt the chip and we were good to go.
And yes, Breakfeast Ciabattas are delecious.
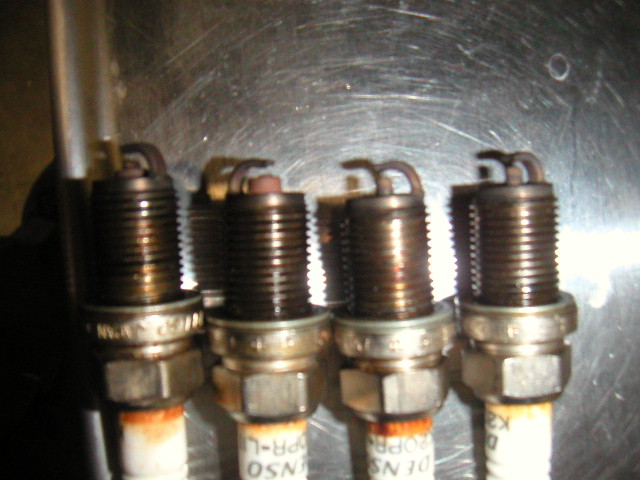
So me and dustin go for a quick ripper in the car, wastegate was set at 8psi. The first pull there was alot of igniton break up. I pulled the plugs, they looked kinda shitty, gapped at .060, so I regapped them down to .030 and went for another ripper, (only in 2nd gear) then it happened... the sound of terror... the sound of "the suby" it was only running on 2 or 3 cylinders. Me and dustin were like... WTF just happened? We went back to shop with a huge trail of smoke behind us. I pulled the plugs again and they were melted down, I was in complete disbeleif. The breather was shooting out a ---- ton of smoke. A compression test wasnt even needed, we knew that the ringlands were done.
But why? what did I do wrong? I couldnt beleive it, was it a tuning error? Did the wastegate ---- up? WTF happened?! How was I suppose to explain this to my customer.. "Hey I just blew up your engine, I'm sorry" lol
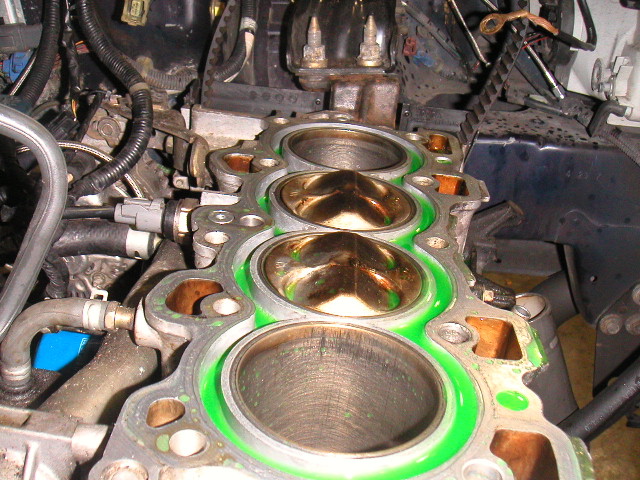
I pulled the head, and honestly about crapped my pants. Well Well Well, what do we have here? Those pistons sure as hell are not stock GSR's haha. After further inspection they were B16b Civic Type R pistons, which yeild around 12.6c/r PERFECT FOR BOOST, hah. The owner of the car didnt even know it had these pistons in it. He bought the car like this! I thought it felt like a strong GSR NA..
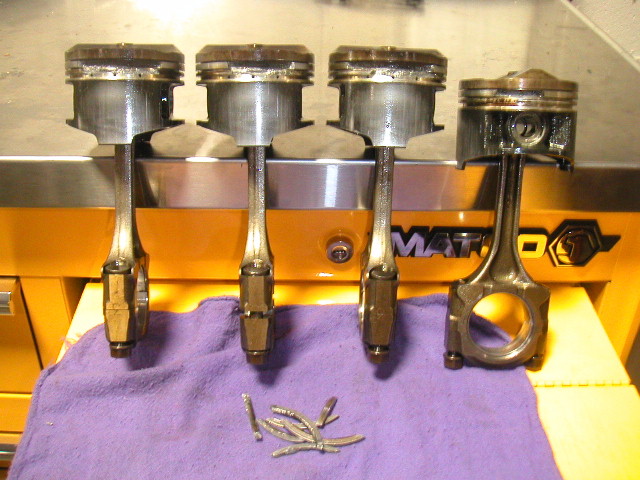
As suspected, all the ring lands were done, on practically the first pull and only in second gear. Now that this wasnt my fault I was feeling much better.
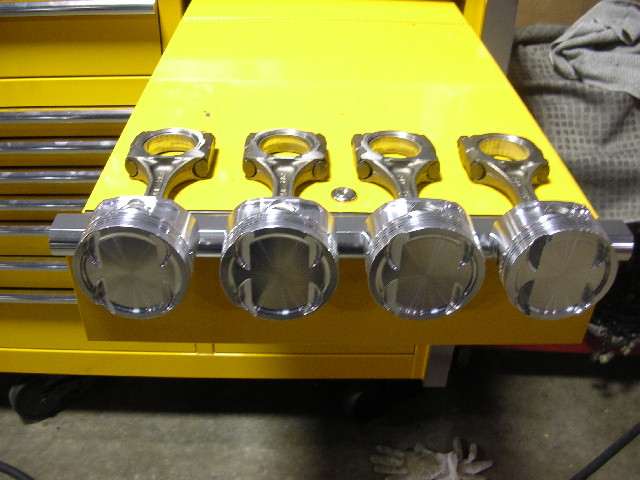
I talked Jared into a set of Forged CP Pistons. I picked them up from James at BMC.. thanks dude!
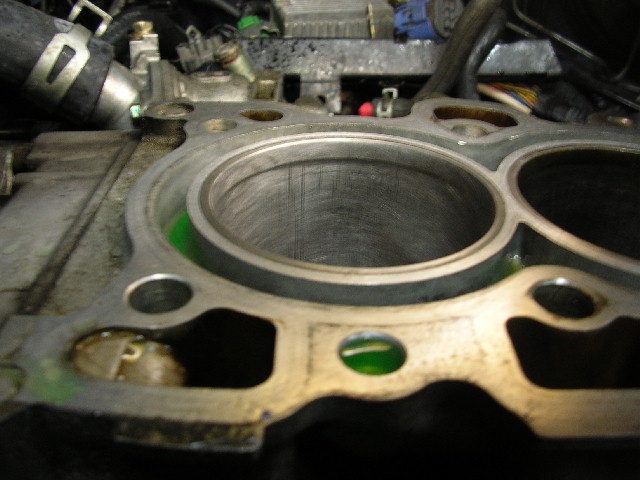
The cylinders were so beat up on this thing, way worse than my trailerpark b16a. Grooves on both sides where the skirt rides. I gave it the backyard hone job, I measured a few ring end gaps and they were so far out of spec, I couldnt beleive it. Then just for the hell of it, I took a look at a few main bearings, and for the first time ever on a honda (that I've seen) the bearings were just beat to hell, usually the rod bearings take the beating, but the mains were done.. I explained everything to him..
He asked.. "What would you do?" lets slap it together and see what happens. I replaced all the main bearings with a set of ACL's.
Bling Bling, C/R is around 8.8 with these pistons.
All back together and Not smoking
Using a SS Autochrome TurboXS RFL (ripoff) Blow off valve, sounds pretty good.
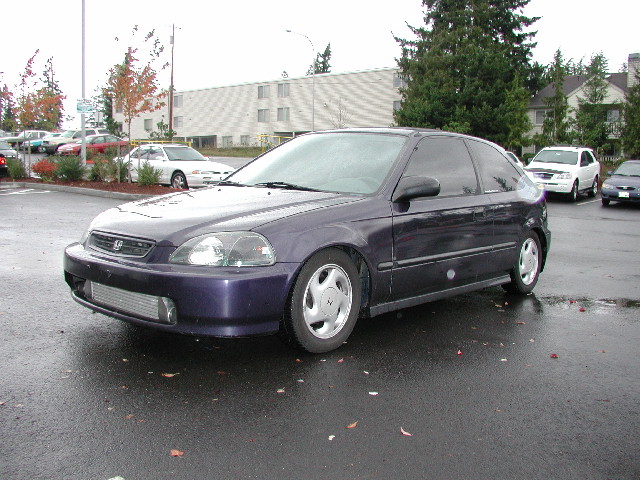
Purple is Hot, rocking the 90-91 Crx SI wheels.
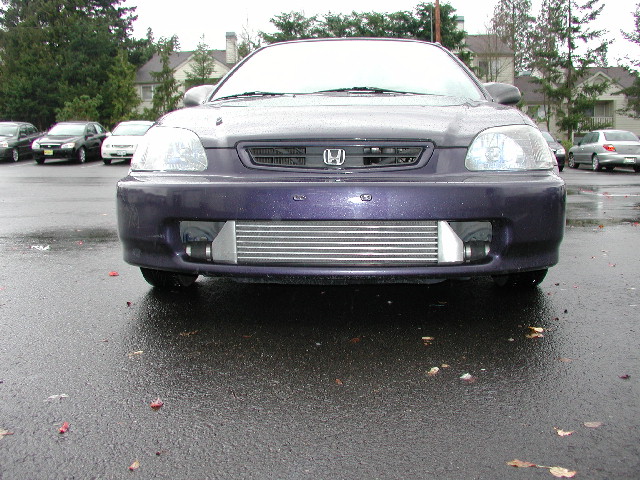
Mike G did a sweet job cutting out the front bumper..
All Done, It came out pretty nice. It feels pretty good for 8psi. It's just running a basemap, still needs to be tuned a bit better. I'll letcha guys know how well its doing in a few months. Jareds pretty lucky having a car like this in high school.
Brought to you by... ^^
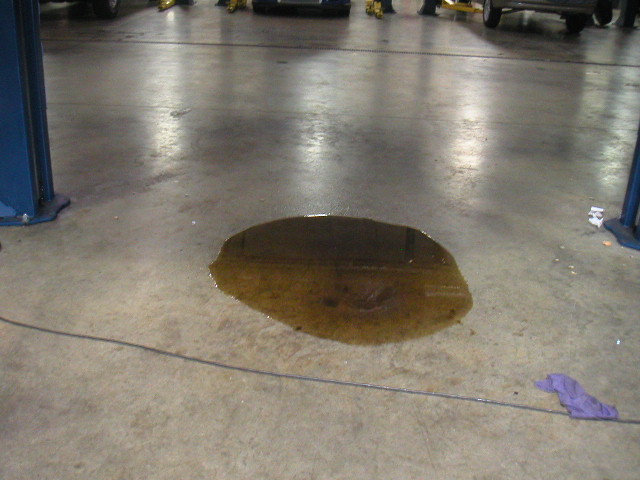
Oh and a side note.. For the guys who tried to steal the intercooler in the middle of the night at the shop (that obviously didnt get it). I did check the intercooler pipes.. Dipshits, thanks for the 1 1/2 gallons of water in the IC and pipes. Did you honestly think I wouldnt check that ----?
Thanks again to:
Beau
Mike G & Mike J
Dustin
Bucker @ SSauto
Craig @ tunertoys
Chris @ xenocron
Aaron @ weirRacing
Mom @ CC
-Jeff Frank
Alot of you know I'm trying out some of SSautochromes products, so I thought it would be perfect to try them out on this car. The snail of choice is a T3/T4 57 trim .50/.63 you can pick these up on Ebay for around 250 bucks new. I dissasembled the turbo just for ***** and giggles and it looked mint.
I wanted to use a V-band setup on this setup, Beau welded the Vband directly to the exhaust housing and blocked off the internal gate passage. You can also get these vbands from SSauto, around 30 bucks or so..
Since this setup was on a "Budget" I went ahead and made a standard log manifold. However I thought it would be fun to angle the turbo straight off insted of down.
Obviously a little bit of notching was done on the front body section, but nothing major.
This is actually the first log manifold that I've ever made. Using all mcmaster sch 10 bends, The flanges are from weirRacing. Just a FYI , when you use a GSR block/B16a head, a normal B-series head flange has to be modified on the 2 ends, because it wont sit flush.
All installed, yes the hood shuts, still has about 1/2 inch clearence.
The downpipe, all 2.5in Mandrel bent/Vband. It was really easy to make, and I think from now on I'm going to use Vbands. Definatly the flat-rate of downpipes.
After 2 years, Mike G back in the hmt garage helping out. Mike helped me do all the charge pipes and mounting the intercooler. He did go a little aipshit with the oil return
I now have my Tig at work, so everything on this project was tigged, it just made things go very slow, and I would have rather migged everything but I do need the practice. I now feel bad for always making beau tig all my ---- together haha.
CustomCoach 6in Intercooler, this is the same unit that was in the group buy for 130 shipped. Very nice IC. Fitting these intercoolers are pretty easy. We just made some L brackets and welded them to the body, then bolted the top ones to the body. Basically nobody is going to have a fun time trying to steal this IC
All 2.5in intercooler charge piping was used
Pep Boys had a perfect peice already flared out on both ends for the upper pipe, it made things a sinch, until I started welding it... I didnt know it was galvanized
For coupler material I used Napas 2.5in Fuel Tank filler/Dryer hose. It works very good, and costs around 8 bucks a foot. 2 feet is usually more than enough. Just be advised when cutting this stuff in your chop saw you will **** other people off. It smells like a dave lee dirty second on free beef rubber.
For the Driverside IC piping I wanted to try something that I havent done before. Normally I use silicone adapters or some goofy method to make the compressor side (1.8in) go to (2.5in) on the IC.
I used a chunk of mcmaster straight sch 10 and flared it out to 2in in our press, then flared out the 2 1/4 to the 2.5in pipe.
Came out pretty sexy
I asked Jared (the owner of the car) what color pipes he wanted, and he said he didnt care.. Now with a guy owning a purple car, I thought it would have been funny to do purple charge pipes, but I decided not to, and go with Cast Iron Grey.
I usually use those nice CNC'd fittings from tuner toys, but I couldnt find any, so I just used a factory Saab oil return chopped, then with Heater hose attached to it.
Mike J stopped by as well, he installed the Stealthmode feed line, and Tunertoys Block fitting.
We got a little side tracked and started playing with Mikes dog....
Then went to start the car up... and uhm, someone forgot to put the oil filter back on. I'm not pointing any fingers, but... I think mike left it off hahaha
Horhay wasnt availble, so I had to clean up the big mess.
Yes, only real mechanics wear Abercrombie and geek glasses when fabricating. :1
The engine management was pretty simple. The car was OBD2, so we obviously needed a OBD2-1 Jumper Harness and a chipped P06 ECU curtiosy of Xenocron.
Also, used a set of DSM 450cc blue top injectors, obd0 Injector clips, and a obd0 resistor pack.
Splicing in the new clips, be sure to use solder and heatshrink on these badboys. *** connectors look like *** and it just looks way cleaner this way.
Unlike OBD1 cars the Injector Pins are under the intake manifold on OBD2. So if you want to use the resistor box, you will need to mount it down here. Just de-pin the 4 injectors wires, and 1 12v+ signal wire then use the 5/6 pin connector to attach to the resistor box.
All done, definatly a bit of a pain when its under here, but atleast it looks better than inline resistors.
The Xenocron P06 ecu was chipped and had a GSR basemap for 450's However we had a Solid CEL on first start up.
Turbohf (Dustin) gave me a hand figuring out what happened, just looked like it was a bad burn. We used his OBD1 Test harness to make sure we didnt have a solid cel. Just reburnt the chip and we were good to go.
And yes, Breakfeast Ciabattas are delecious.
So me and dustin go for a quick ripper in the car, wastegate was set at 8psi. The first pull there was alot of igniton break up. I pulled the plugs, they looked kinda shitty, gapped at .060, so I regapped them down to .030 and went for another ripper, (only in 2nd gear) then it happened... the sound of terror... the sound of "the suby" it was only running on 2 or 3 cylinders. Me and dustin were like... WTF just happened? We went back to shop with a huge trail of smoke behind us. I pulled the plugs again and they were melted down, I was in complete disbeleif. The breather was shooting out a ---- ton of smoke. A compression test wasnt even needed, we knew that the ringlands were done.
But why? what did I do wrong? I couldnt beleive it, was it a tuning error? Did the wastegate ---- up? WTF happened?! How was I suppose to explain this to my customer.. "Hey I just blew up your engine, I'm sorry" lol
I pulled the head, and honestly about crapped my pants. Well Well Well, what do we have here? Those pistons sure as hell are not stock GSR's haha. After further inspection they were B16b Civic Type R pistons, which yeild around 12.6c/r PERFECT FOR BOOST, hah. The owner of the car didnt even know it had these pistons in it. He bought the car like this! I thought it felt like a strong GSR NA..
As suspected, all the ring lands were done, on practically the first pull and only in second gear. Now that this wasnt my fault I was feeling much better.
I talked Jared into a set of Forged CP Pistons. I picked them up from James at BMC.. thanks dude!
The cylinders were so beat up on this thing, way worse than my trailerpark b16a. Grooves on both sides where the skirt rides. I gave it the backyard hone job, I measured a few ring end gaps and they were so far out of spec, I couldnt beleive it. Then just for the hell of it, I took a look at a few main bearings, and for the first time ever on a honda (that I've seen) the bearings were just beat to hell, usually the rod bearings take the beating, but the mains were done.. I explained everything to him..
He asked.. "What would you do?" lets slap it together and see what happens. I replaced all the main bearings with a set of ACL's.
Bling Bling, C/R is around 8.8 with these pistons.
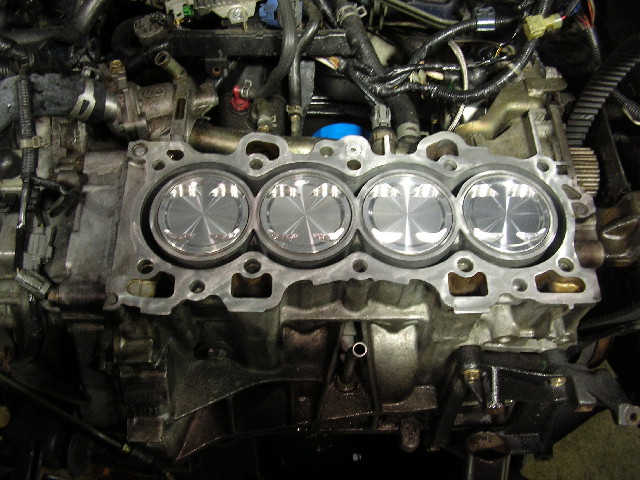
All back together and Not smoking
Using a SS Autochrome TurboXS RFL (ripoff) Blow off valve, sounds pretty good.
Purple is Hot, rocking the 90-91 Crx SI wheels.
Mike G did a sweet job cutting out the front bumper..
All Done, It came out pretty nice. It feels pretty good for 8psi. It's just running a basemap, still needs to be tuned a bit better. I'll letcha guys know how well its doing in a few months. Jareds pretty lucky having a car like this in high school.
Brought to you by... ^^
Oh and a side note.. For the guys who tried to steal the intercooler in the middle of the night at the shop (that obviously didnt get it). I did check the intercooler pipes.. Dipshits, thanks for the 1 1/2 gallons of water in the IC and pipes. Did you honestly think I wouldnt check that ----?
Thanks again to:
Beau
Mike G & Mike J
Dustin
Bucker @ SSauto
Craig @ tunertoys
Chris @ xenocron
Aaron @ weirRacing
Mom @ CC
-Jeff Frank


 11-13-2005, 07:03 PM
#7
3.0 BAR

Join Date: Jun 2003
Posts: 3,975
damn nice job jeff.
i was thinking Project: SS-Auto Budget GSR would be all ss products.
and the Budget turned into rebuild and new pistons.
high school kid with that car: won't last long.
that an open wg? i can't see a dumptube below it. maybe just the flange..
i was thinking Project: SS-Auto Budget GSR would be all ss products.
and the Budget turned into rebuild and new pistons.
high school kid with that car: won't last long.
that an open wg? i can't see a dumptube below it. maybe just the flange..
11-13-2005, 07:03 PM
#8
Administrator
Thread Starter
Join Date: Dec 2002
Posts: 13,991
Originally Posted by 90boostdaccord
god dammit. whenever i read thread like this, all the pics get fucked up. oh well, from what i saw, looks like another good project coming out of the NW
https://www.homemadeturbo.com/2005/SSGsr/
11-13-2005, 07:05 PM
#9
3.0 BAR

Join Date: Feb 2004
Posts: 7,785
Your not the only one where the pics get all fucked up. It like freezes and just repeats everything over and over.  I get that for the majority of posts that have alot of pics in them. So whats the story now Jeff? You post your services in the newpaper up there or something or how do you always get all these side jobs?
I get that for the majority of posts that have alot of pics in them. So whats the story now Jeff? You post your services in the newpaper up there or something or how do you always get all these side jobs?
11-13-2005, 07:07 PM
#10
3.0 BAR

Join Date: Oct 2005
Posts: 9,282
any videos of the car? 
how much would you charge for a project like that if the pistons werent messed up?
thats ------- aweosme.
same here. mozilla makes the pictures ---- up. i just opened it in internet explorer and it works fine 
how much would you charge for a project like that if the pistons werent messed up?
thats ------- aweosme.
Originally Posted by 90boostdaccord
god dammit. whenever i read thread like this, all the pics get fucked up. oh well, from what i saw, looks like another good project coming out of the NW


