home made twin turbo Infiniti FX35
 10-15-2010, 01:57 AM
#1
0.0 BAR
Thread Starter

Join Date: Oct 2010
Posts: 3
hey guys, what's up. I've had my fx for a few years now & I've done a bunch of mods to it, but I've always thought that I just need more power. anyway, I kicked a whole lot of different ideas around, but in the end I decided that I don't want to butcher it up too much, I really want to keep all of the features of my fx and keep the awd & all the electronics intact like traction control & stability control etc, this things got a really sophisticated awd system that makes it handle like an animal, I like to think of it like a big fat gtr wagon  I don't want to turn it into a race car or change it into anything that it's not, so thoughts of something more radical like a twin turbo LS2 swap or something that I'd normally think to consider doing is out. I've built some cars but this one I really want to keep it exactly the way it is cause it's awesome as-is,but I want I just want it to be strong
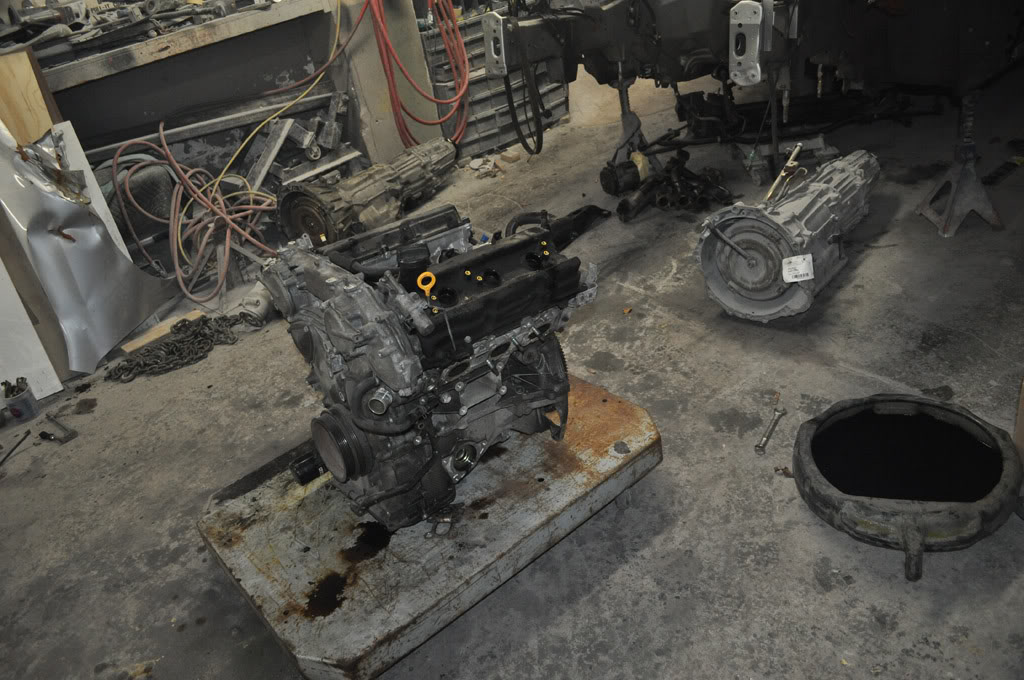
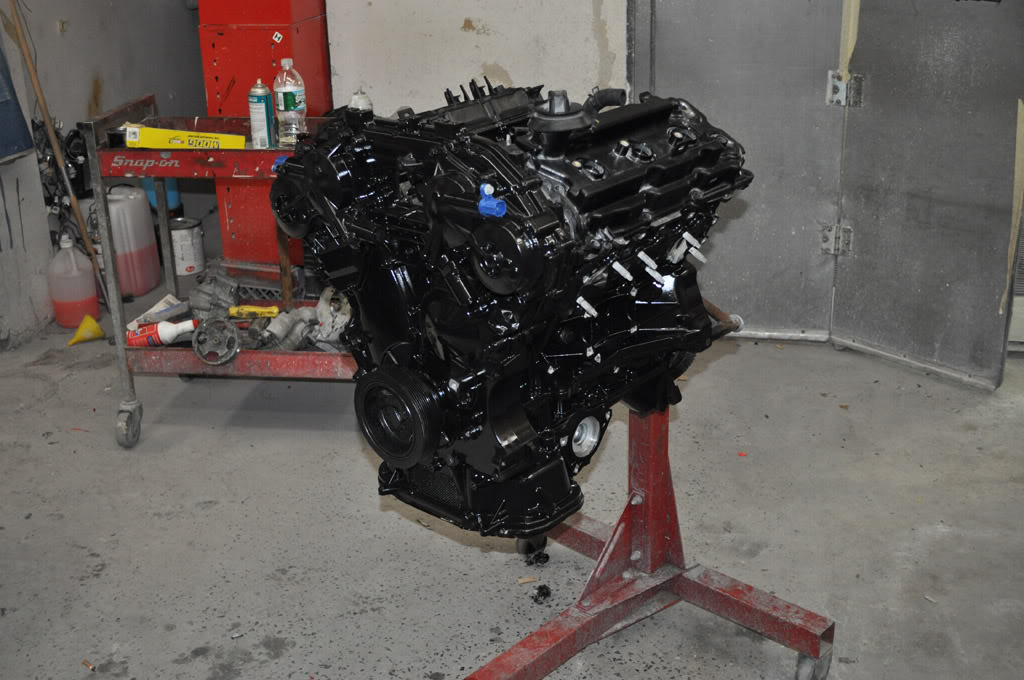
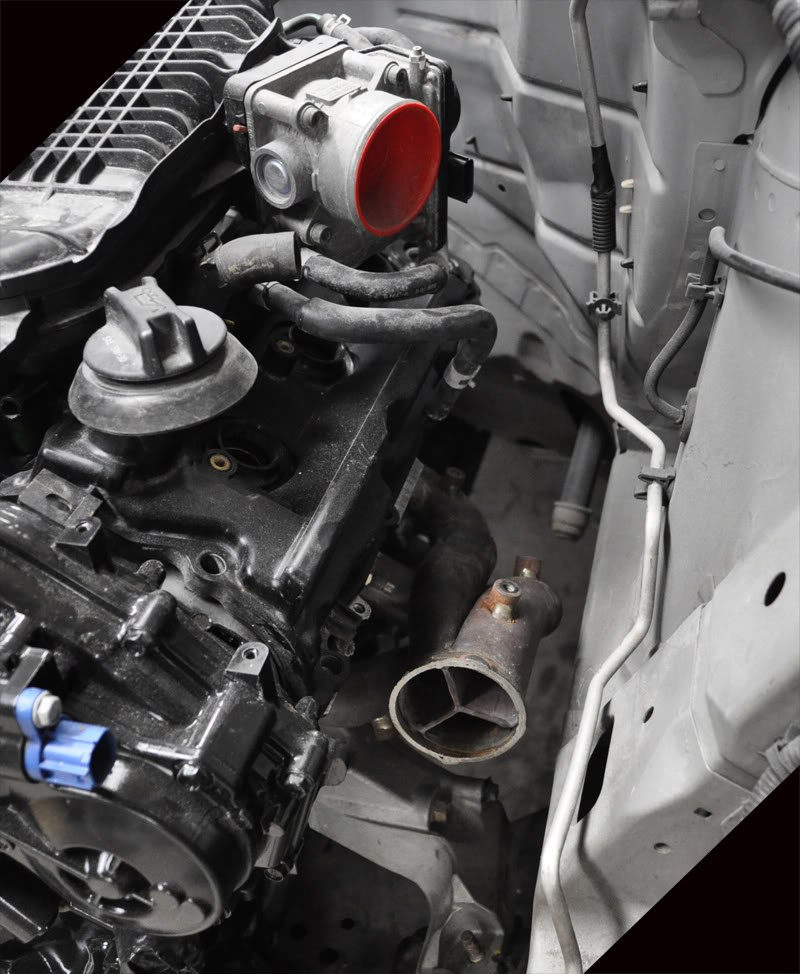
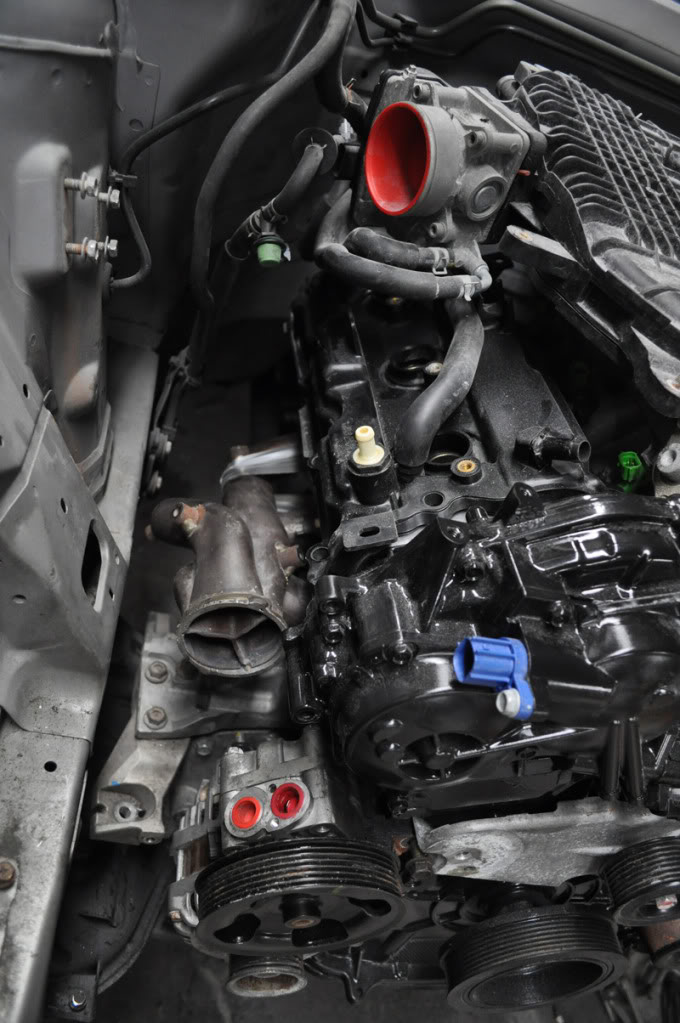
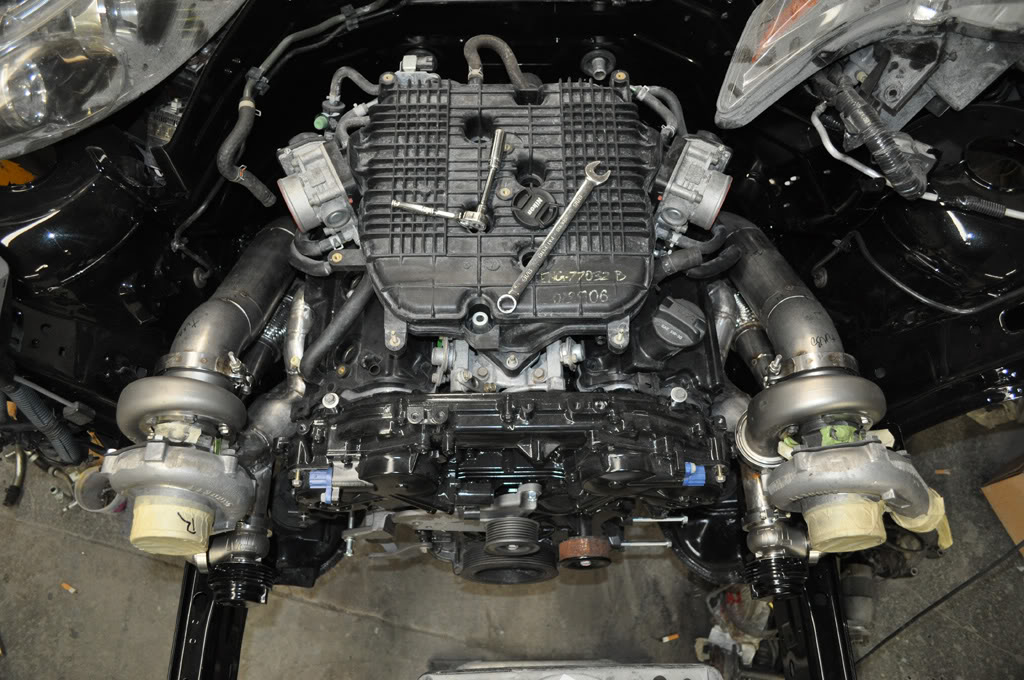
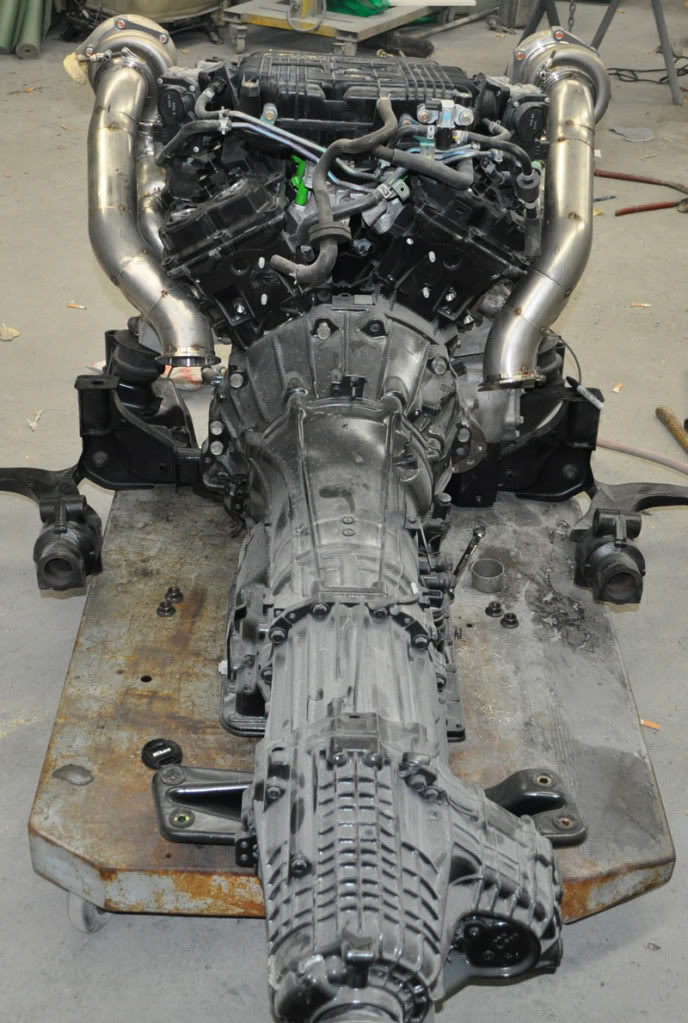
after considerig all my options I decided to use Nissan's newer VQ35HR engine to replace the current VQ35DE engine. the HR engine is much stronger, revs higher & has dual throttle bodies. it's strong enough that for my use it's about the equivalent of a built up DE engine, 350z's are running 600whp+ stock block, that's more than my drivetrain can handle, I'm hoping to tune to 450+whp, maybe 475? don't want to blow the rest of the drive train, just want to push it a bit, I picked up a low mileage AWD drivetrain from a newer G35X for this swap.
the electronics are different & there are like 7 different computers in the factory CAN buss system that all need to communicate with each other, at least staying in the nissan family gives me some shot at integrating all of the electronics & splicing the harnesses & trying to get everything to work 100% together like factory. 07 ecu has to be made to work with all the 03 sub systems, in short it's pretty complicated, there are almost no successful DE to HR swaps even done yet that I know of & I haven't ever seen one 100% completely integrated swap yet really, so you'd think that'd be the biggest challenge I guess...
far as the twin turbo part of this thing, I could have used an off the shelf twin turbo setup but instead I decided to build my own, not because I wanted it to be cheaper, but because I wanted it to be better. the off the shelf kits that I could have made fit easily enough are all built around the 350Z & the G35's which share the same platform as the FX, but they don't have anywhere near the amount of room I have, so the off the shelf kits tuck the turbo's down under the sides of the engine with log manifolds. not a big fan of log manifolds really
kits are made to bolt in easily without altering anything on a tiny 350z, but a nice custom install that's done correctly should be better. kits give you ~$4k worth of components for like $7k just because it bolts in easily. that may be well worth it for some, but I want more. I figure I rather build it all custom fitted, component by component & use all great components. most kits make a lot of sacrifices to meet certain price points, I want to build a sick custom twin turbo swap even if it costs more than a kit.
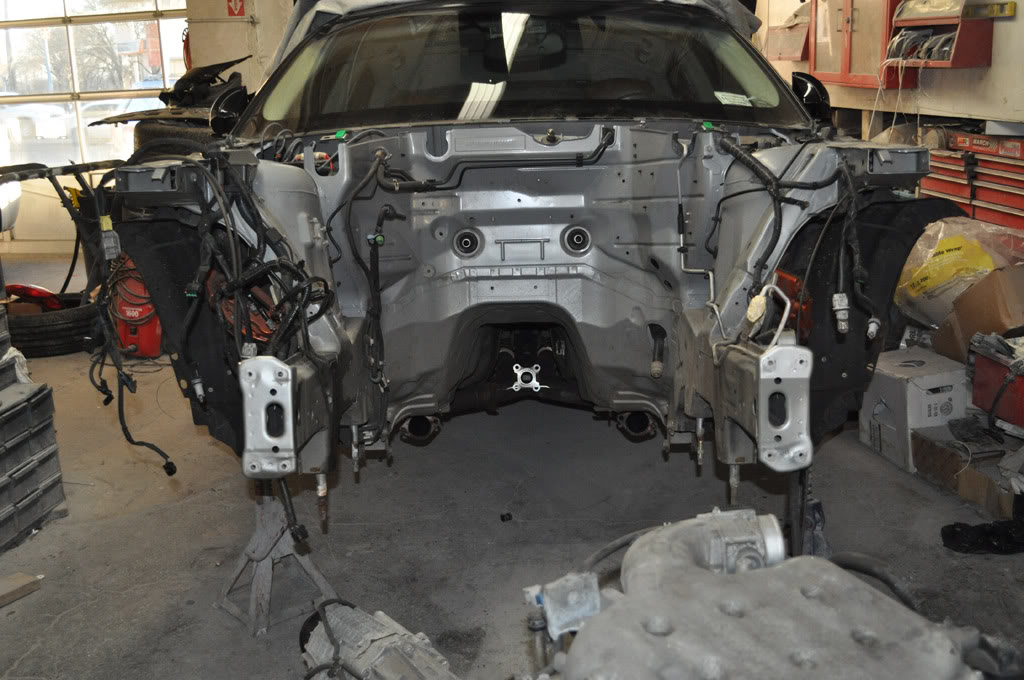
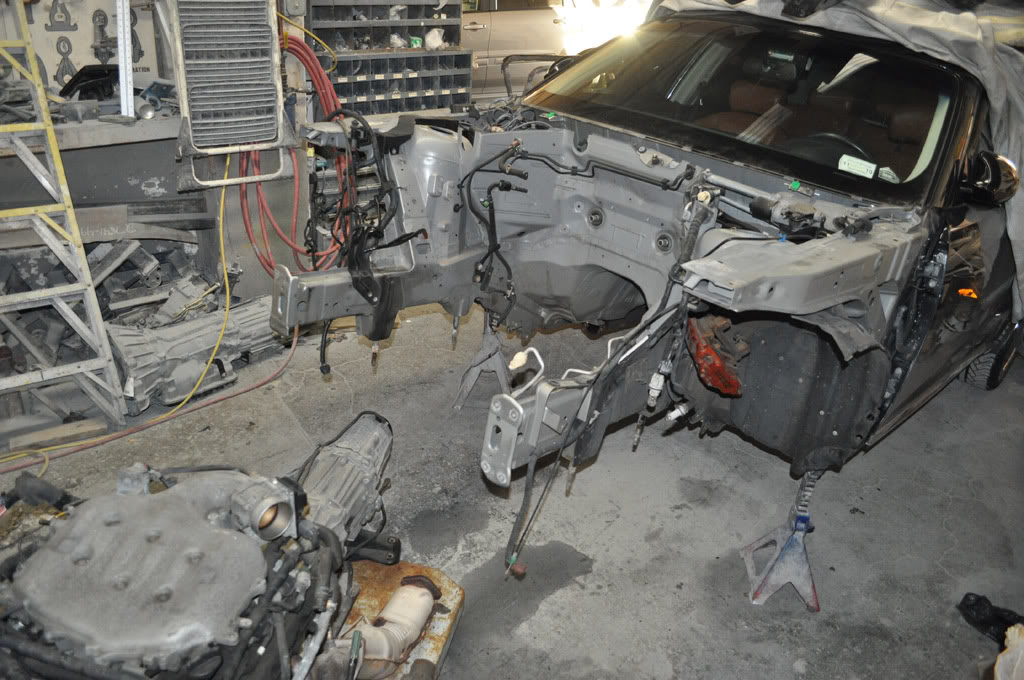
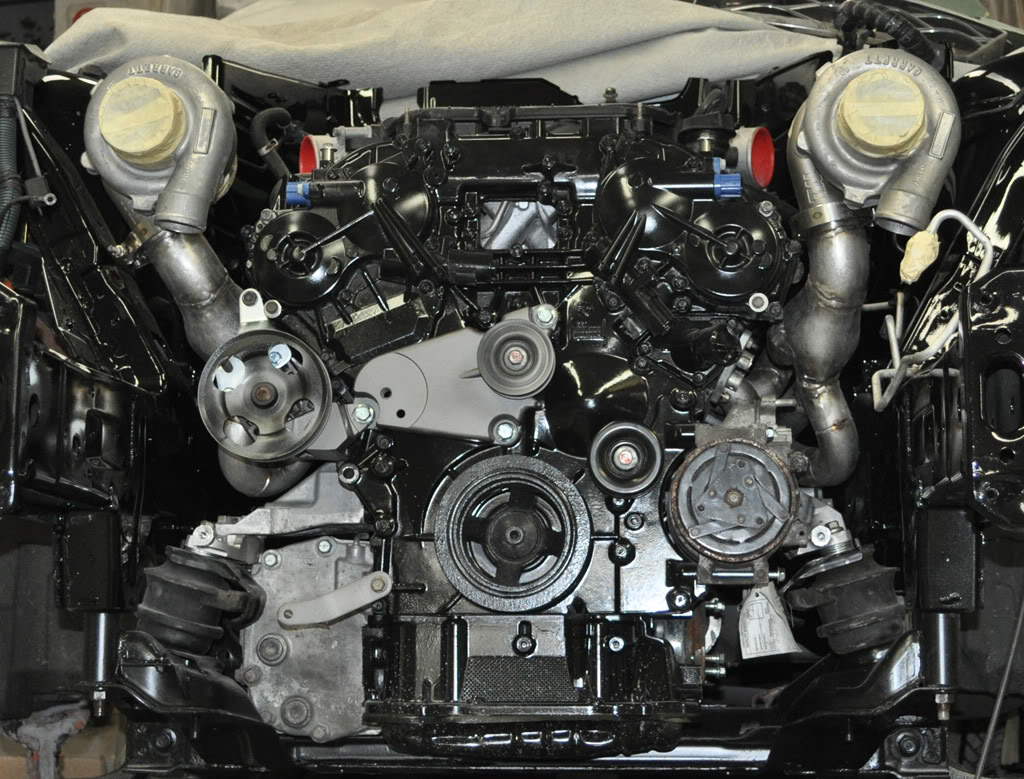
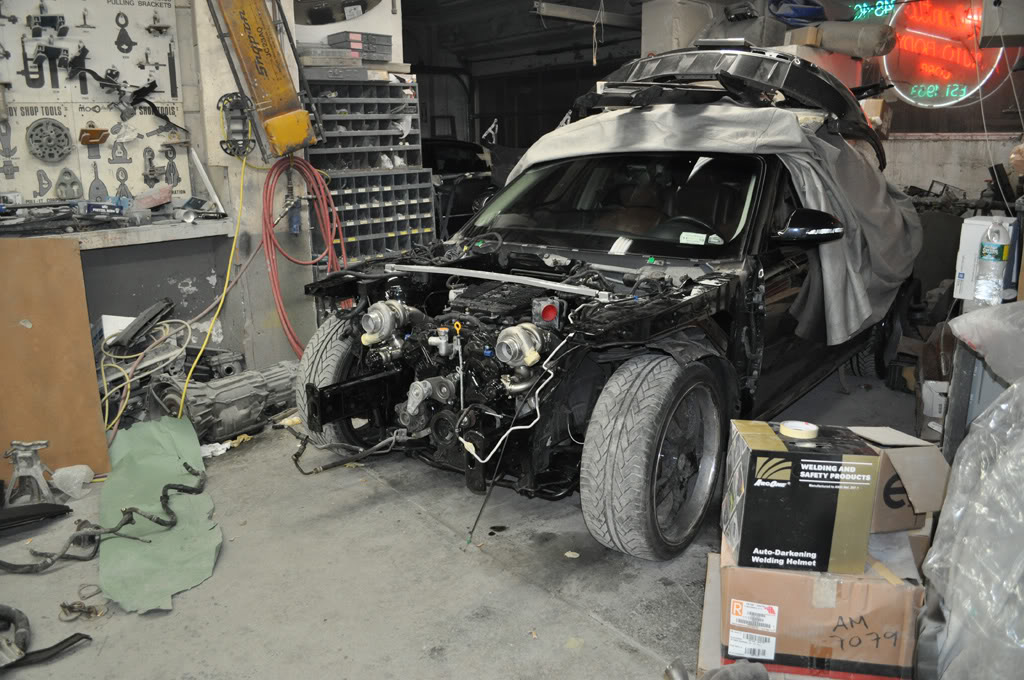
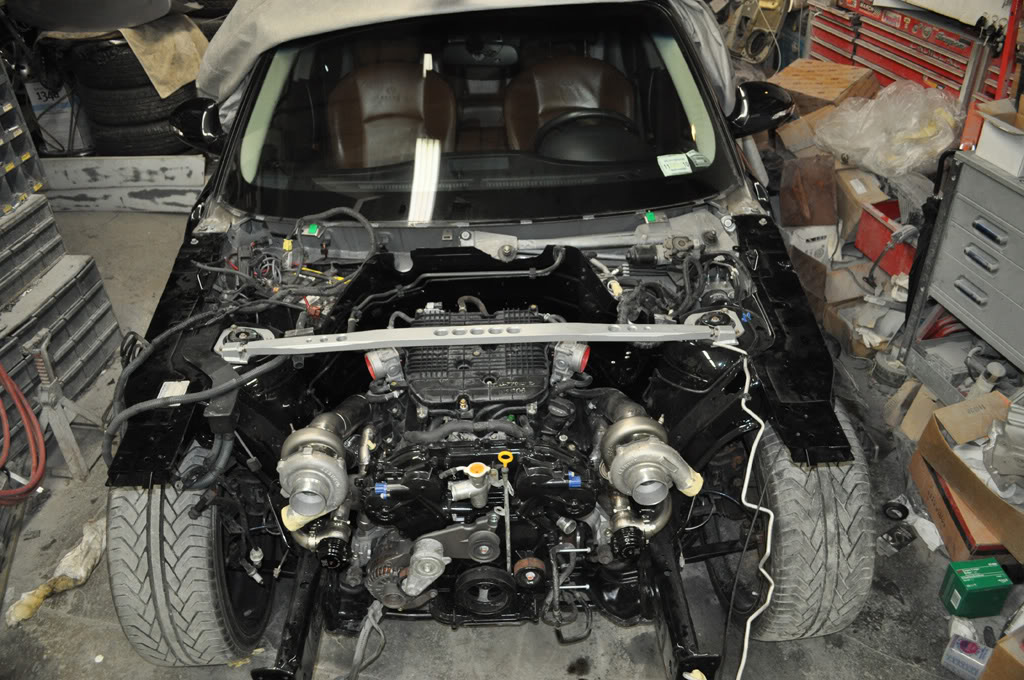
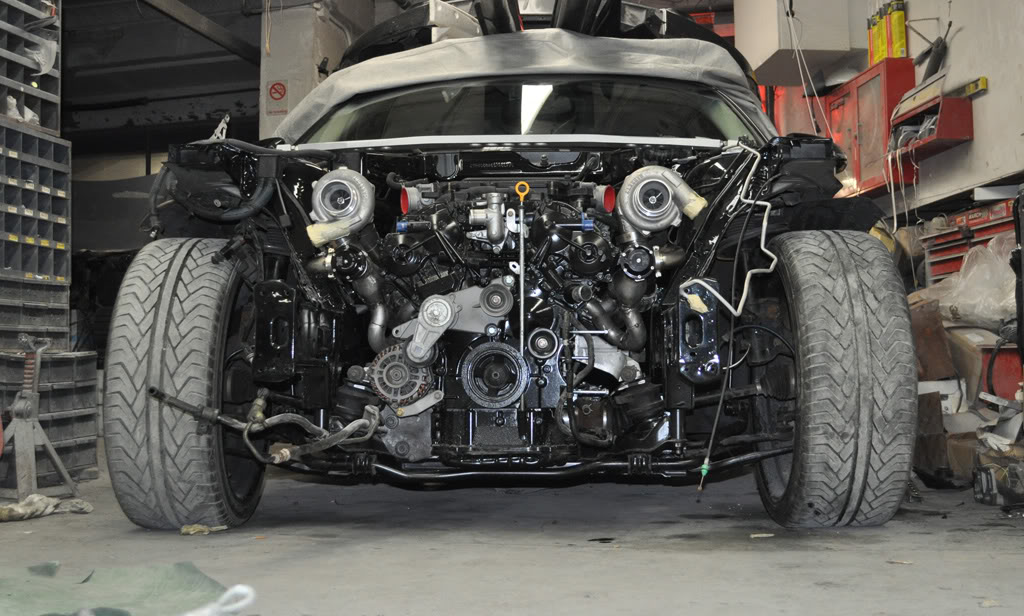
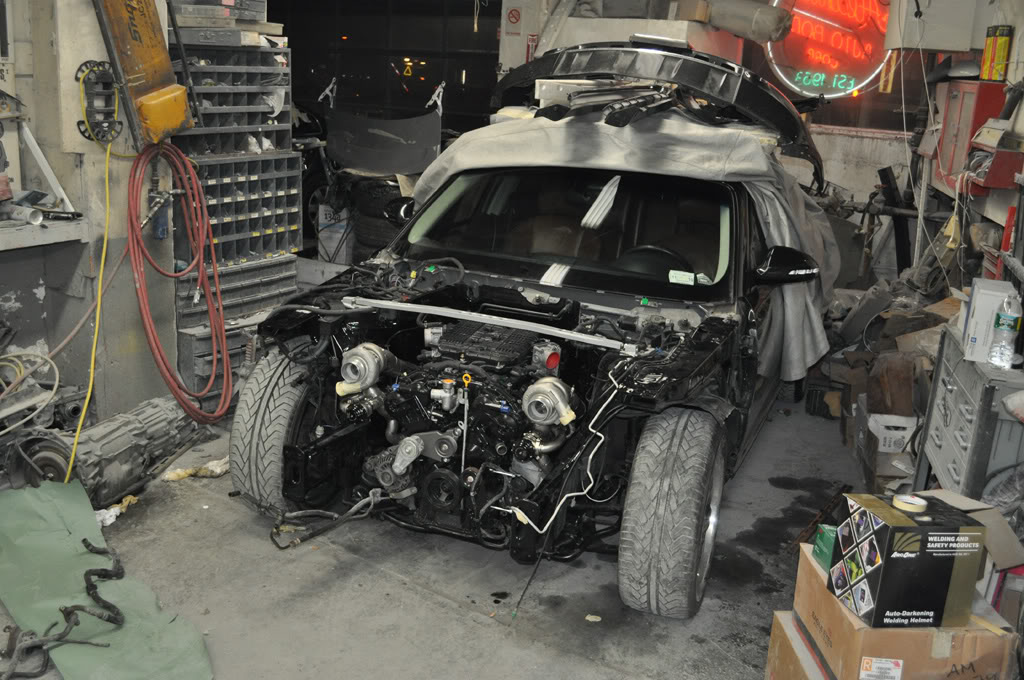
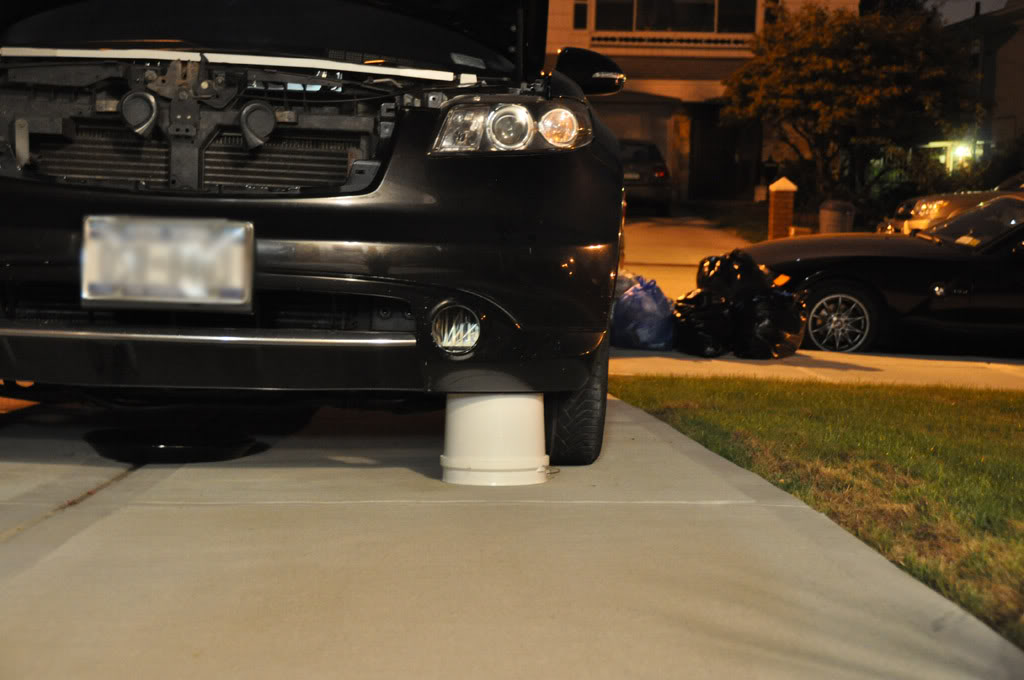
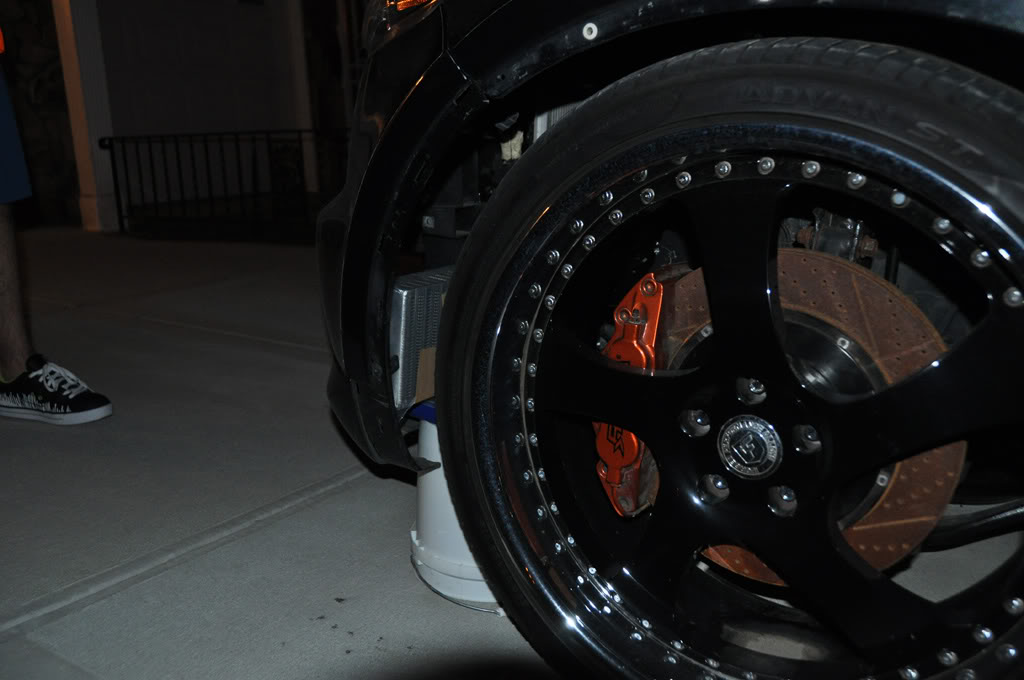
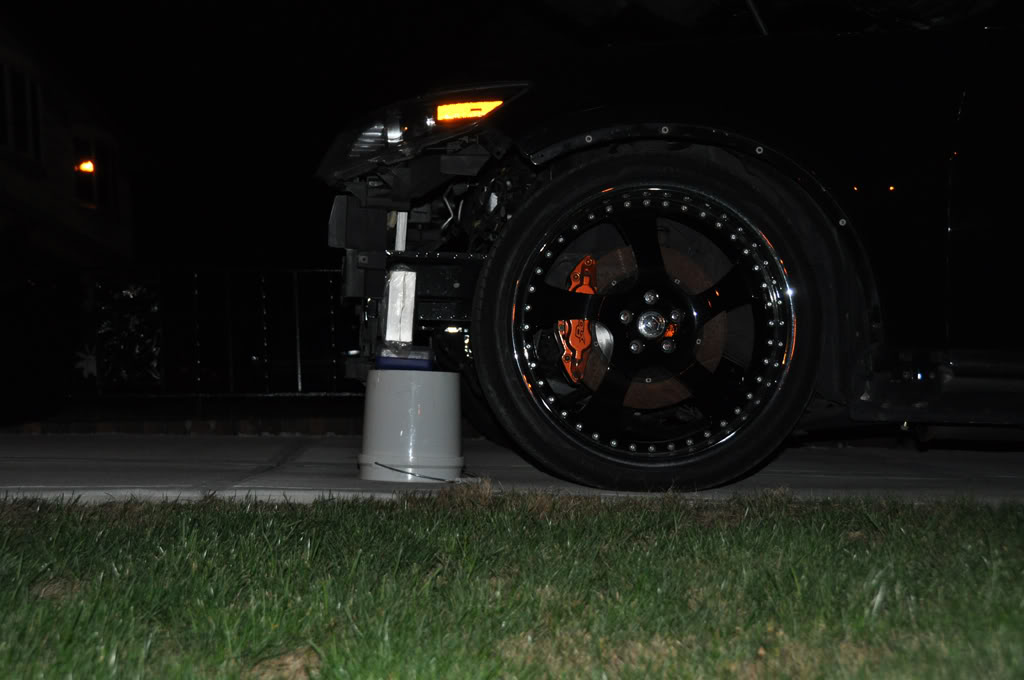
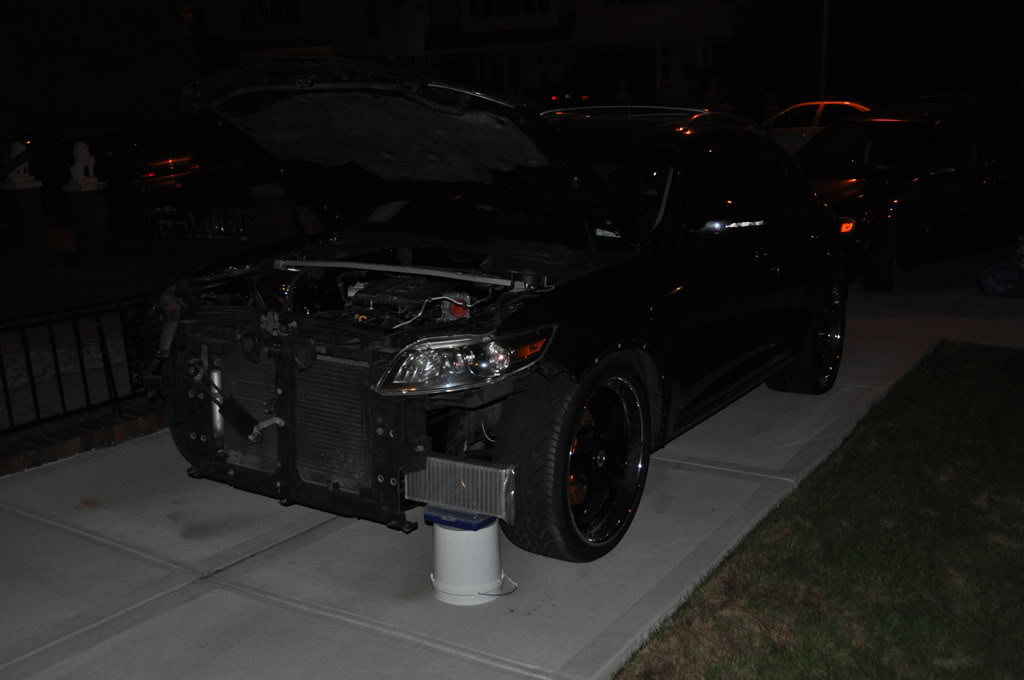
anyway enough words for now, first heres a bunch of pictures of the car itself. tell me this thing don't look like it's just begging for a twin turbo honestly II wish I could make it over 1,000hp monster, but I'll be satisfied if it's at least fast enough to hang with & maybe even beat some of the best in it's class... stuff like the cayennes & ml63's & srt8's I guess


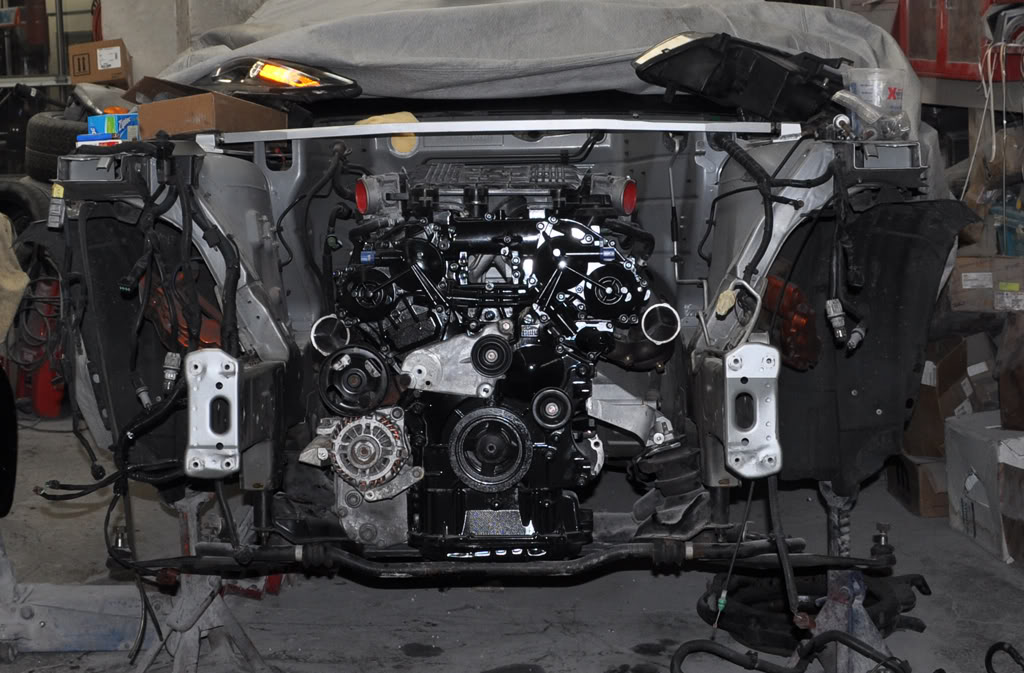
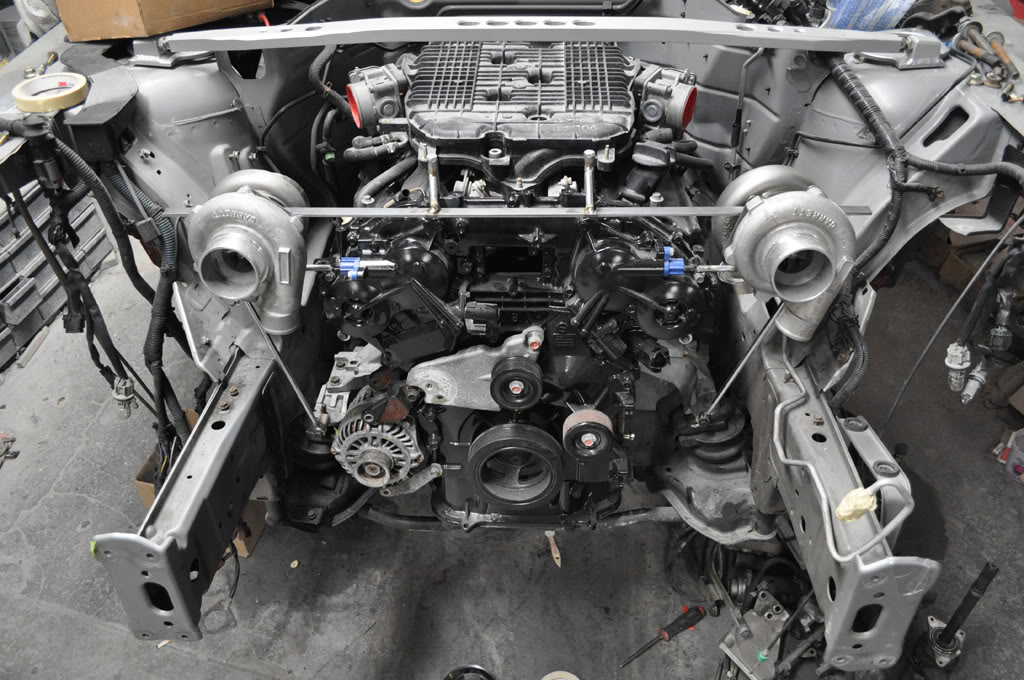
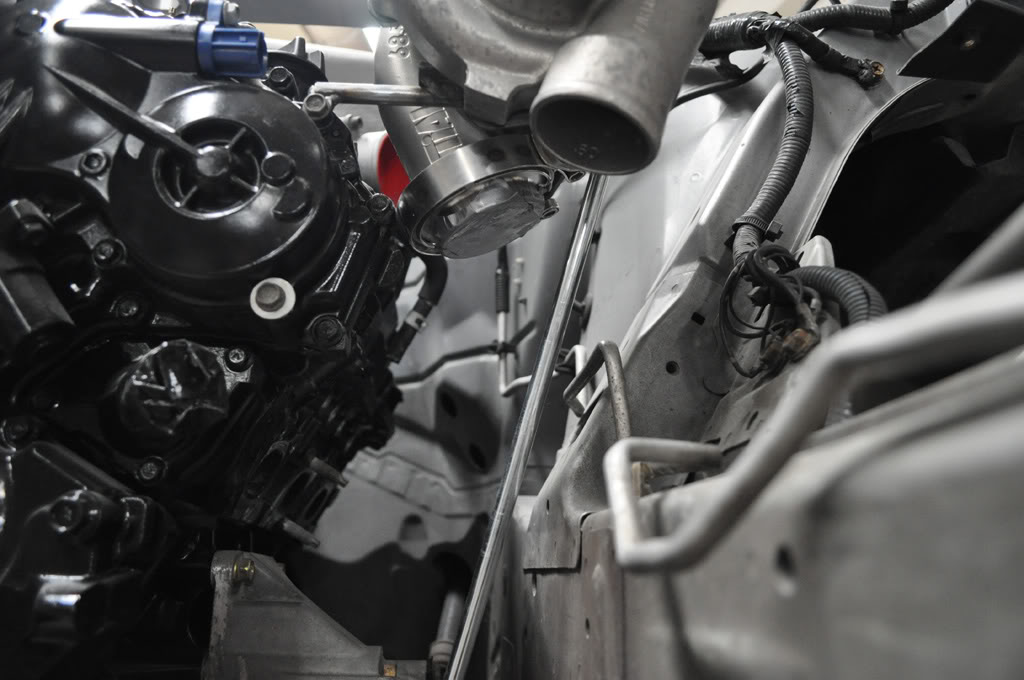
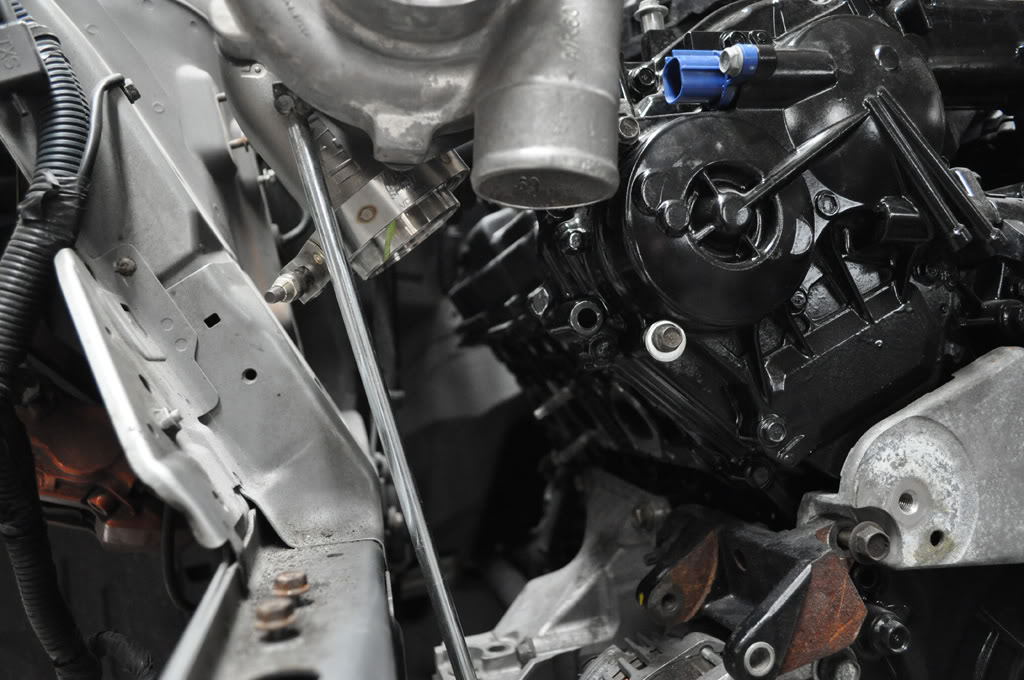
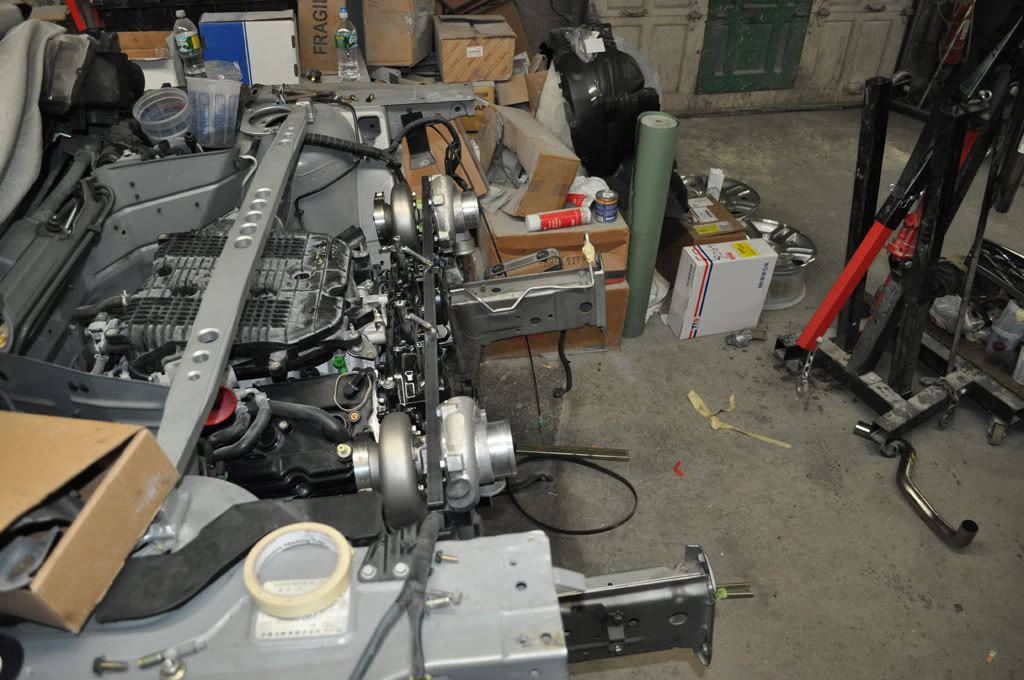
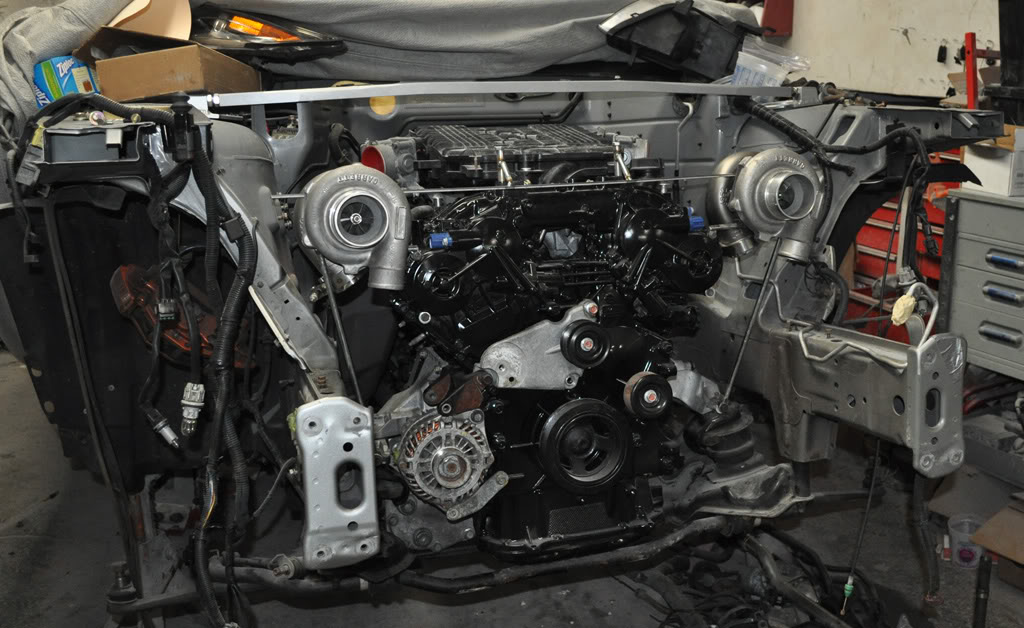
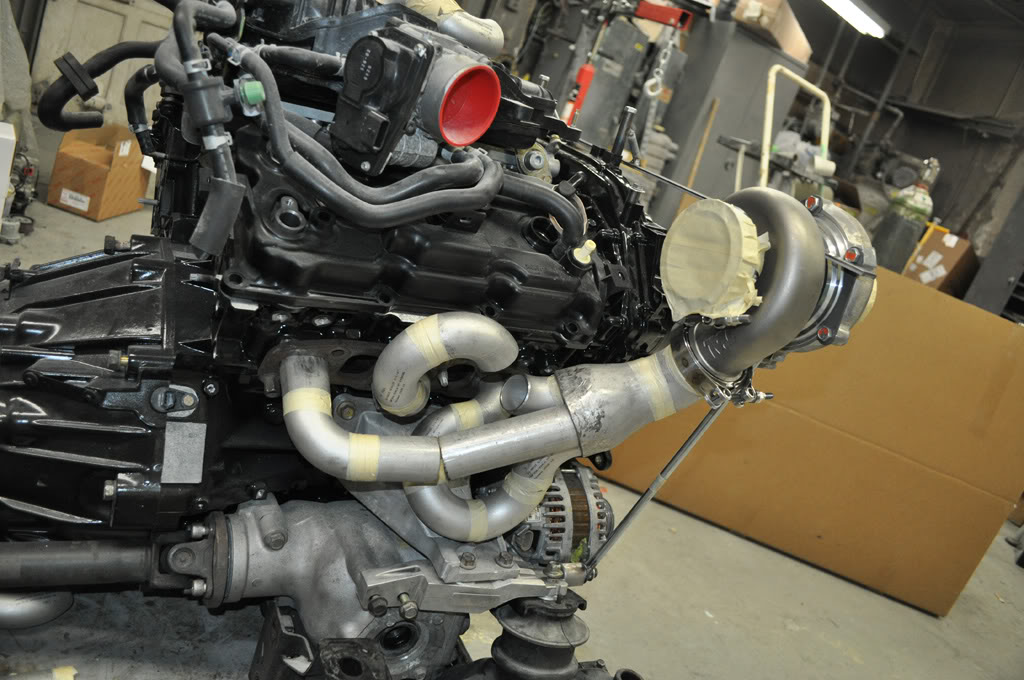
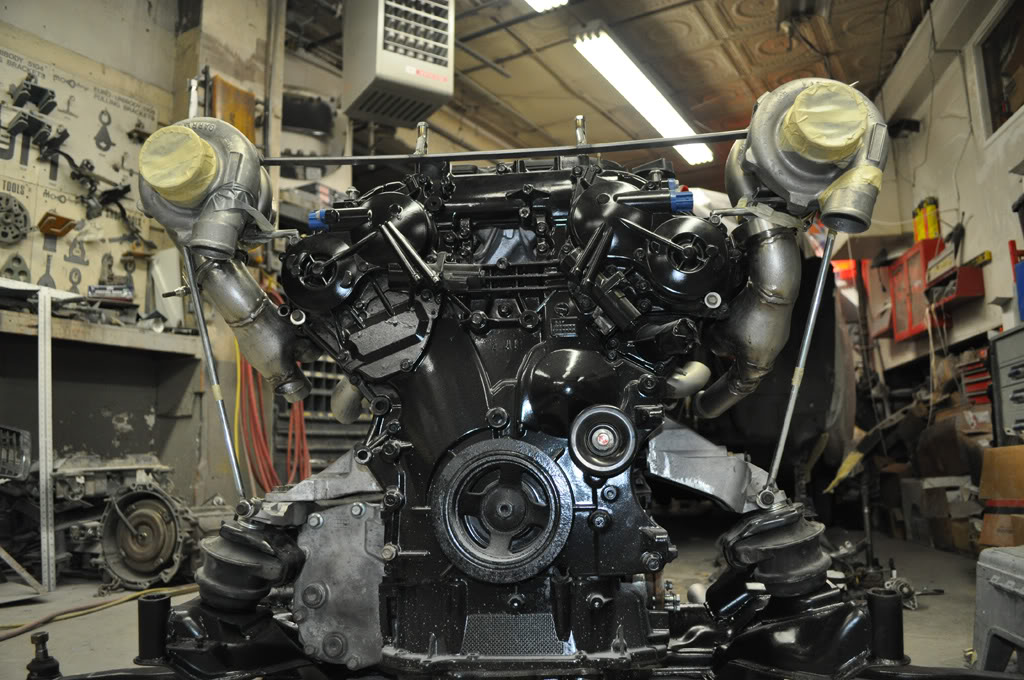
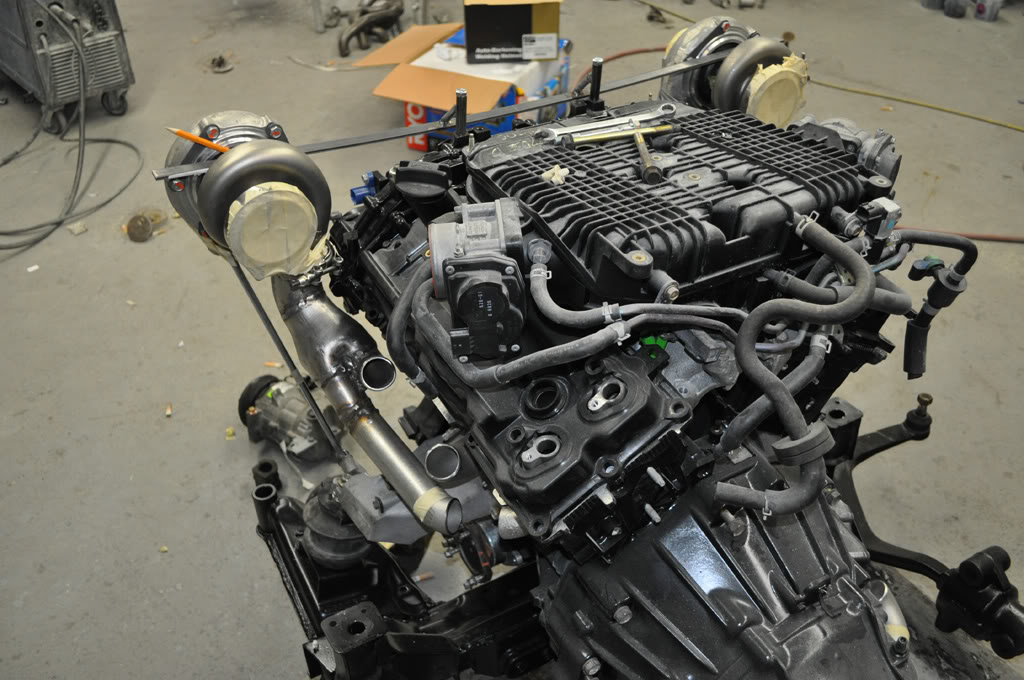
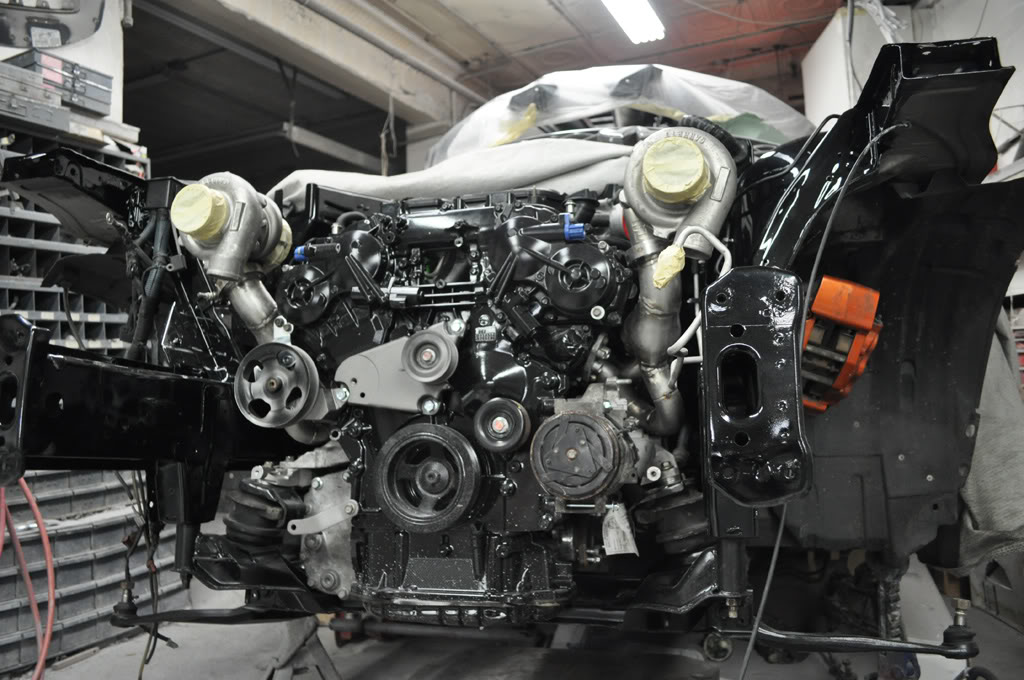
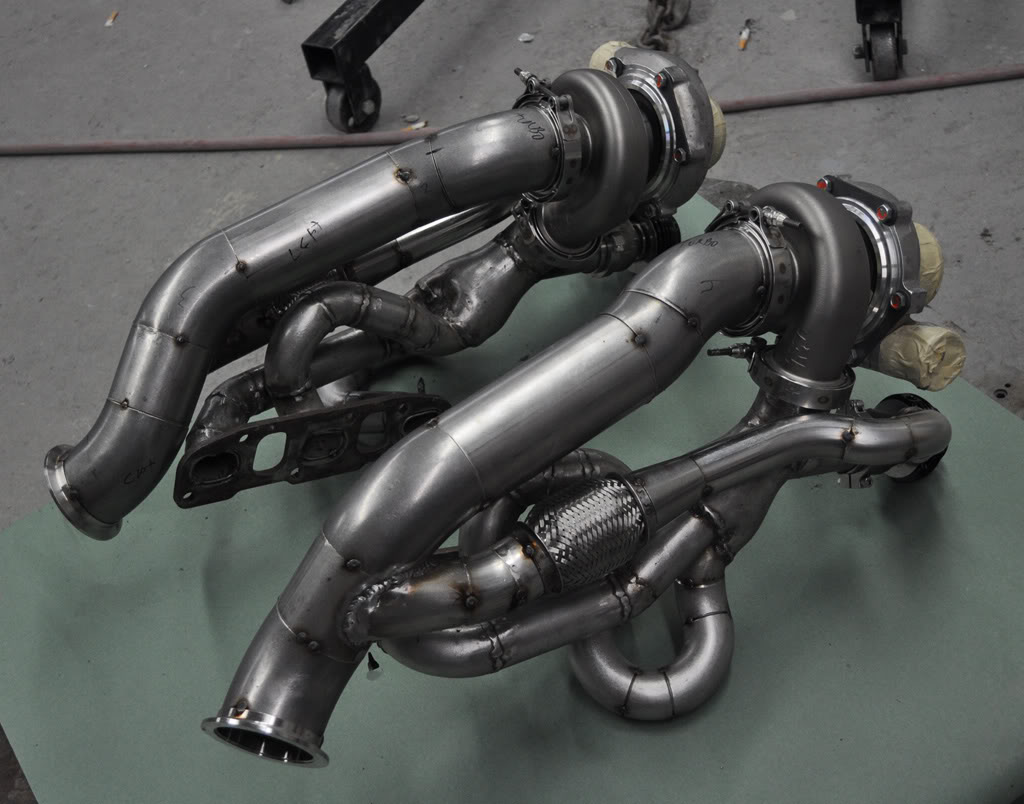
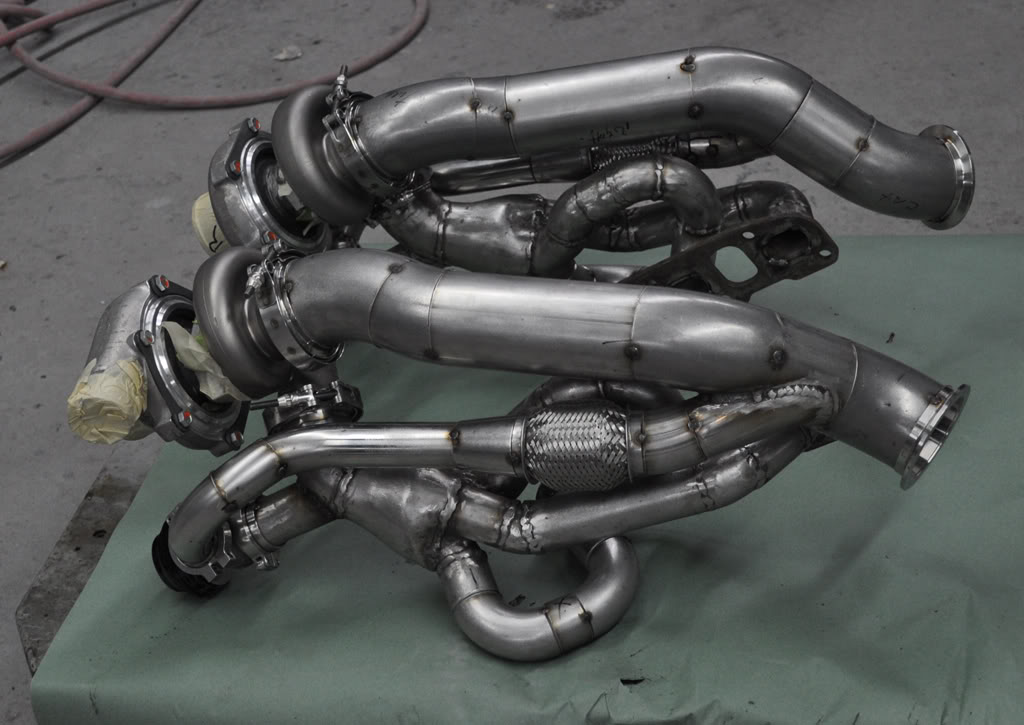
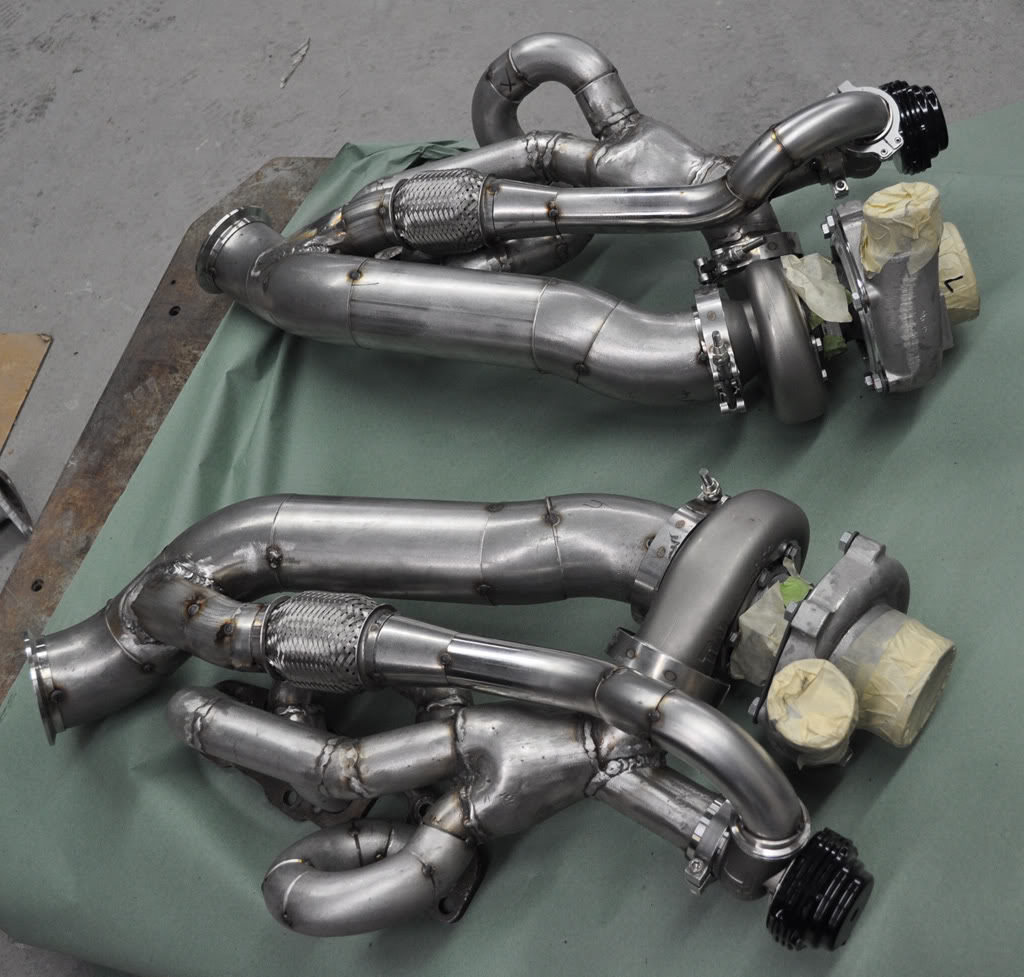
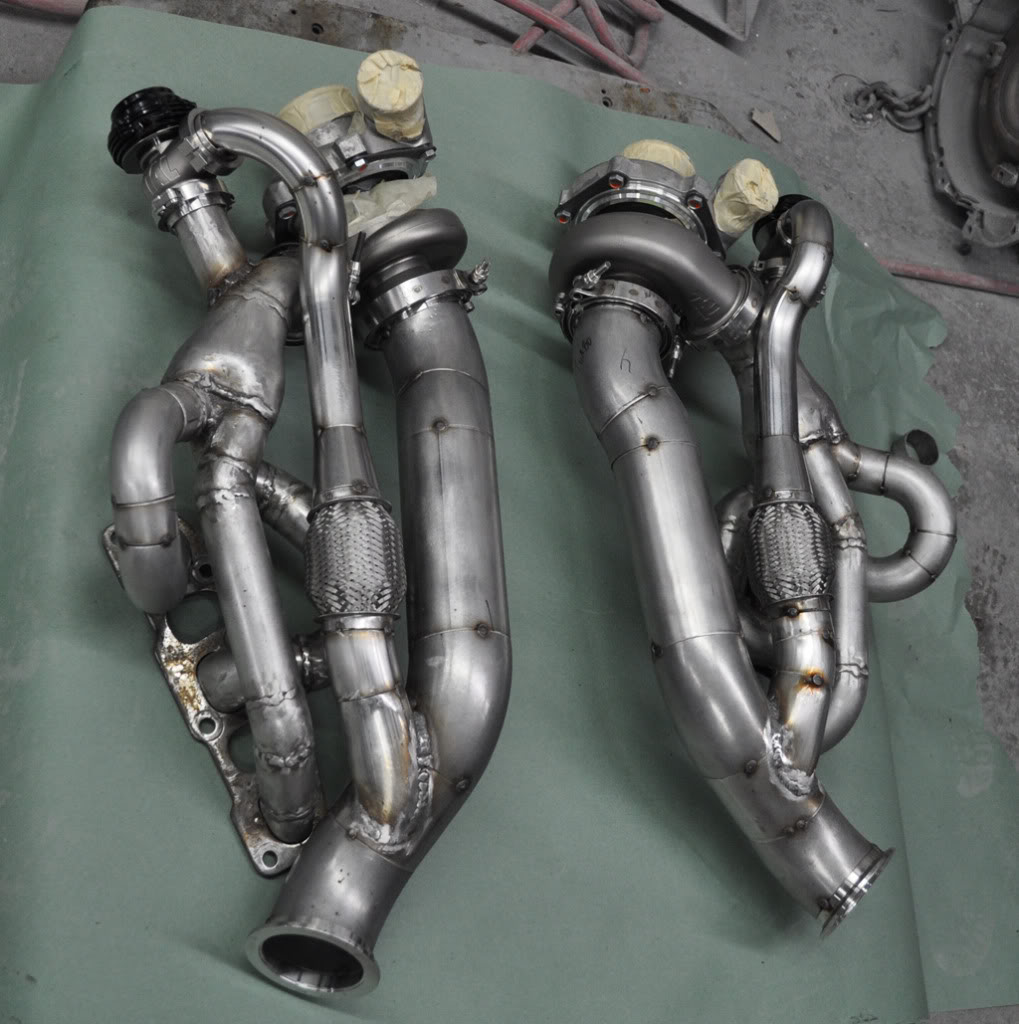
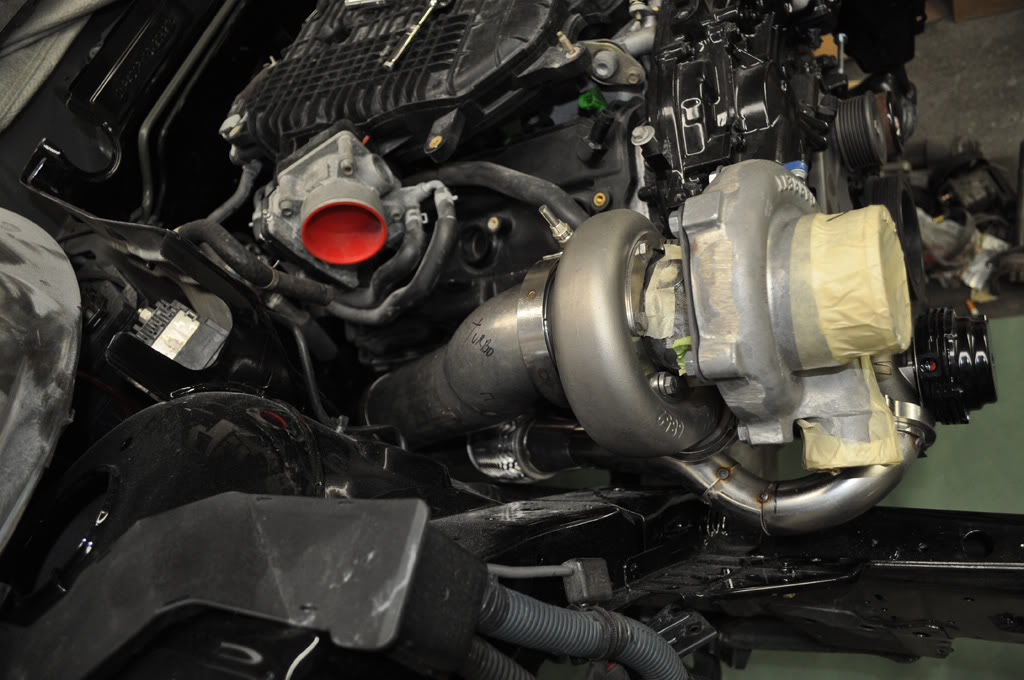
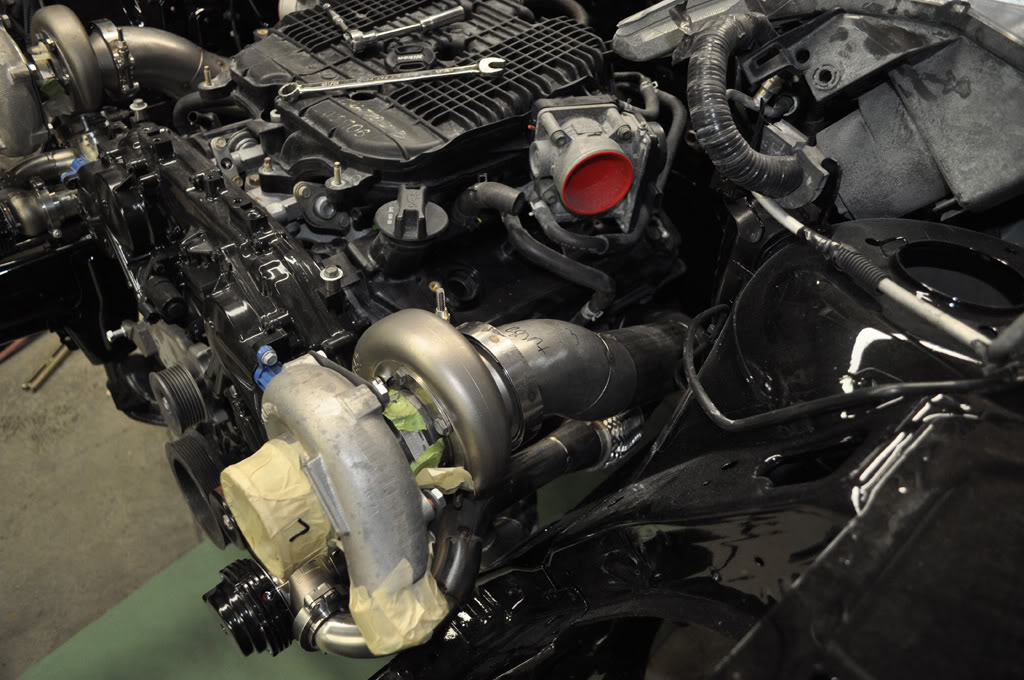
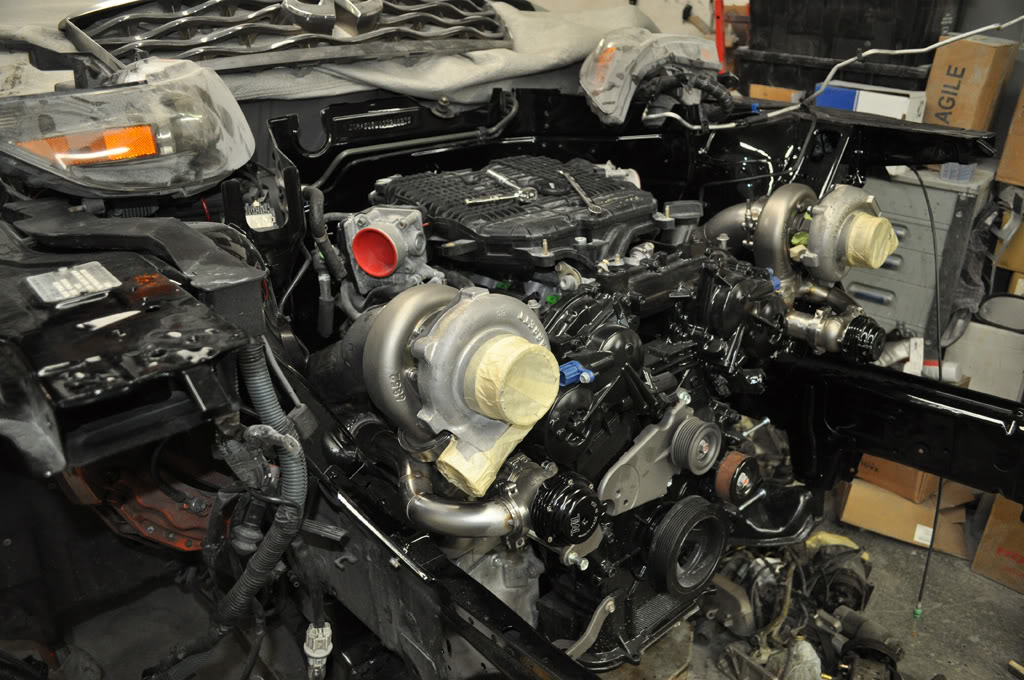
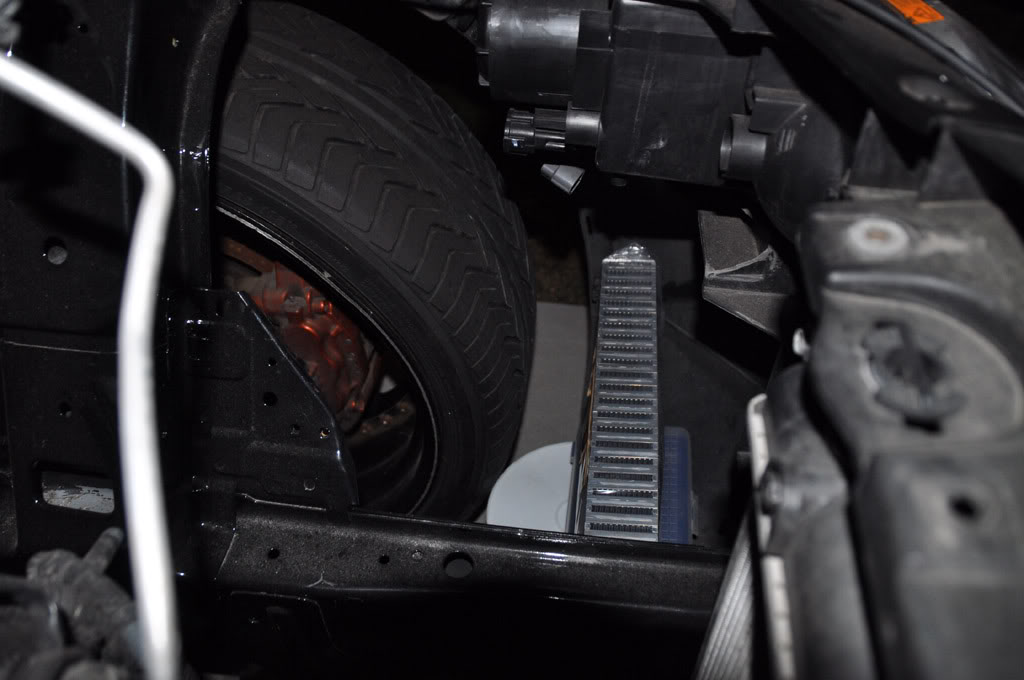
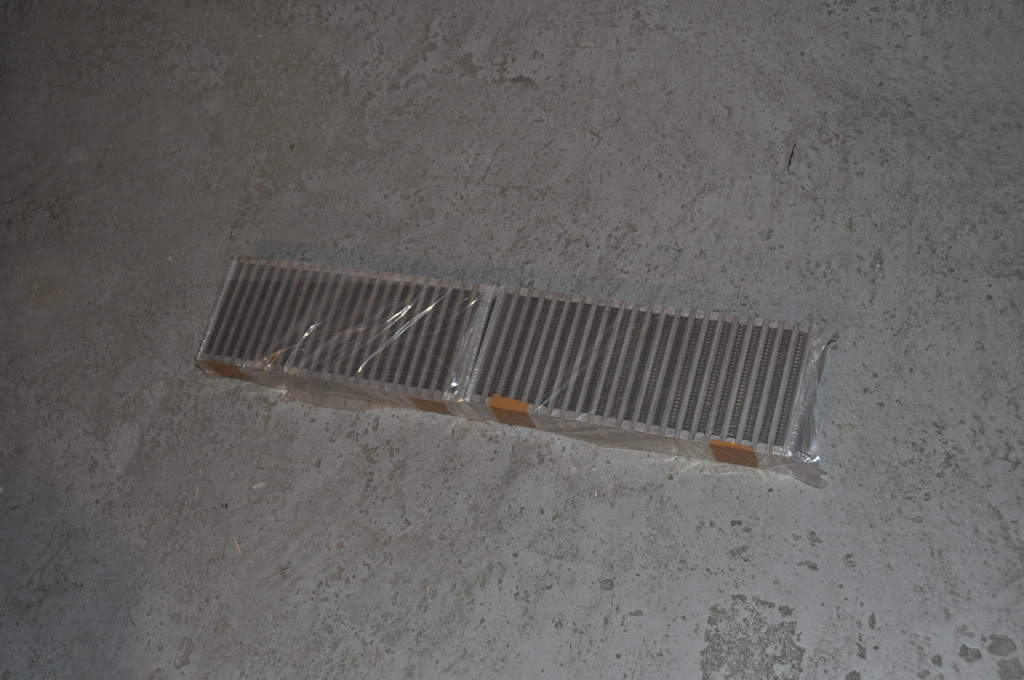
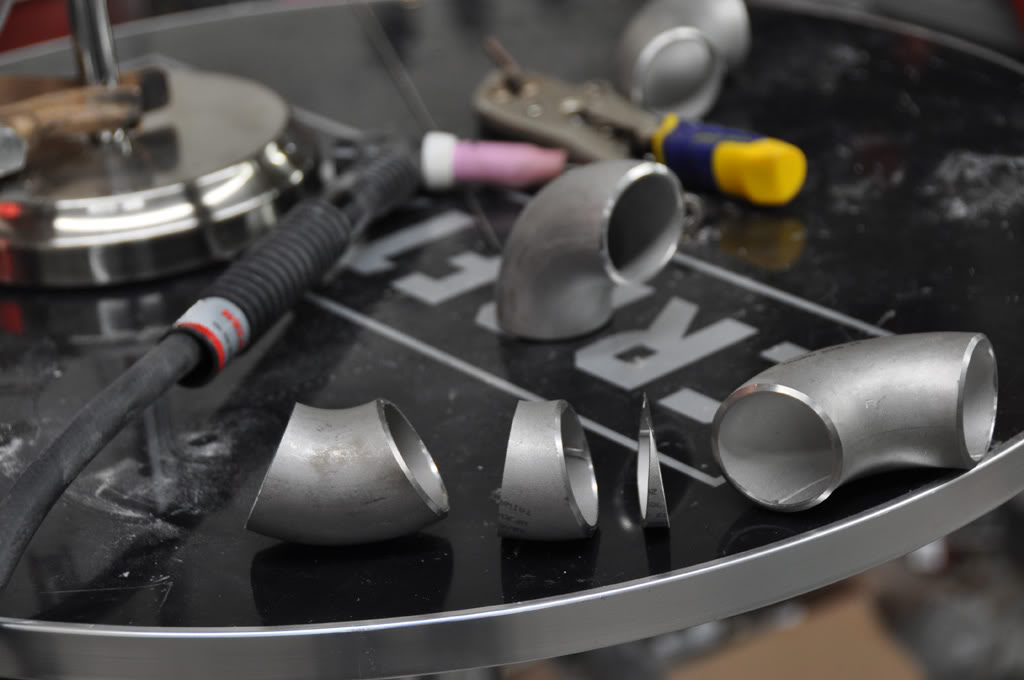
for my install I figured it'd be much better to build my own tubular equal length headers & mount the turbo's in front of the motor, right up top to the left & right, right smack in your face when you pop the hood. the fx has plenty of room for this. by using this better turbo placement it makes all my cold side plumbing much shorter and with only using a few smooth mild bends, better flow with less volume for least amount of turbo lag & high efficiency. I tried to design everything for the most efficiency. intercooler cores I'm using are custom bell vertical flow cores, short tube's, but many of them, mounted left & right instead of center... better air flow & no reduction in the cooling systems capacity by having it blocked by a center mounted intercooler. the cores I'm using are only 2.5" thick & will be ducted to the bumper so crazy flow through the cores, they can support over 800hp, but are still efficient enough for least pressure drop across the core without adding too much volume.
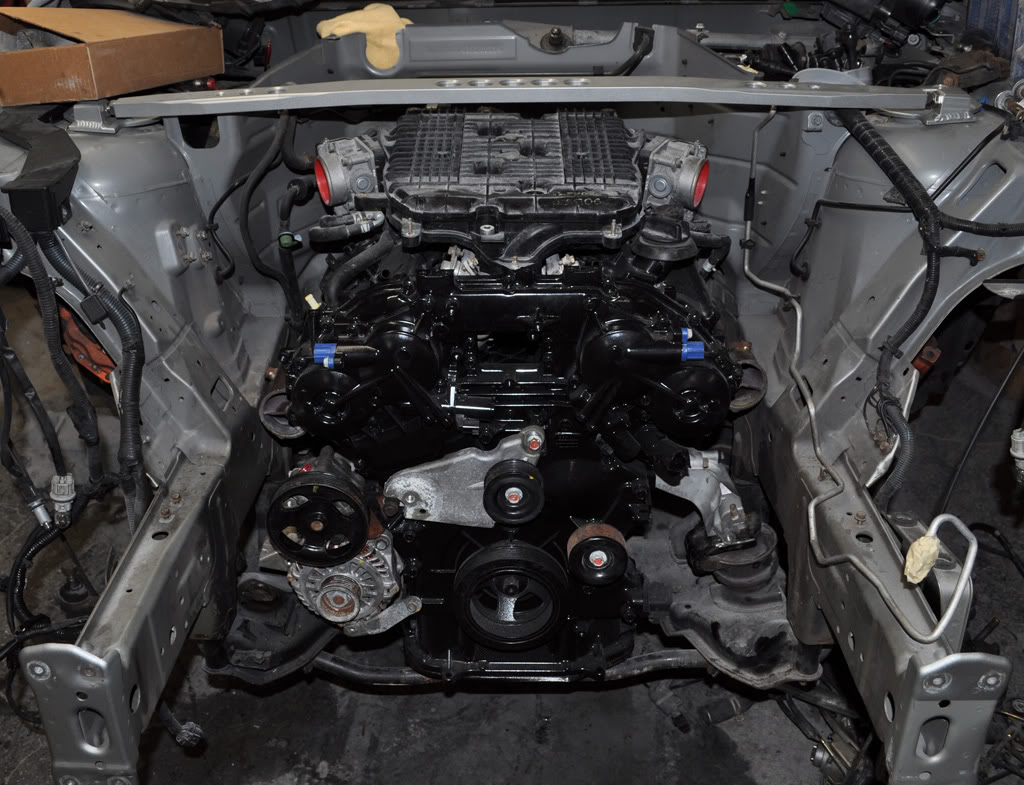
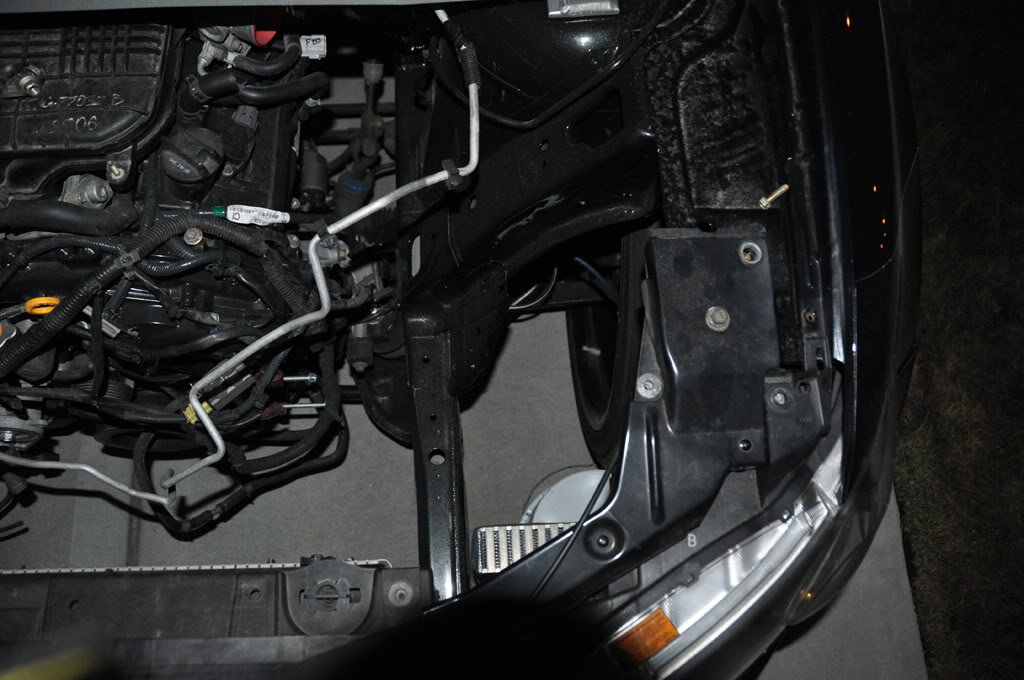
more pictures. btw the fx was silver when I got it, that's why the engine compartment's silver
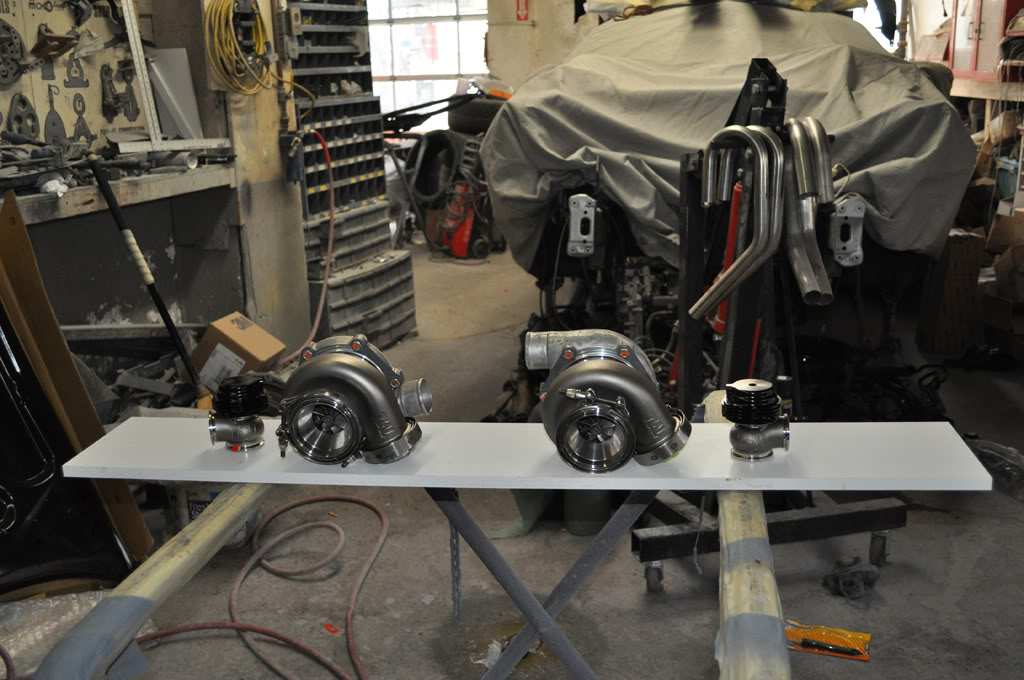
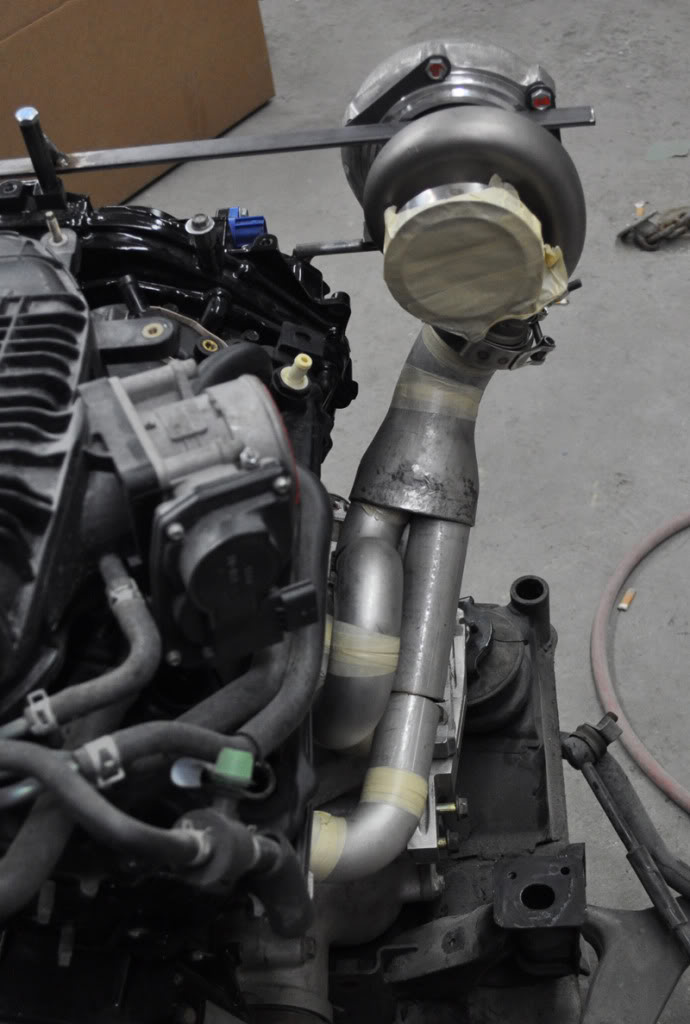
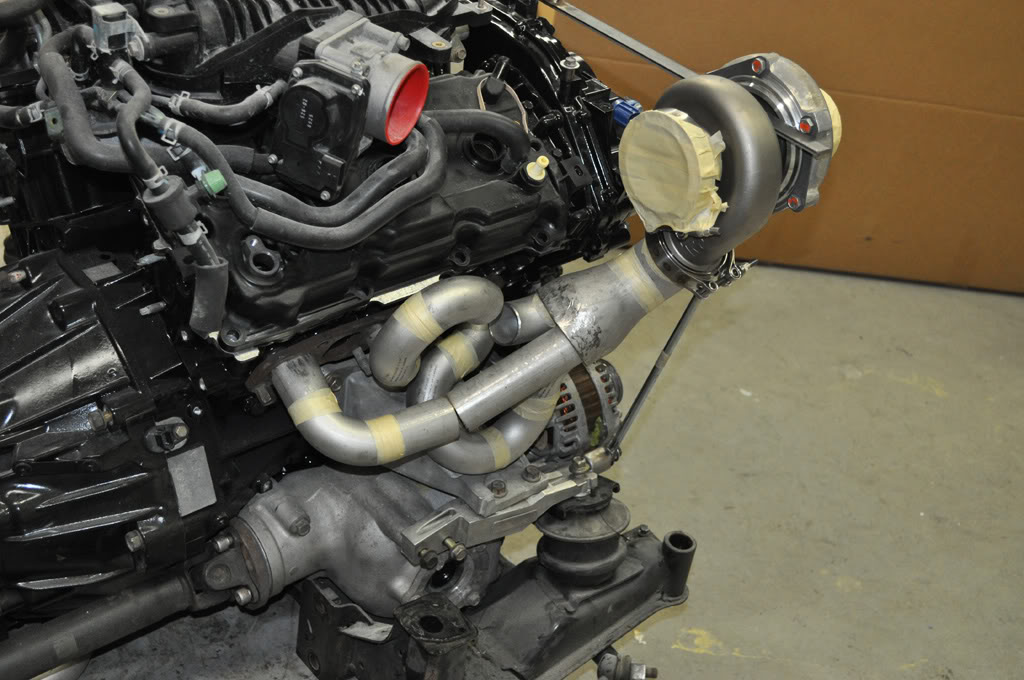
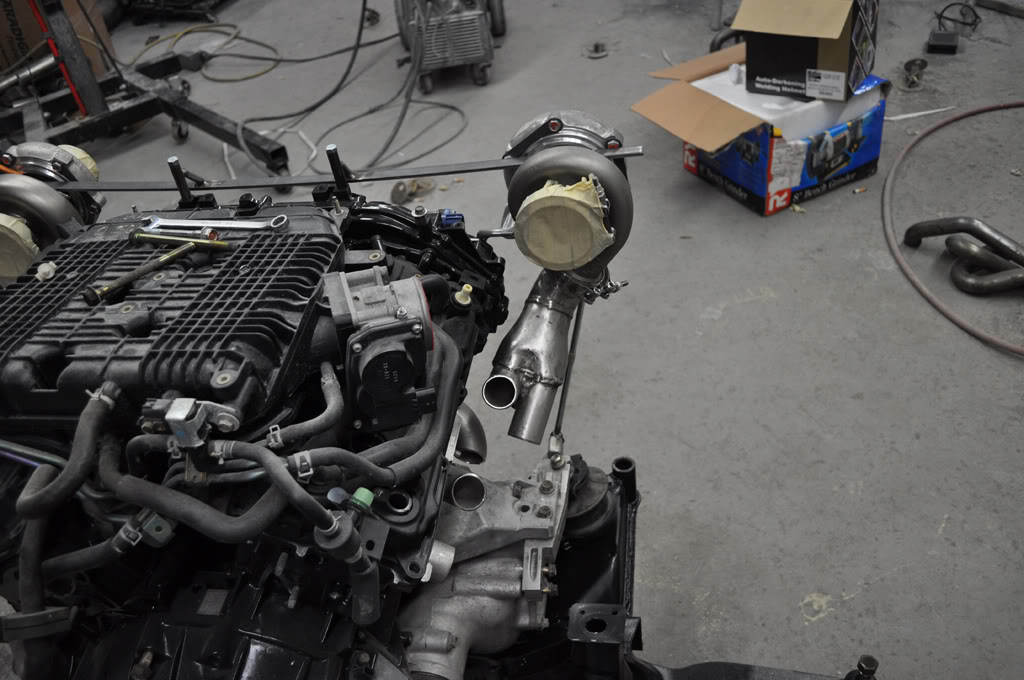
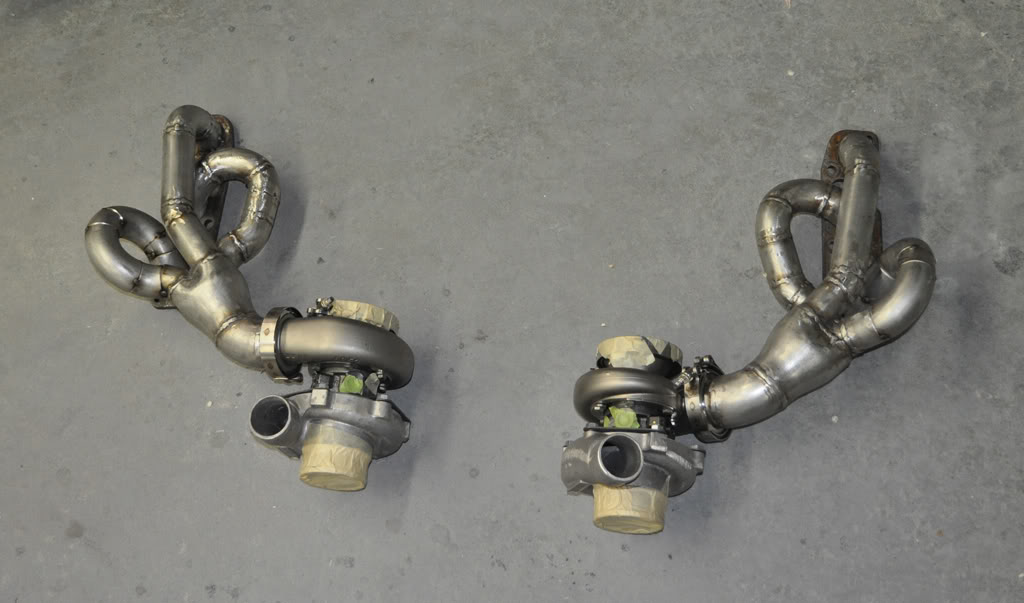
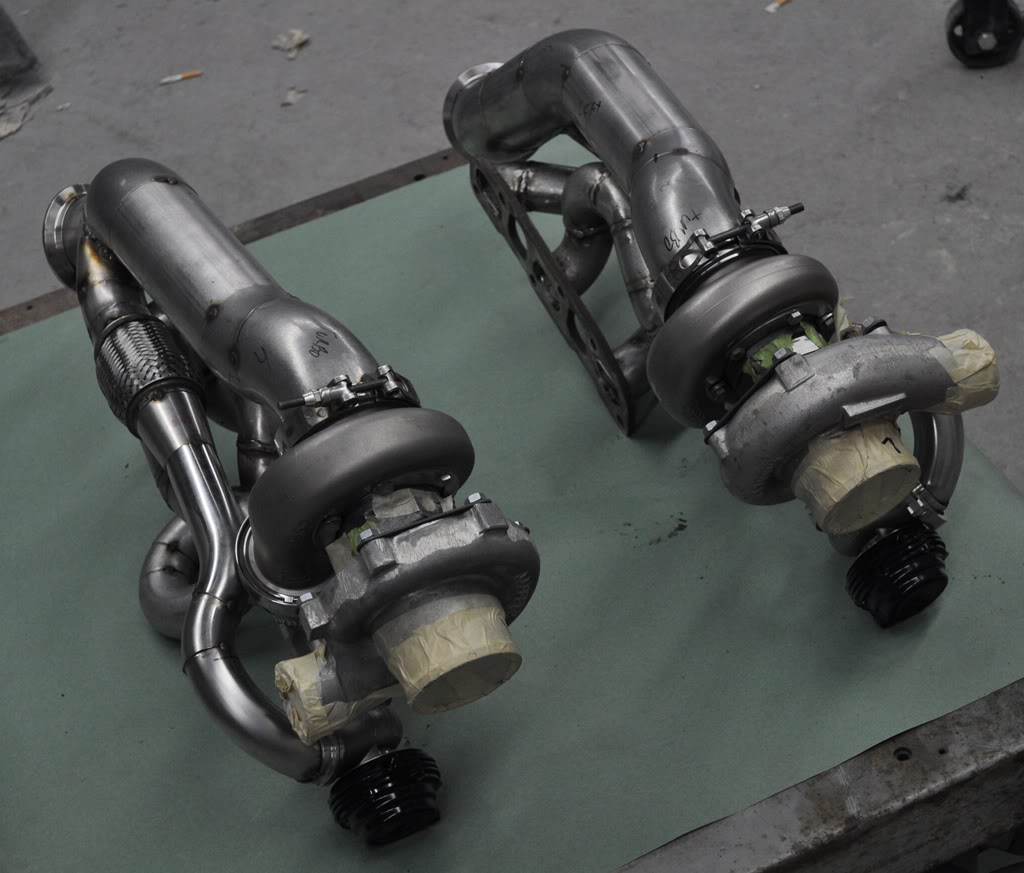
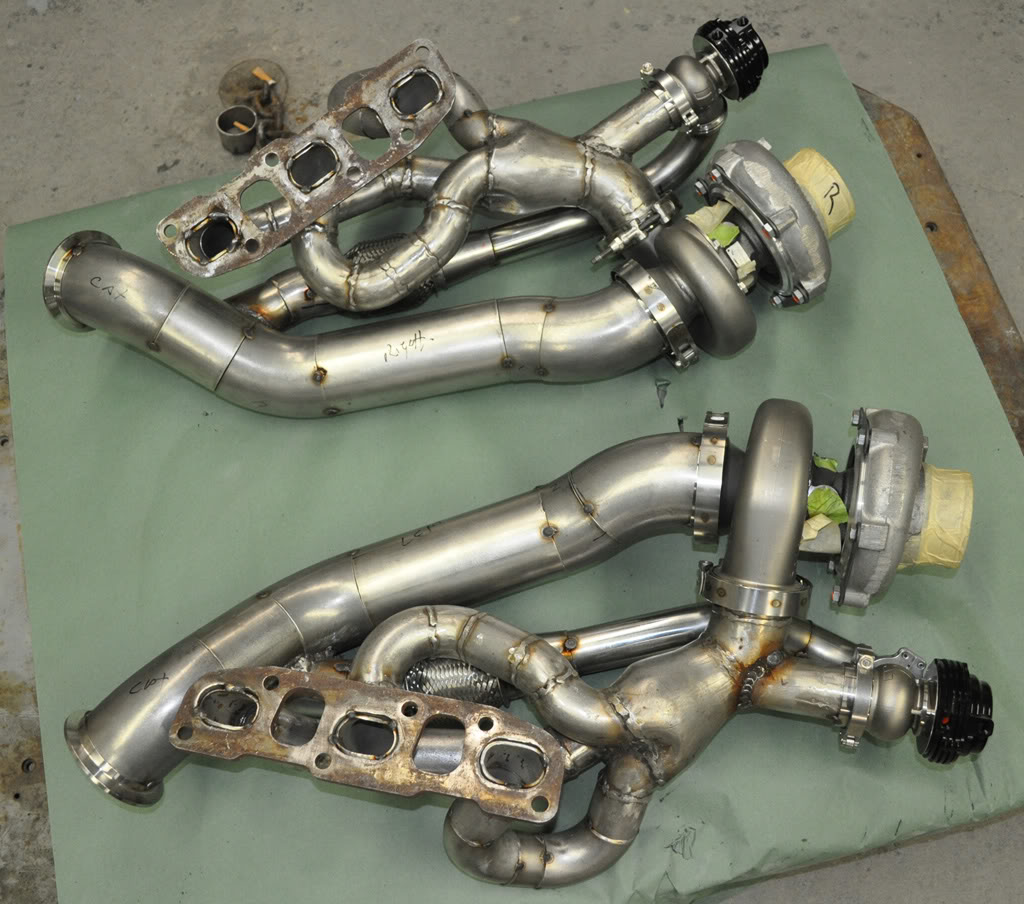
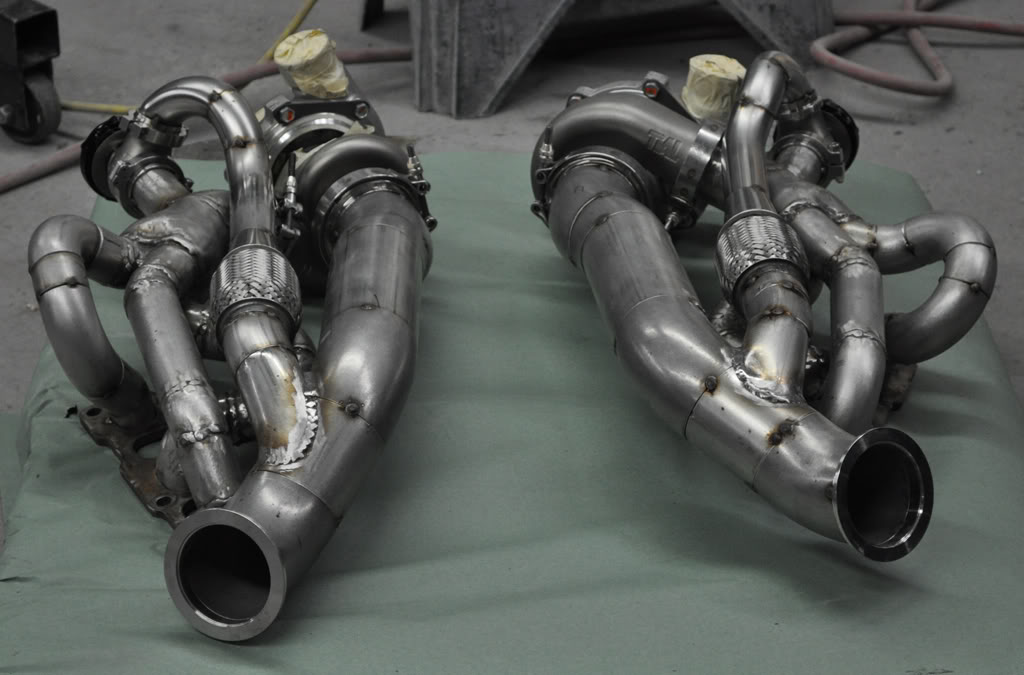
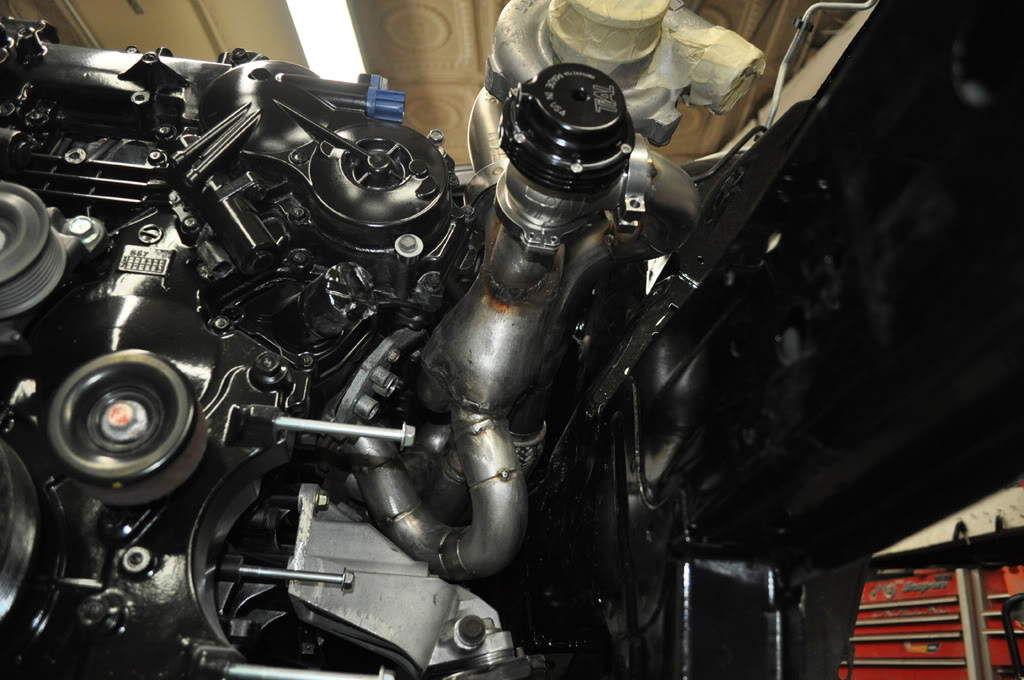
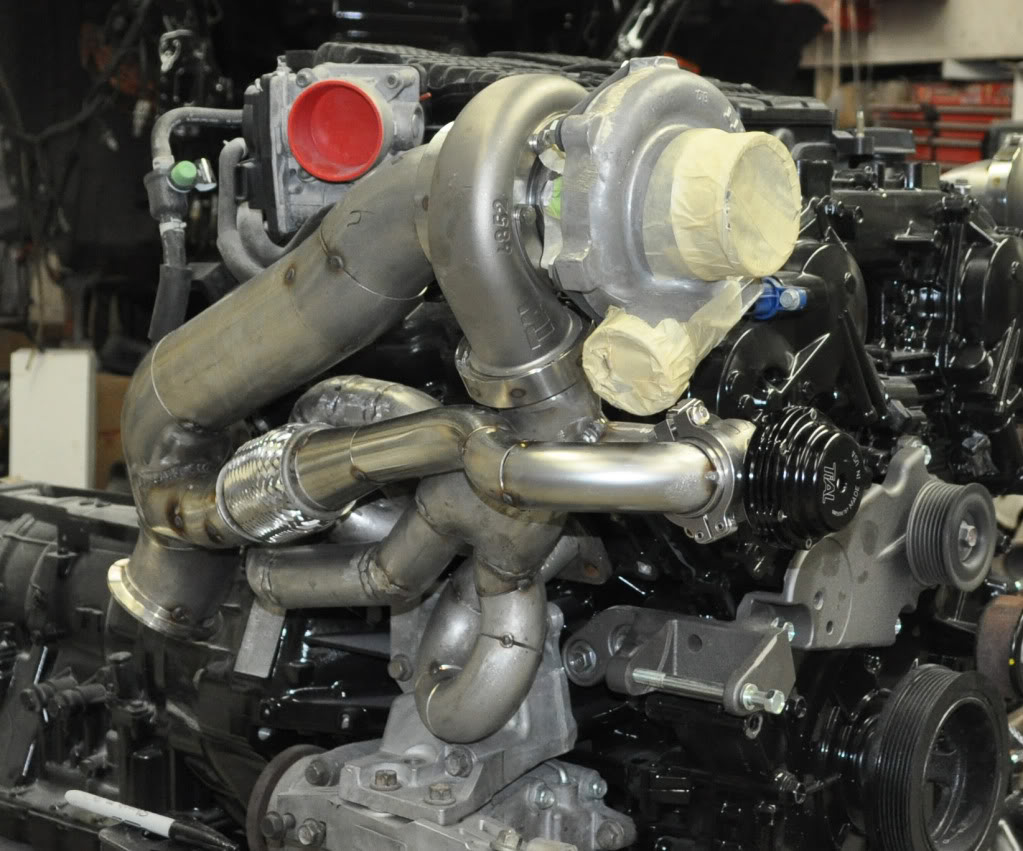
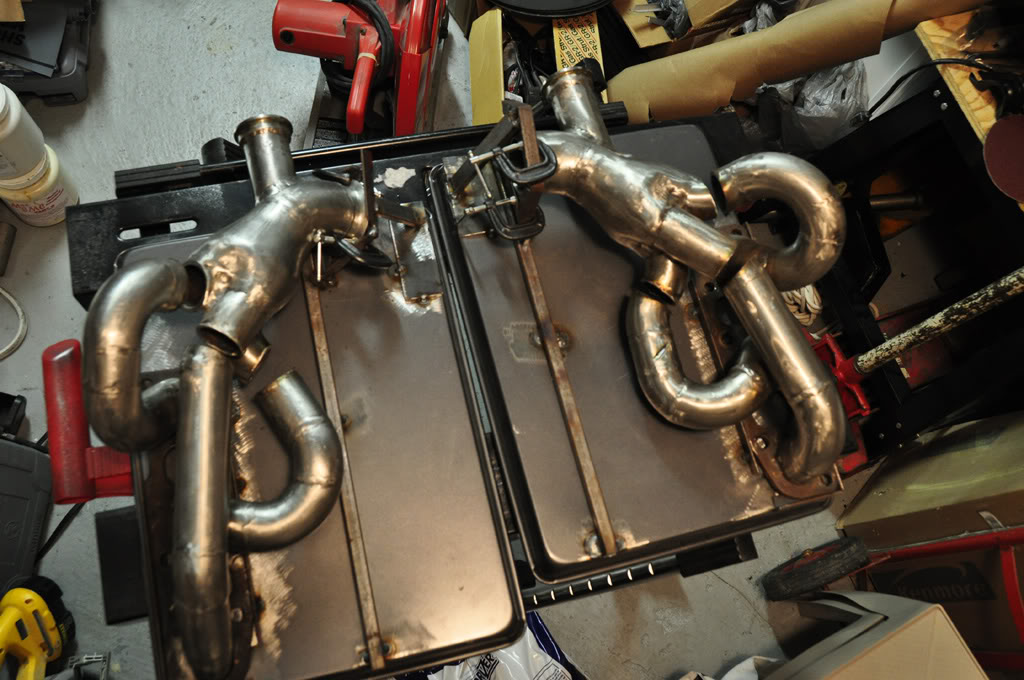
the tial stainless steel v-band exhaust housings are so sexy, these are .83 gt2860r ball bearing turbo's
at first I thought of trying to just flip the stock HR header type manifolds & run the turbo's off of them. this could have worked
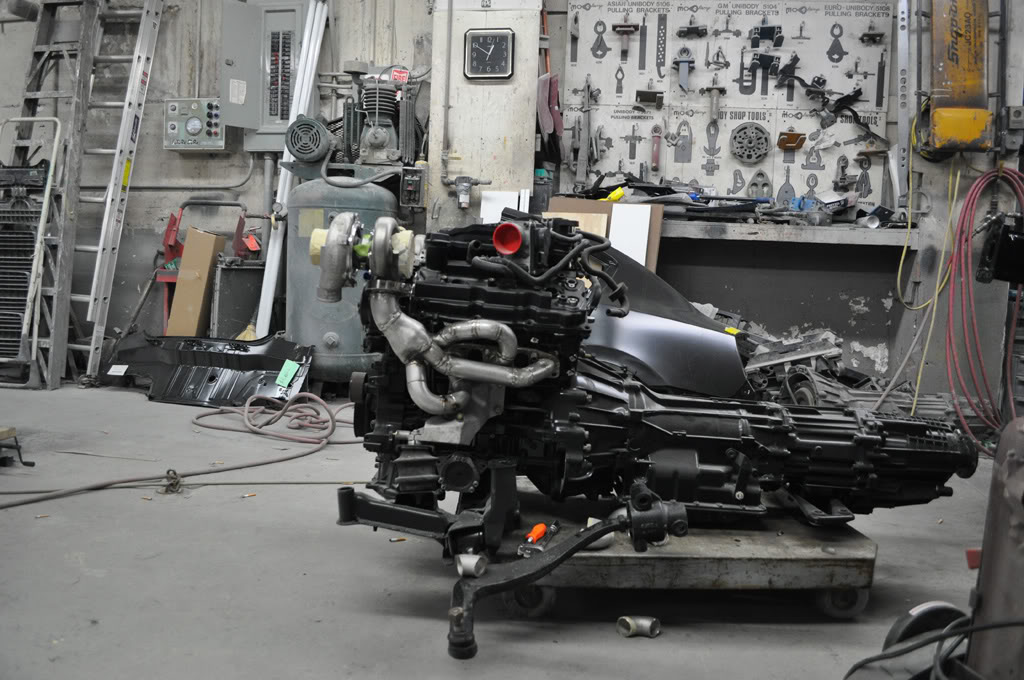
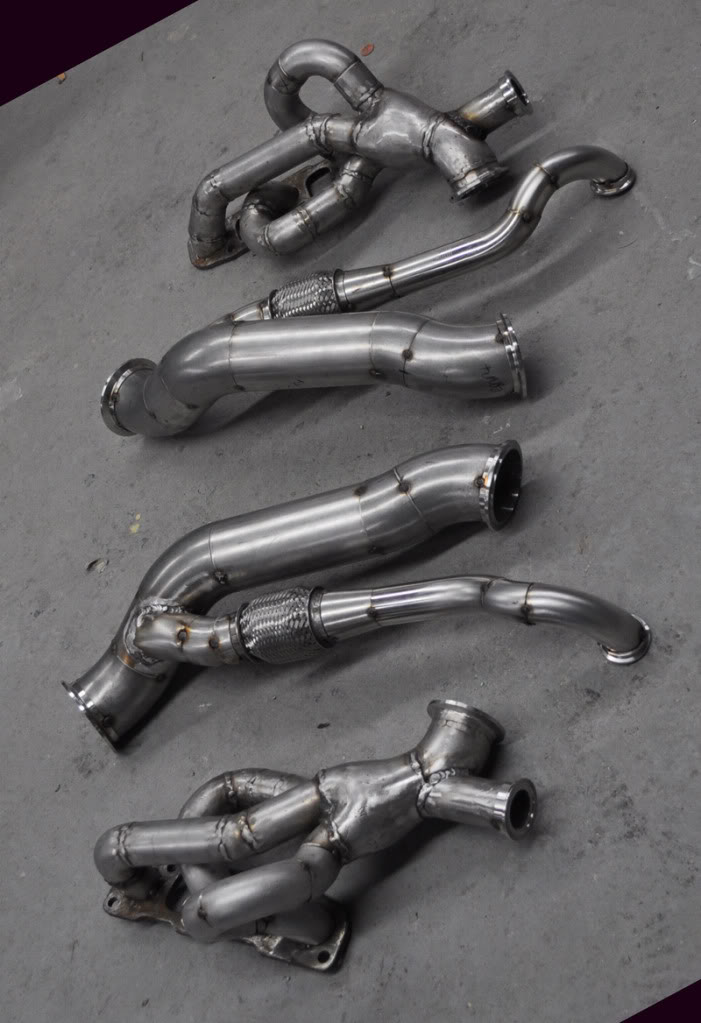
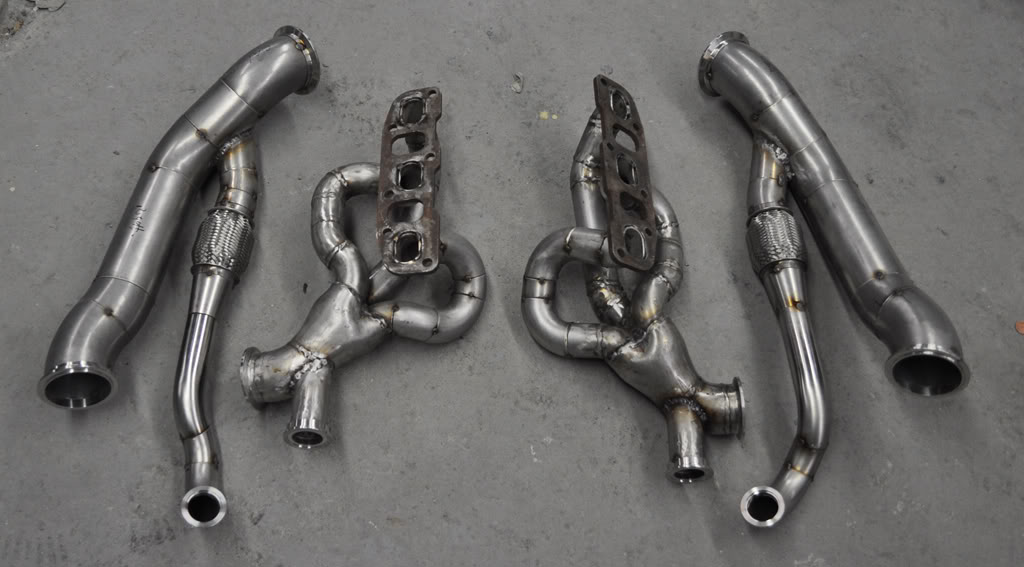
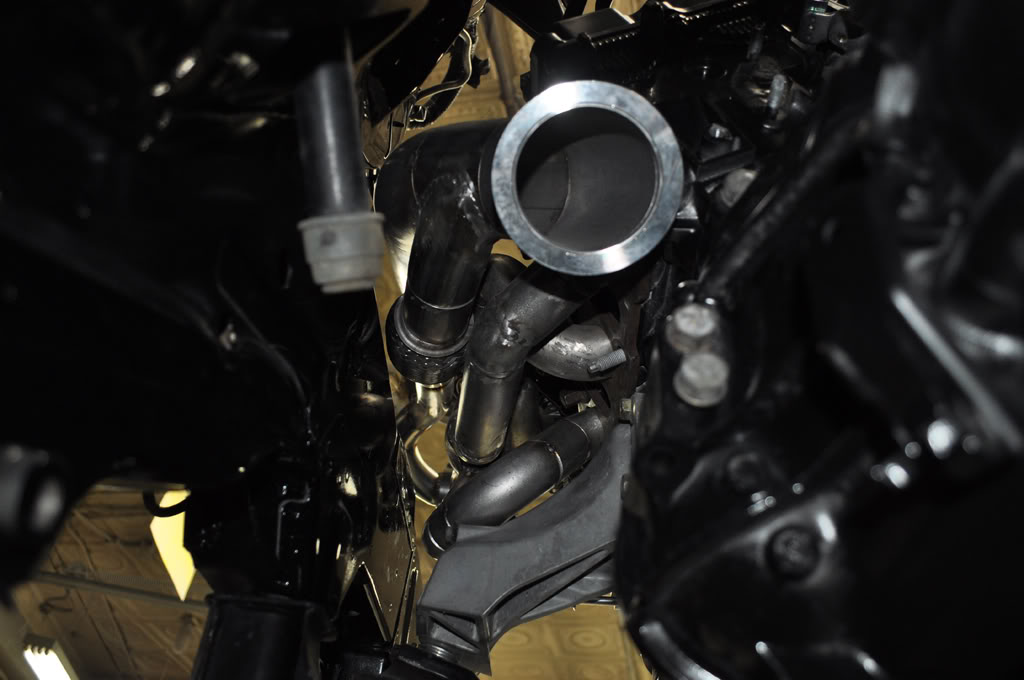
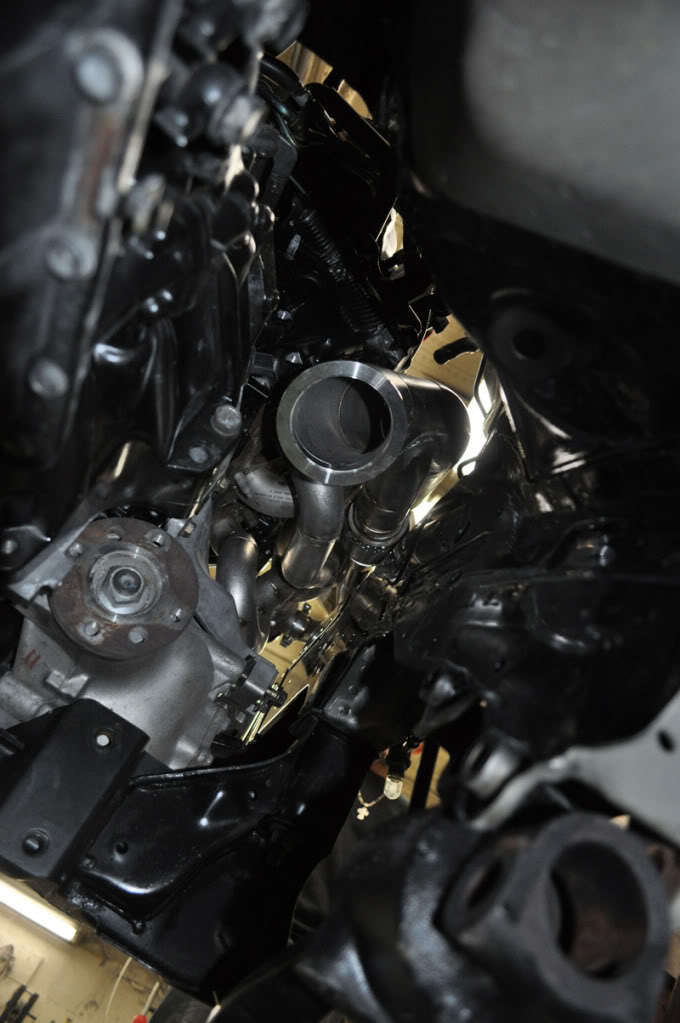
I wasn't happy with these, they are not equal length & the collectors wouldn't be so great, there crush bent tubing, just wasn't feeling it. I then tried the same thing but with a pair of stillen headers chopped up & flipped backwards. positioning wasn't realy so great though & I wasted those headers for nothing, I thought I might get it to work but nope, still wasn't good. at this point I decided only option to do it right was to build my own headers from scratch. started out just by putting the turbo's exactly where I wanted them, then just built the headers to fit. motor went in & out many times to build these

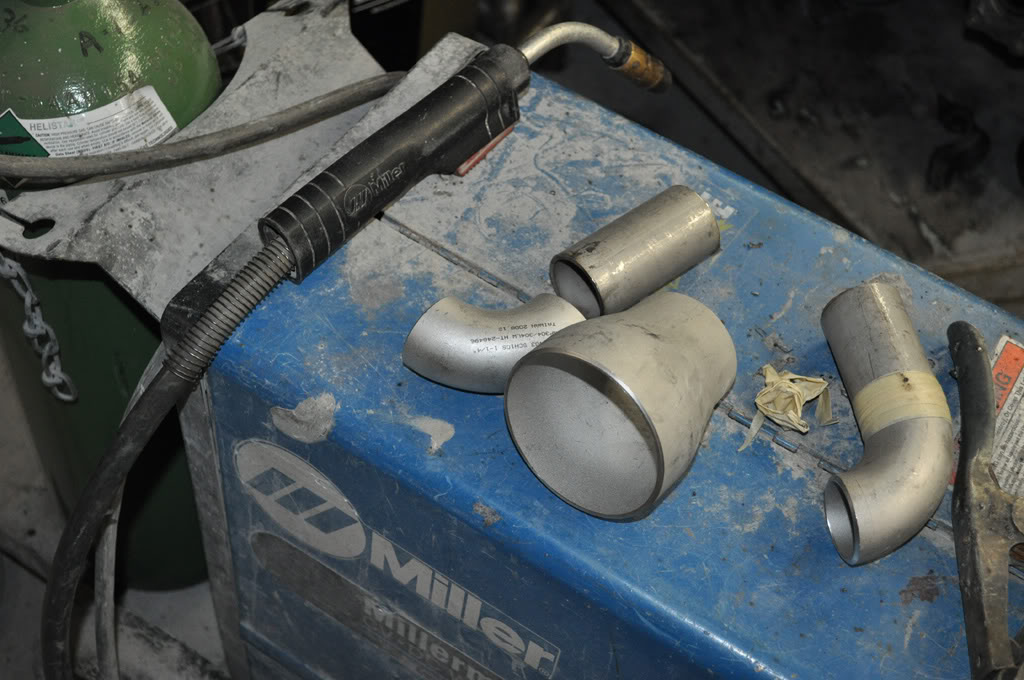
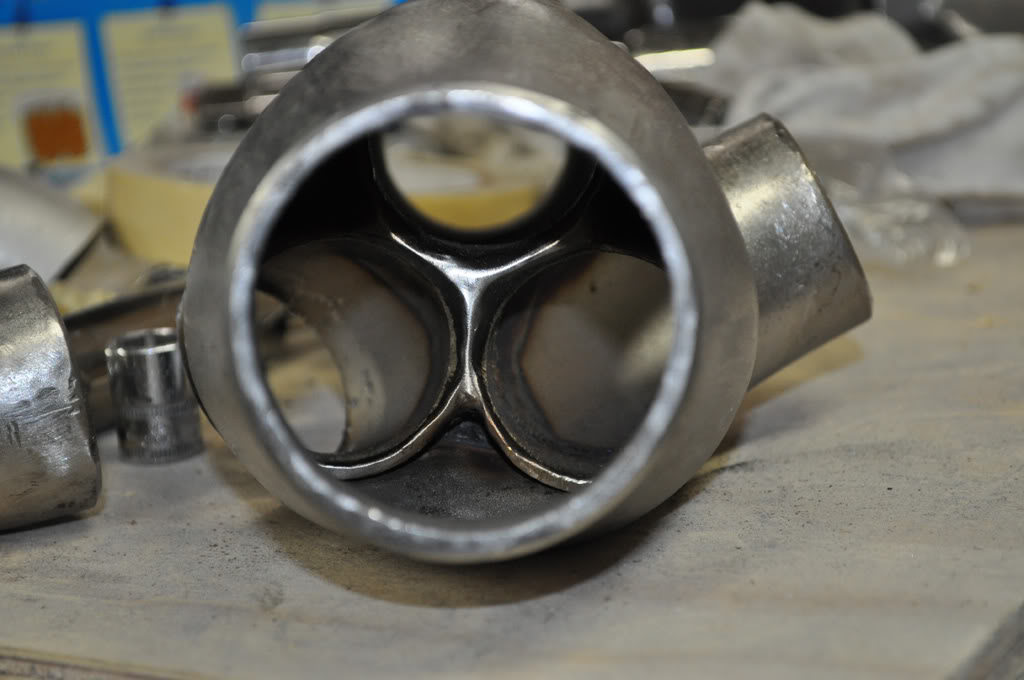
this is what the collectors started out as
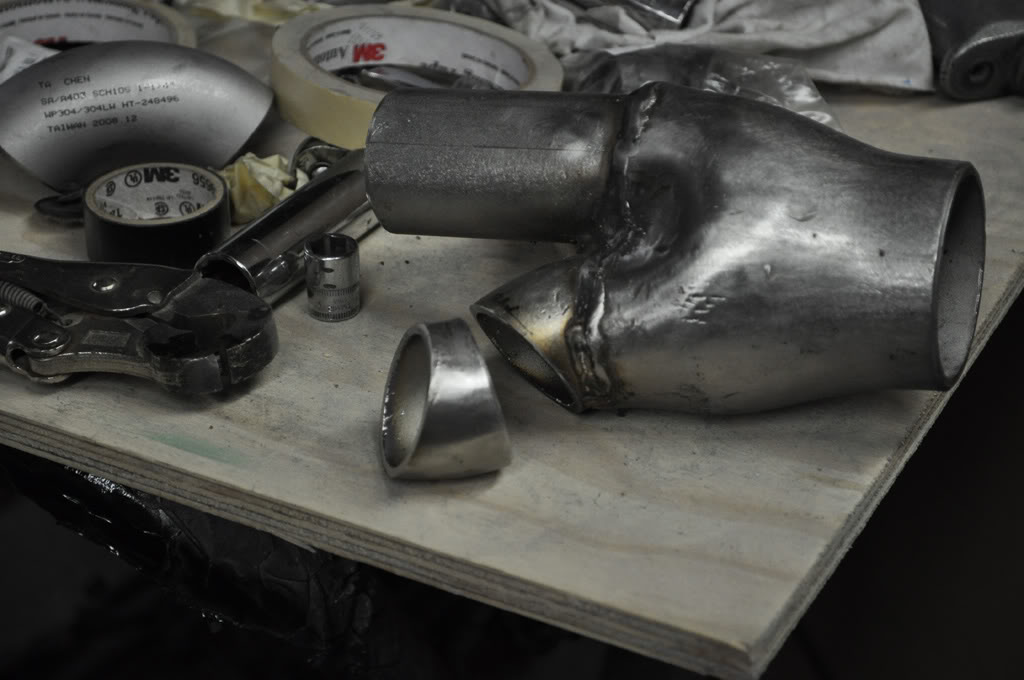
and this is how they went togeather


and the intercoolers, this was the original mock up I had in mind
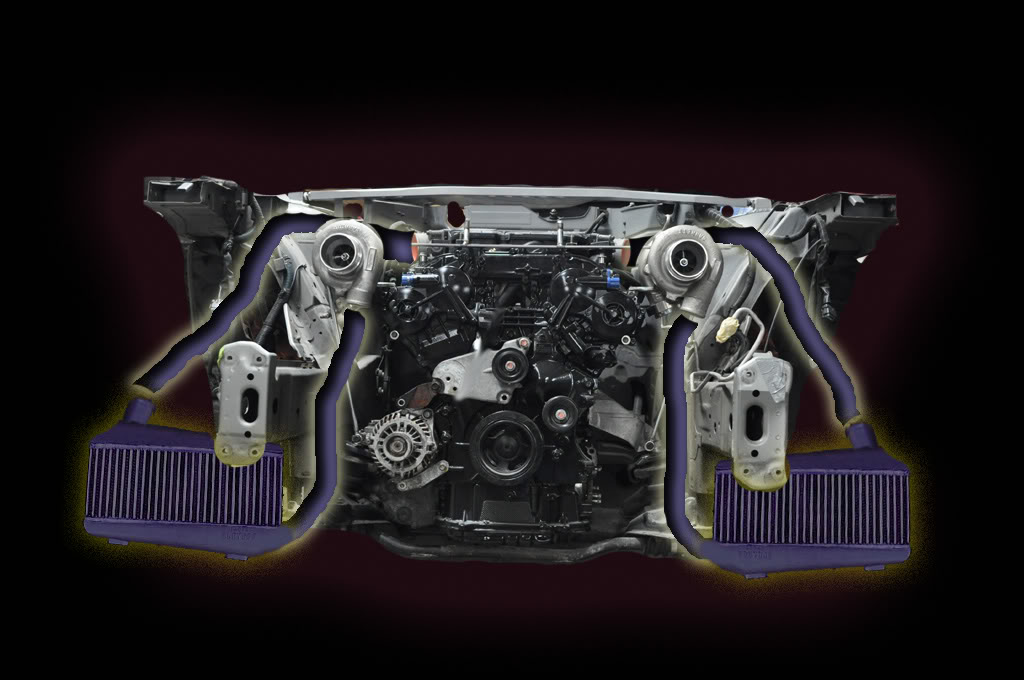
and of course the bumper will be modified for these

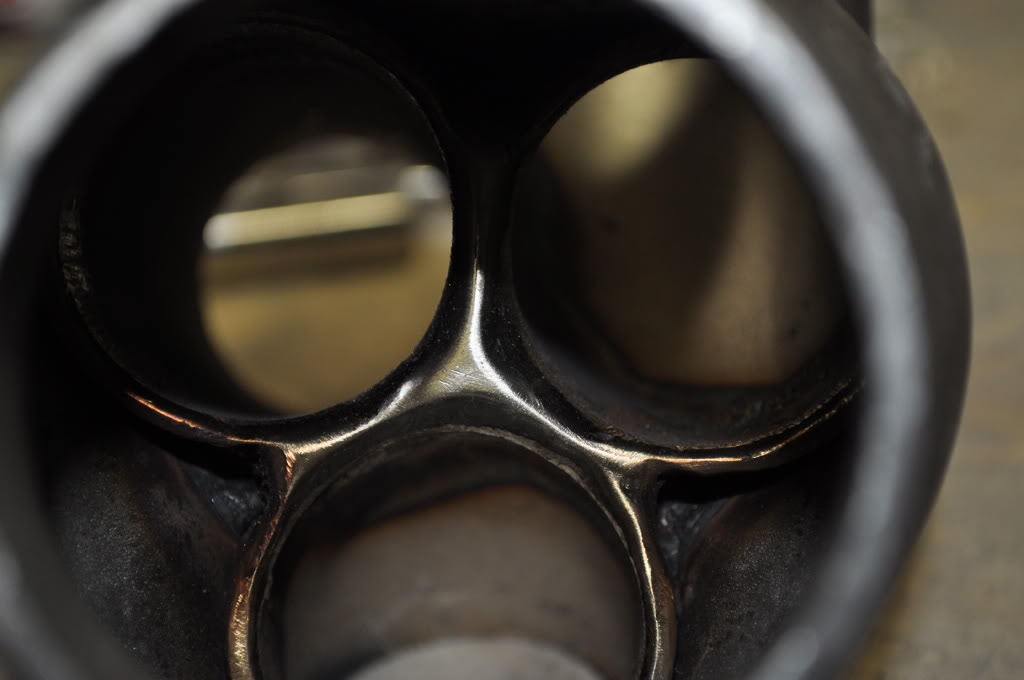
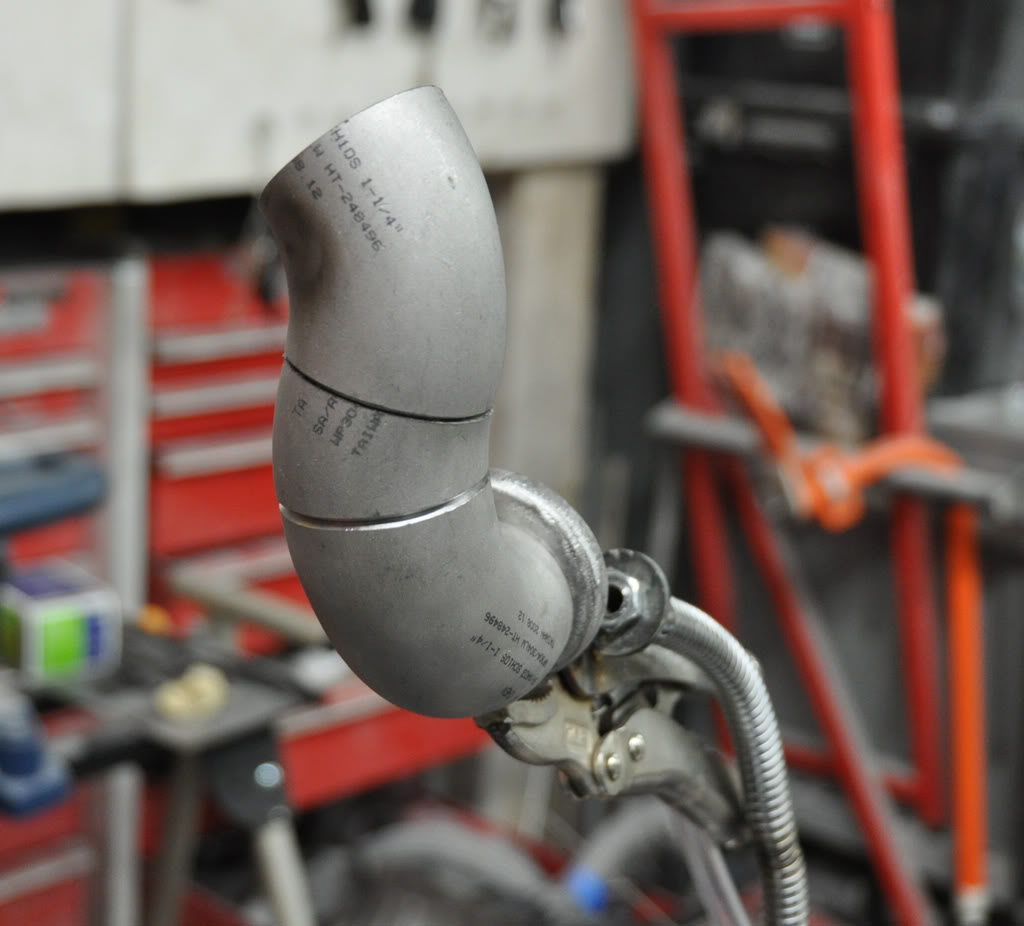
looking good so far right? friggn things were a ton of work to build, cutting & grinding all this stainless steel is no joke on a chop saw & a grinder & a dremel but somehow I managed to pull it off.... well, this is where my biggest problem comes in. see I didn't have a tig welder, I just used my mig with ss wire & tri mix to start to put these together & I didn't know much about welding stainless steel at all, first time I even tried, but I was told by many that I really should have these gone over with a tig welder. so after they were all pretty much done to this point I just bolted the engine & tranny final into the fx & put it all back together, then just sent the headers & down pipes out to have them all tig welded for me.....
so now the problem. the guy I sent it too is a good friend, been building racecars sine the 60's. I always went to him for advice with fabrication stuff so I gave them to him to do when he said he could do them no problem, well he winded up tig welding everything up for me, but he did not BACK PURGE the damn things, I didn't think all that much of it, don't know anything about welding stainless steel but I expected the guy who told me he could do them would at least know wtf he was doing, I just figured if he didn't back purge them then maybe they didn't need to be backpurged? I sure didn't know any better but trusted he did. big mistake, after getting back the headers is when I realized they were ruined ...the welds all had slag on the insides & the welds were pretty sugared up in many places, ----, all that work down the drain I tried everything from hones to even talking to extrude hone, but once this happens it's just too late, now have no choice but to redo them the right way
ok, that's it for my first post, time for bed. tomorrow I'll show where I'm at with this now after a few months of dealing with this major setback & my fx just sitting dead in my driveway all summer because of this.
I don't want to turn it into a race car or change it into anything that it's not, so thoughts of something more radical like a twin turbo LS2 swap or something that I'd normally think to consider doing is out. I've built some cars but this one I really want to keep it exactly the way it is cause it's awesome as-is,but I want I just want it to be strong after considerig all my options I decided to use Nissan's newer VQ35HR engine to replace the current VQ35DE engine. the HR engine is much stronger, revs higher & has dual throttle bodies. it's strong enough that for my use it's about the equivalent of a built up DE engine, 350z's are running 600whp+ stock block, that's more than my drivetrain can handle, I'm hoping to tune to 450+whp, maybe 475? don't want to blow the rest of the drive train, just want to push it a bit, I picked up a low mileage AWD drivetrain from a newer G35X for this swap.
the electronics are different & there are like 7 different computers in the factory CAN buss system that all need to communicate with each other, at least staying in the nissan family gives me some shot at integrating all of the electronics & splicing the harnesses & trying to get everything to work 100% together like factory. 07 ecu has to be made to work with all the 03 sub systems, in short it's pretty complicated, there are almost no successful DE to HR swaps even done yet that I know of & I haven't ever seen one 100% completely integrated swap yet really, so you'd think that'd be the biggest challenge I guess...
far as the twin turbo part of this thing, I could have used an off the shelf twin turbo setup but instead I decided to build my own, not because I wanted it to be cheaper, but because I wanted it to be better. the off the shelf kits that I could have made fit easily enough are all built around the 350Z & the G35's which share the same platform as the FX, but they don't have anywhere near the amount of room I have, so the off the shelf kits tuck the turbo's down under the sides of the engine with log manifolds. not a big fan of log manifolds really
kits are made to bolt in easily without altering anything on a tiny 350z, but a nice custom install that's done correctly should be better. kits give you ~$4k worth of components for like $7k just because it bolts in easily. that may be well worth it for some, but I want more. I figure I rather build it all custom fitted, component by component & use all great components. most kits make a lot of sacrifices to meet certain price points, I want to build a sick custom twin turbo swap even if it costs more than a kit.
anyway enough words for now, first heres a bunch of pictures of the car itself. tell me this thing don't look like it's just begging for a twin turbo
honestly II wish I could make it over 1,000hp monster, but I'll be satisfied if it's at least fast enough to hang with & maybe even beat some of the best in it's class... stuff like the cayennes & ml63's & srt8's I guess for my install I figured it'd be much better to build my own tubular equal length headers & mount the turbo's in front of the motor, right up top to the left & right, right smack in your face when you pop the hood
. the fx has plenty of room for this. by using this better turbo placement it makes all my cold side plumbing much shorter and with only using a few smooth mild bends, better flow with less volume for least amount of turbo lag & high efficiency. I tried to design everything for the most efficiency. intercooler cores I'm using are custom bell vertical flow cores, short tube's, but many of them, mounted left & right instead of center... better air flow & no reduction in the cooling systems capacity by having it blocked by a center mounted intercooler. the cores I'm using are only 2.5" thick & will be ducted to the bumper so crazy flow through the cores, they can support over 800hp, but are still efficient enough for least pressure drop across the core without adding too much volume. more pictures. btw the fx was silver when I got it, that's why the engine compartment's silver
the tial stainless steel v-band exhaust housings are so sexy, these are .83 gt2860r ball bearing turbo's
at first I thought of trying to just flip the stock HR header type manifolds & run the turbo's off of them. this could have worked
I wasn't happy with these, they are not equal length & the collectors wouldn't be so great, there crush bent tubing, just wasn't feeling it. I then tried the same thing but with a pair of stillen headers chopped up & flipped backwards. positioning wasn't realy so great though & I wasted those headers for nothing, I thought I might get it to work but nope, still wasn't good. at this point I decided only option to do it right was to build my own headers from scratch. started out just by putting the turbo's exactly where I wanted them, then just built the headers to fit. motor went in & out many times to build these
this is what the collectors started out as
and this is how they went togeather
and the intercoolers, this was the original mock up I had in mind
and of course the bumper will be modified for these
looking good so far right? friggn things were a ton of work to build, cutting & grinding all this stainless steel is no joke on a chop saw & a grinder & a dremel but somehow I managed to pull it off.... well, this is where my biggest problem comes in. see I didn't have a tig welder, I just used my mig with ss wire & tri mix to start to put these together & I didn't know much about welding stainless steel at all, first time I even tried, but I was told by many that I really should have these gone over with a tig welder. so after they were all pretty much done to this point I just bolted the engine & tranny final into the fx & put it all back together, then just sent the headers & down pipes out to have them all tig welded for me.....
so now the problem. the guy I sent it too is a good friend, been building racecars sine the 60's. I always went to him for advice with fabrication stuff so I gave them to him to do when he said he could do them no problem, well he winded up tig welding everything up for me, but he did not BACK PURGE the damn things, I didn't think all that much of it, don't know anything about welding stainless steel but I expected the guy who told me he could do them would at least know wtf he was doing, I just figured if he didn't back purge them then maybe they didn't need to be backpurged? I sure didn't know any better but trusted he did. big mistake, after getting back the headers is when I realized they were ruined ...the welds all had slag on the insides & the welds were pretty sugared up in many places, ----, all that work down the drain
I tried everything from hones to even talking to extrude hone, but once this happens it's just too late, now have no choice but to redo them the right way ok, that's it for my first post, time for bed. tomorrow I'll show where I'm at with this now after a few months of dealing with this major setback & my fx just sitting dead in my driveway all summer because of this.
Last edited by turbocad6; 10-15-2010 at 02:01 AM.
 10-15-2010, 03:45 PM
#2
0.0 BAR

Join Date: Oct 2010
Posts: 19
there should be no slag with tig welding.sugar yes but not slag.you should be able to get to most of them with a carbide cutter(the long ones are available) and a porting tool (aka die grinder) you may have to live with some of them looking bad on the inside but just make sure the ---- isn't loose and you should be fine.i mean it isn't a formula car and if it is not significantly blocked you should be ok.if you have to redo them just cut them apart with a zip wheel and then clean up the welds and put it back together and weld properly.have your buddy do it.after all it was his screwup.good luck and post some pics of the bad welds please before you fix it.

 10-16-2010, 01:28 AM
#5
0.0 BAR
Thread Starter
Join Date: Oct 2010
Posts: 3
thanks guys, yeah, I guess what I'm calling slag is really just sugaring, not sure if I even know exactly what slag really looks like even, but either way it just didn't look so good to me. the guy who did this welding for me is someone who I really respect & at first I didn't even want to complain or even mention it to him at all, although I did eventually after a month or so when I asked him what I owed him, he didn't charge me anything & he did feel bad that it happened for whatever that's worth, but whatever, whats done is done, the way I look at it eventually I'm going to teach him the right way to weld stainless  I don't think he did it maliciously, I think he just genuinely did not know better, although I wish at the time he did tell me that he doesn't have much experience with stainless rather than just saying yeah, I can do it for you.
anyway, after I seen this sugaring in the pipes is when I started really researching & learning everything I could about welding stainless steel. part of what I learned was that not only is the sugaring a real danger of breaking off as the headers heat cycle, but the sugaring also causes the welds themselves to be weaker too.
there was just no way to grind this all out without cutting them apart, & at that point the exact turbo positioning will change & the way I placed these things they need to be exactly where they are. I went to great lengths to get these positioned exactly symmetrical & even & straight, cutting the headers apart & re-welding them would change that exact positioning, I don't even have enough space for them to move back or down even a few millimeters, the clearances are all just that tight. plus the welds would still be weaker than they should be because they weren't back purged to begin with,
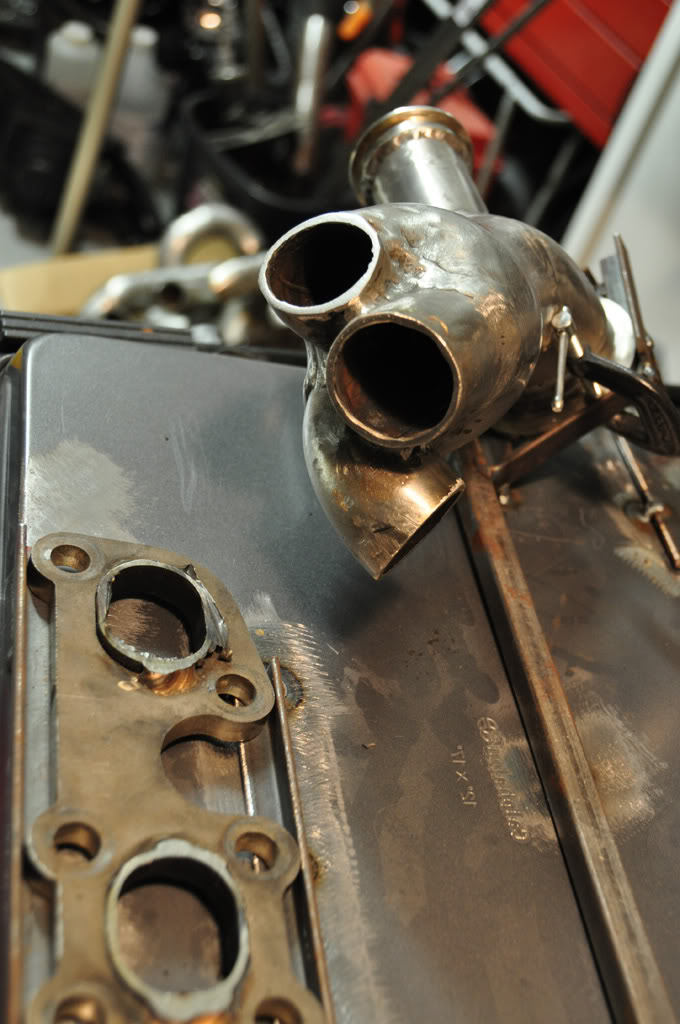
I'm a little bit of a nut & if something isn't right then I'm not going to want it, I don't believe in moving on to the next step until the step your at is 100%, remember I wanted to build something that is better than any kit & I don't think headers based on questionable welds is a good way to reach that goal. this happening to my headers was just like hitting a brick wall, I considered all my options & I decided to just replace all the tubes while reusing the collectors & turbo/wastegate head part of these headers, because that part he did not get enough penetration really to do any damage, plus there accessible to the inside, especially with the tubes all cut off.
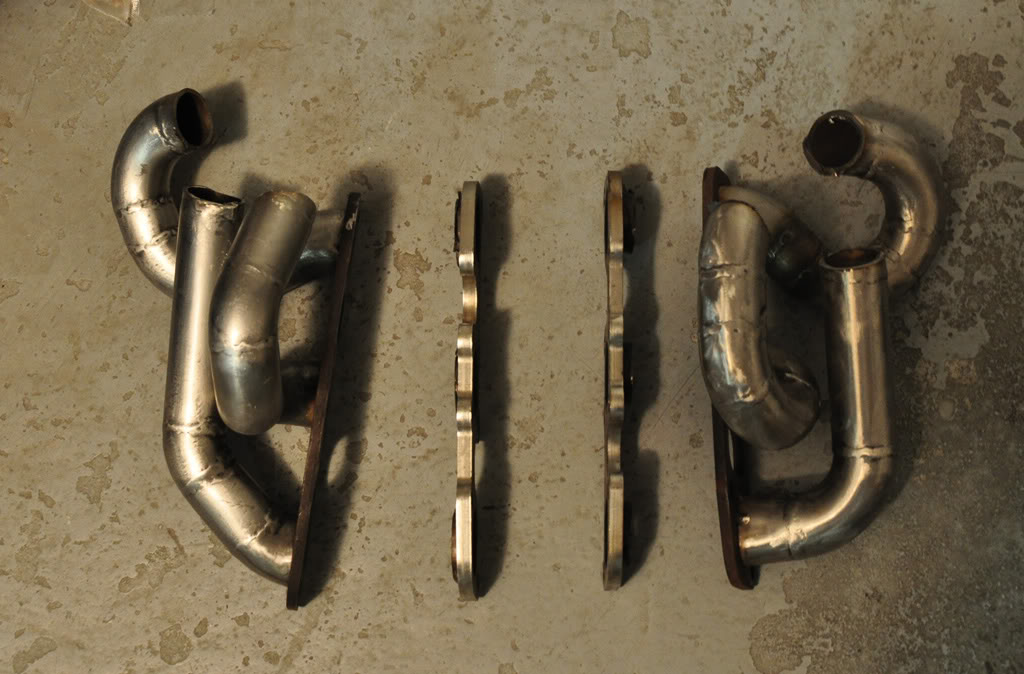
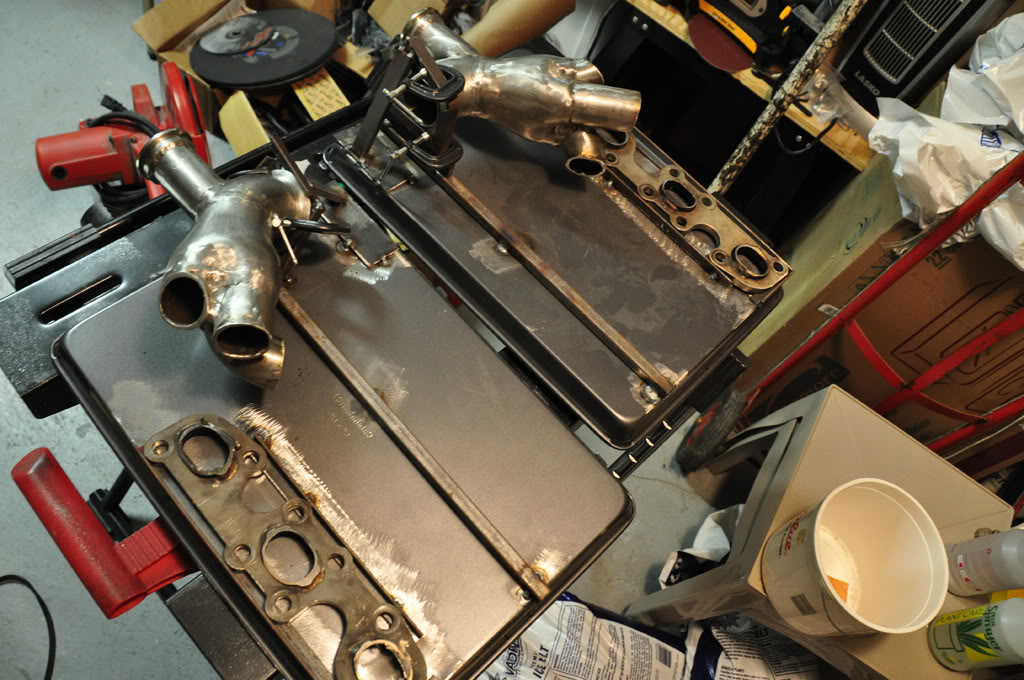
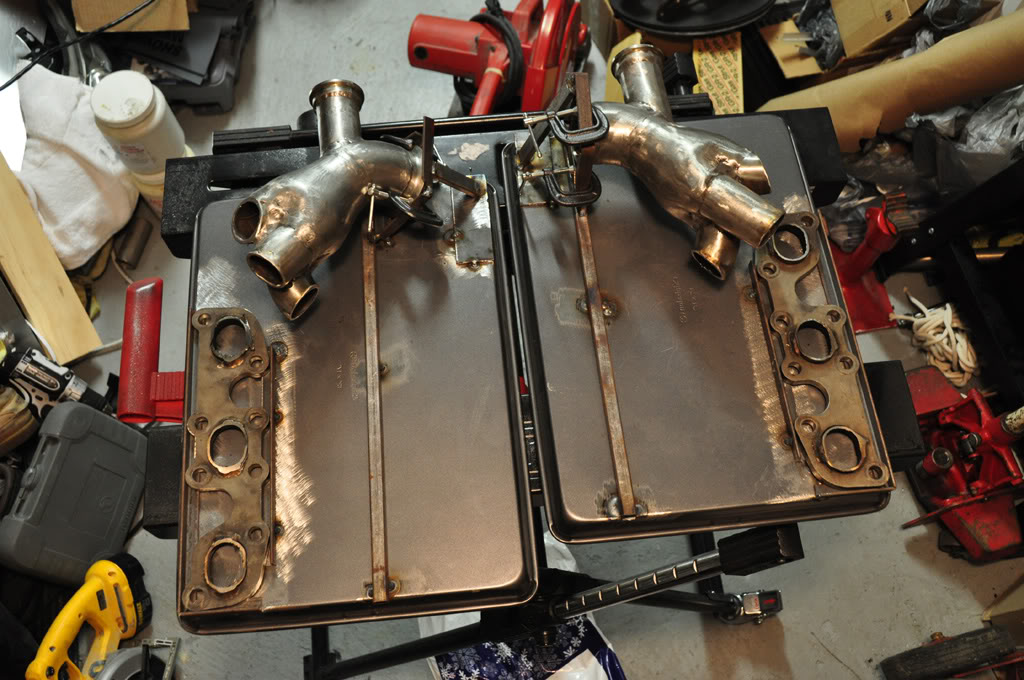
I don't have the luxury of building these things on the motor anymore & I need them to fit exactly the same as they did, so I built a jig to position the header heads relative to the head flange in a way that i could cut them apart & redo them while keeping the same fitments
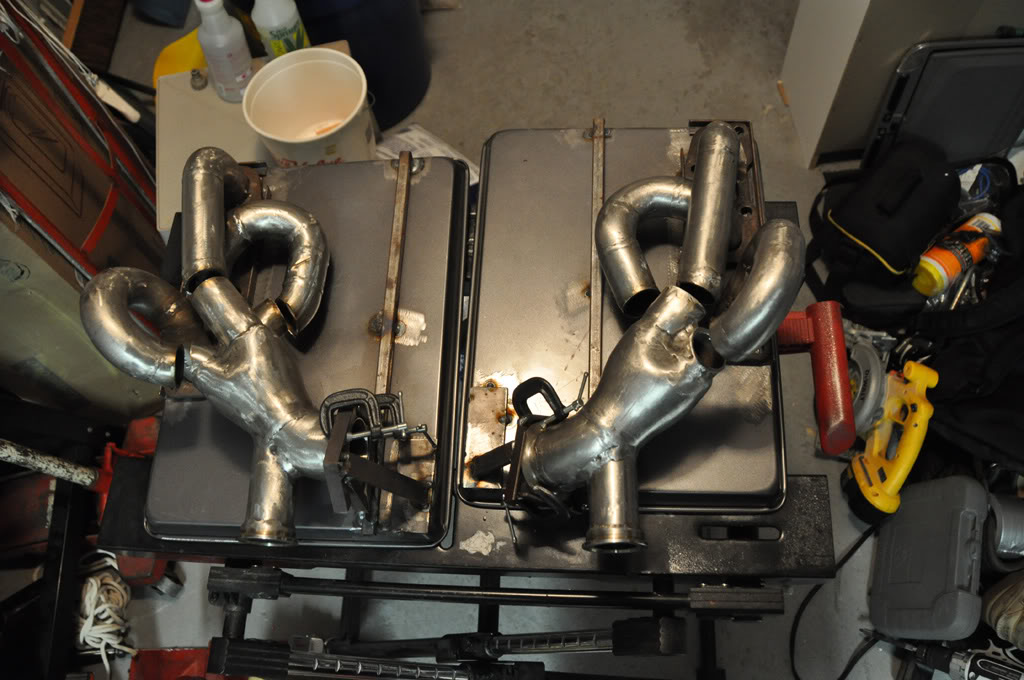
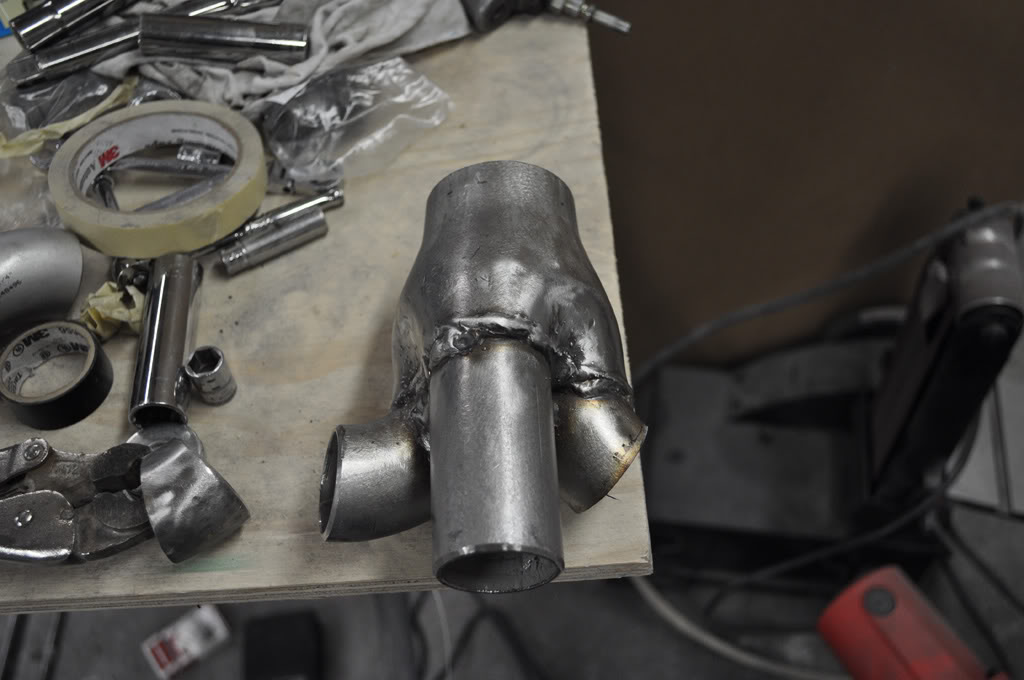
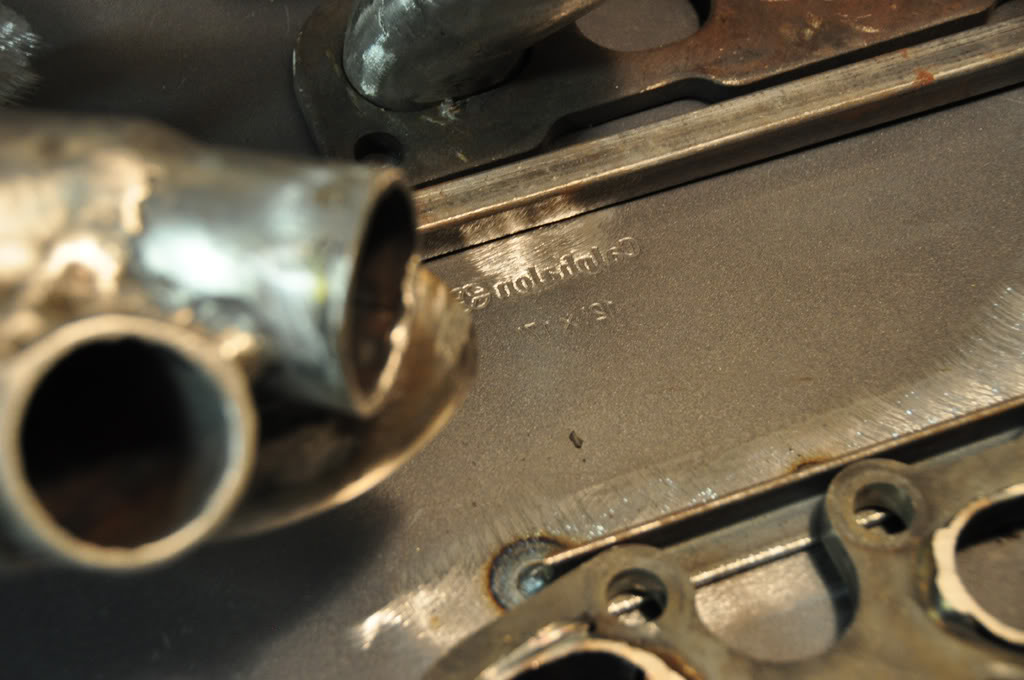
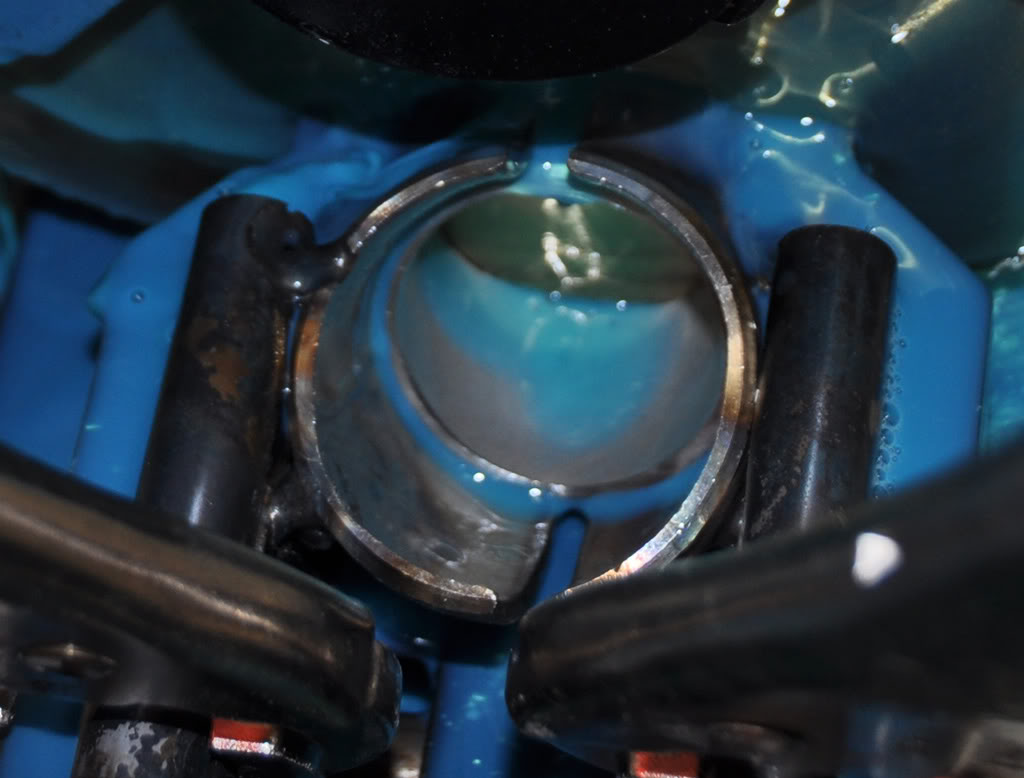
this is the part that will need to be replaced. I'm using the head flanges from the stillen headers this time cause there thicker & there stainless steel instead of the mild steel flanges I used the first time

and more of the jig
ok, so I decided no choice but to redo them, but honestly like I said the chop saw cutting & grinding of all this stainless steel the first time was just a friggin nightmare to me, I mean yeah, I was able to do it the first time but the angles were not really 100% & the cuts were rough, took a lot of grinding & straightening out after, plus they were just a bitch to cut in the first place, you wind up almost burning threw rather than cutting threw, kept jambing up & breaking blades, even had a few pieces wind up jambing & throwing a piece of stainless clear across the shop. when I finished these the first time I was so relieved & I just couldn't see myself even thinking of trying to do it that way again. I was lucky I didn't loose a finger the first time & I decided that I'd rather spend some $$ to just get the right tool for the job to cut these weld el's & pipe.
well then I started looking around & researching what the best way would be to do all these stainless weld el cuts easily. I searched around a bit trying to see what everyone else was doing but did not come up with all that much, seems a lot of guys also just struggle to get these cut really, nothing just seemed to be the best obvious choice. in the end I came down to 3 choices, first was a band saw, which is what a few guys recommended, could just push them through a vertical band saw with a block of wood or something. I looked around to buy one but the ones I wanted were just so huge, not having that much space to play with I started looking else ware. I then considered carbide blade dry saws, I guess that might have worked but at the same time I also started looking into cold saws. the cold saw idea was cool, I mean they just cut awesome, def the cleanest cut, a cut from a cold saw is like a milled finish, this just turned me on, & even though I was told it wouldn't work because it wouldn't be able to clamp the little elbows well enough I decided that this was what I really wanted to use, so I bought a baileigh cold saw.
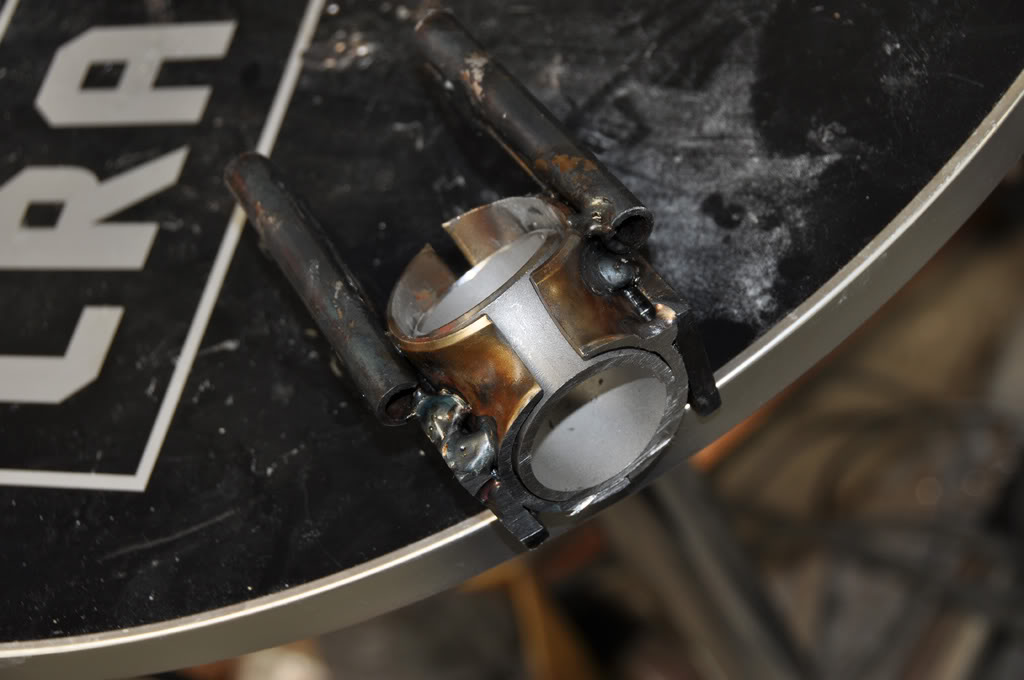
I got the cold saw & I built a jig to clamp the weld el's, it works awesome & really makes these cuts go from being a nightmare into being a very simple effortless way to cut any angle I needed
heres the jig I built
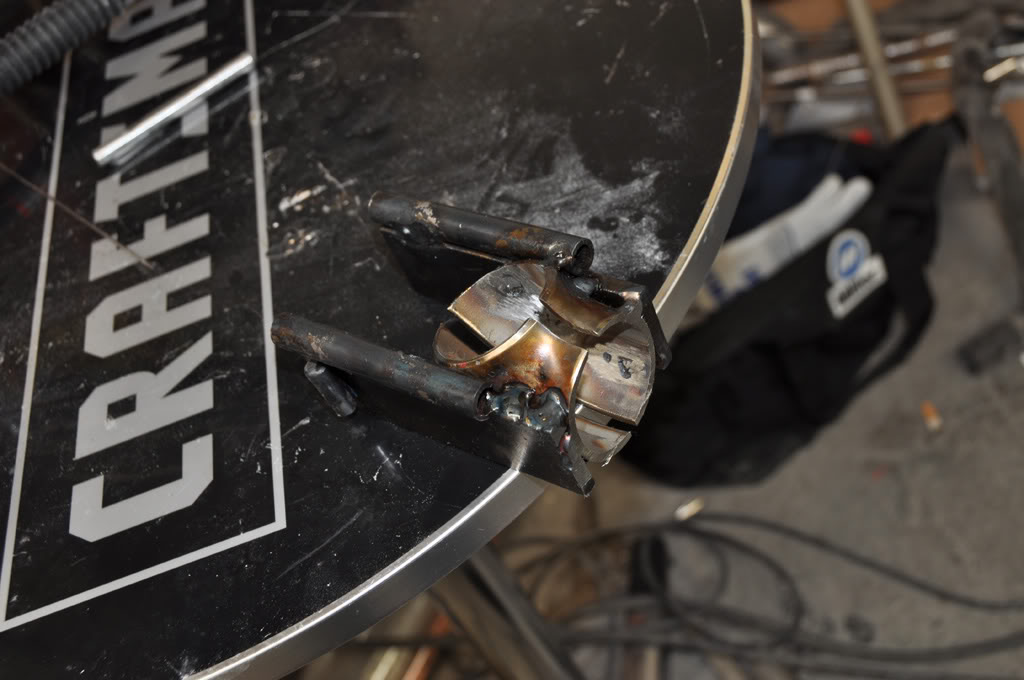
I made it in a way to be easy & quick to put it on & off the saw, worked out very well
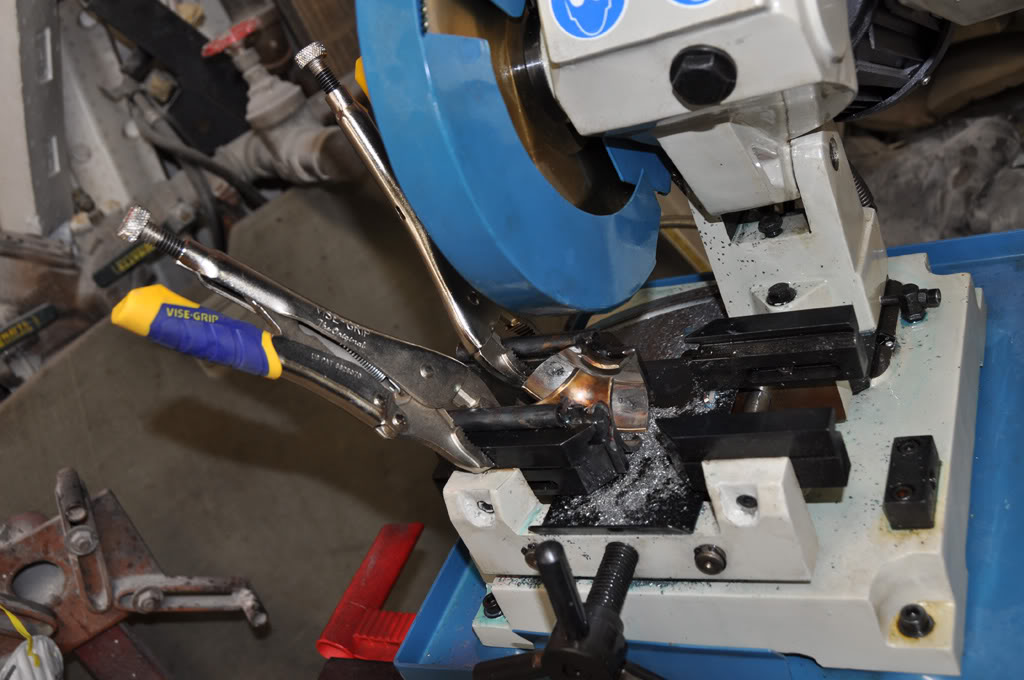
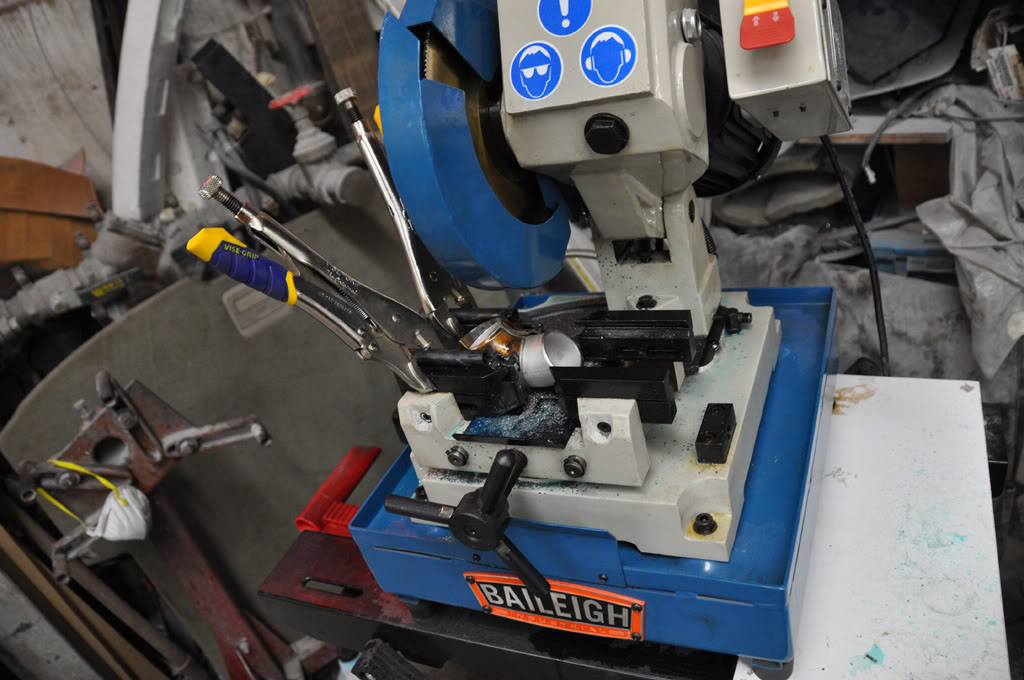
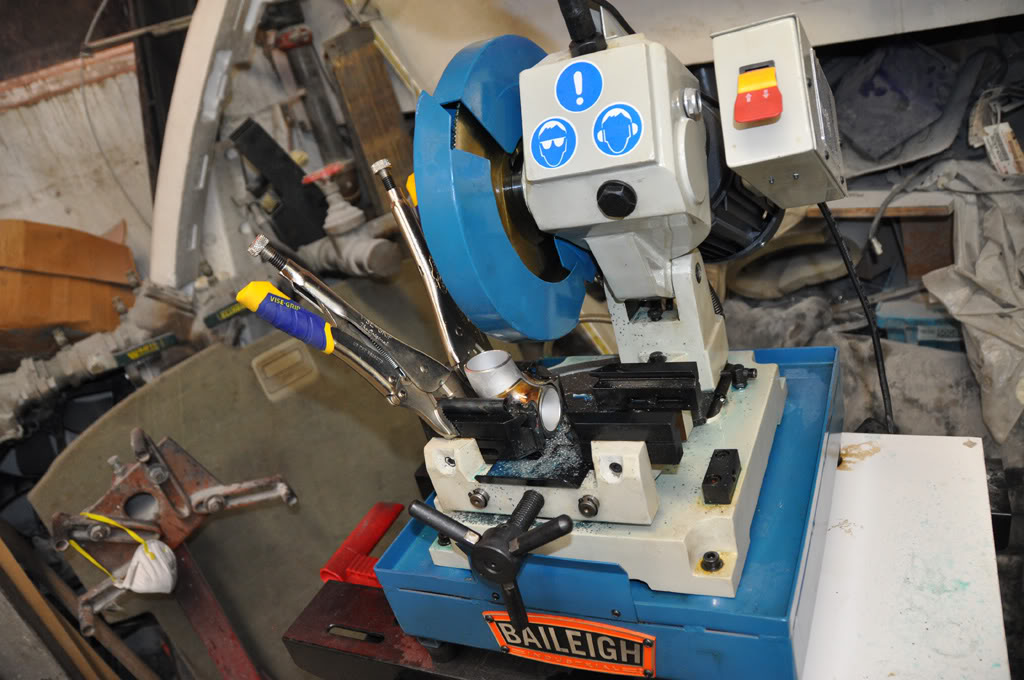
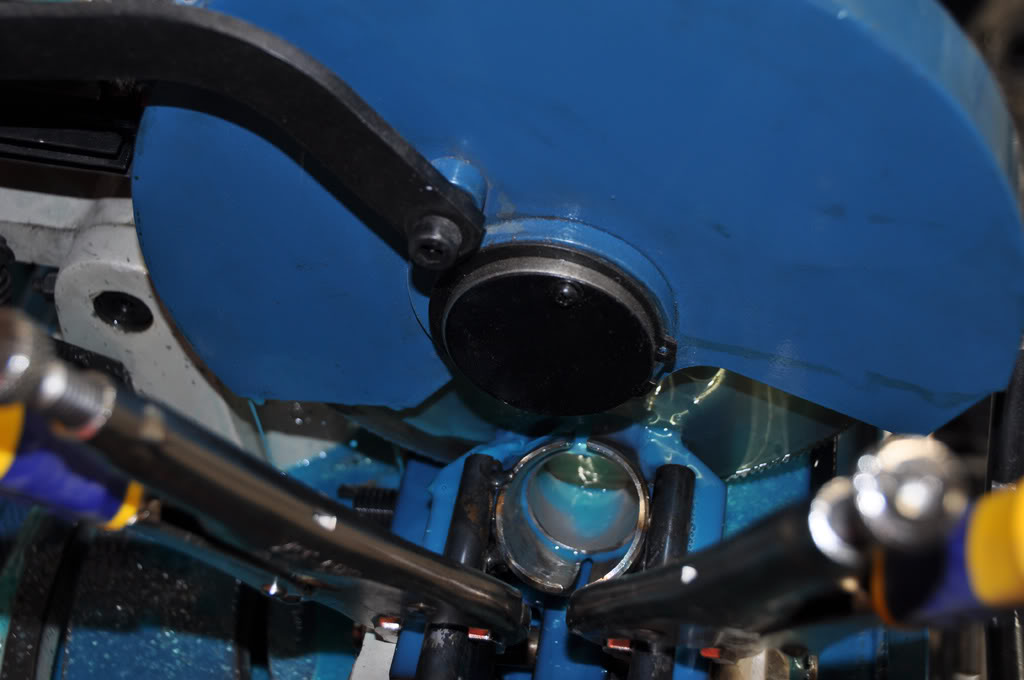
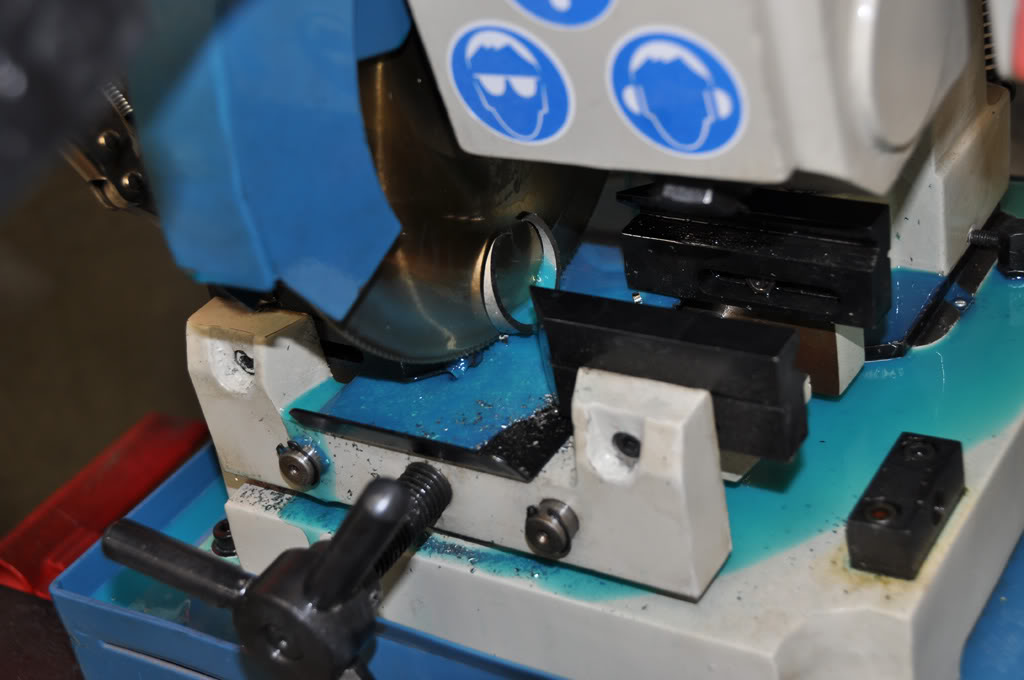
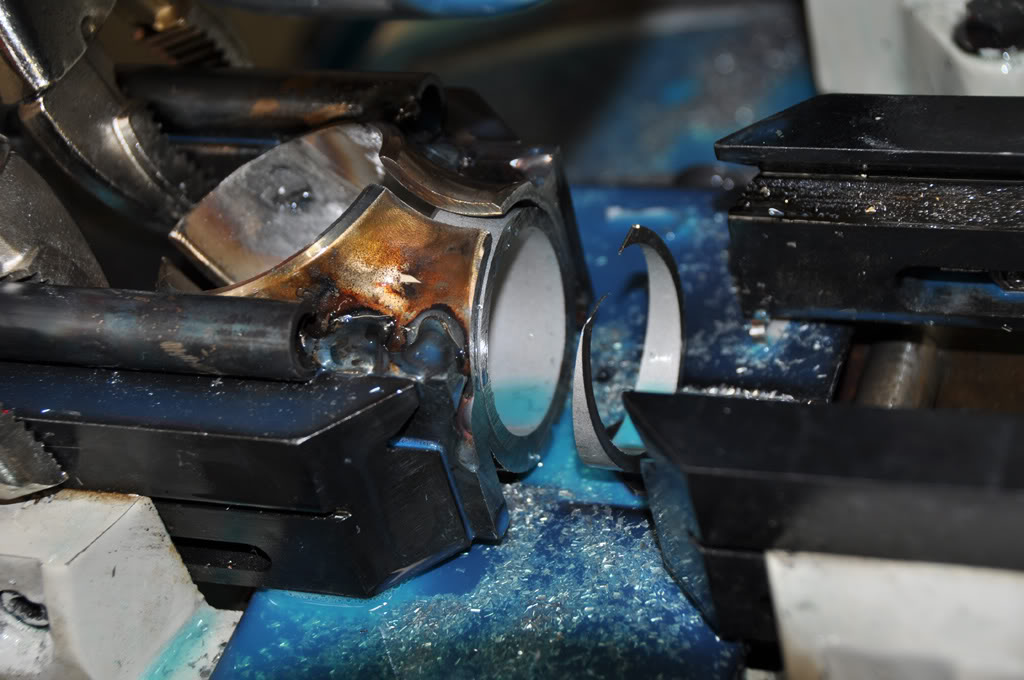
now I can get almost effortless angle cuts, was worth every penny for this tool to me
I also talked to a few other guys about welding these up for me, but after what happened the first time I was a bit Leary & did not want to take any chance of getting anything but a good weld. I talked to another race car builder I know but was not comfortable with the amount of experience he had with welding stainless either, I then found out about a guy who does air craft welding & considered seeing what he would want to do it for me but figured it would be expensive anyway, then I started thinking that maybe I should just get my own tig welder & learn how to just do it myself, I mean I always wanted a tig welder anyway, but just never wanted it or needed it bad enough to spend the cash for one, & a good tig welder was pretty expensive but maybe this was the time for me to get one.
at first I started looking at cheaper Chinese units, the ones that had built in plasma cutters seemed cool but like I said I'm a little bit of a nut & I just don't like to just settle, so little by little I kept working my way up & up to the point of just wanting to get a kick *** tig welder. after looking at a lot of units I decided to get a miller dynasty 200dx inverter tig, nice little machine & being a high end miller I knew it would wind up being something that will last, plus getting my own tig would mean that I could also do all my own aluminum welding & open up a lot of other uses for things that I couldn't do myself before, having my own tig I figured I could now finish my FX 100% all by myself rather than having to rely on any one else for anything.
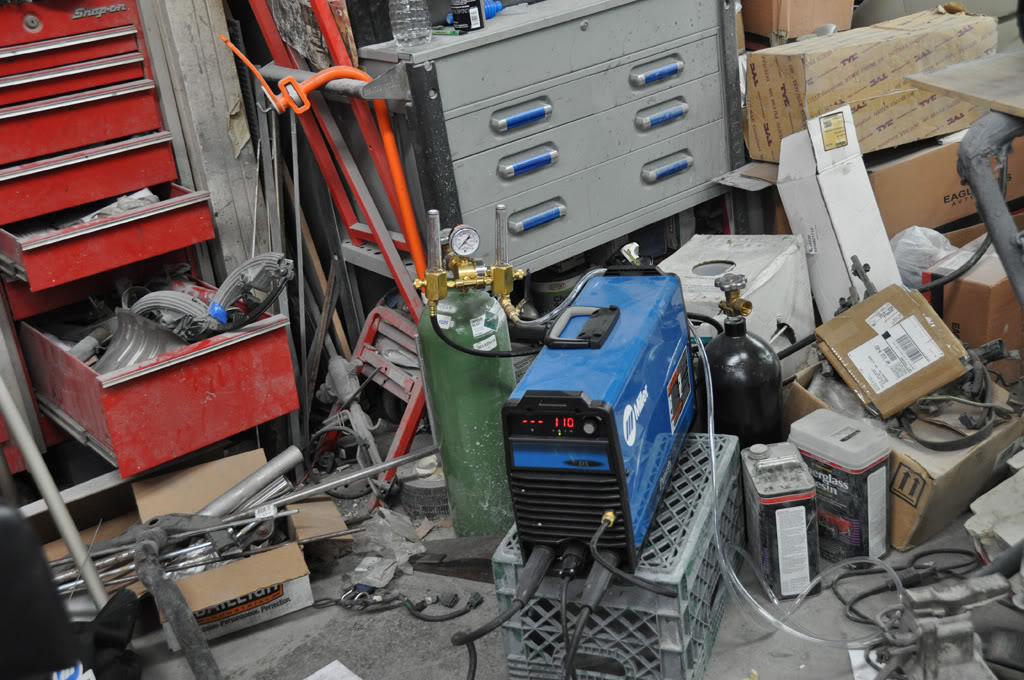
so now I get this tig & start playing with it, but let me tell you that just having a tig welder & being able to actually tig weld these stainless tubes 100% correctly are 2 very different things, since I got it I've been practicing & practicing like crazy, finally getting a bit better now & closer to being confident enough in my consistency to attempt to redo these headers but it's been a long road to this point taking a whole lot of patience & dedication, but I'm not the kind to give up so eventually I have to get it done the way I want it to be.
part of the reason I joined here is to get some advice & seek some opinions on certain things about tiging this thing... I've been reading a lot & now realize that a proper weld will have full penetration without really overheating the stainless causing carbide precipitation. I've been reading & learning about sanitary welds & I'm determined to be able to do not just adiquate welds, but to actually do good welds.
I don't think he did it maliciously, I think he just genuinely did not know better, although I wish at the time he did tell me that he doesn't have much experience with stainless rather than just saying yeah, I can do it for you. anyway, after I seen this sugaring in the pipes is when I started really researching & learning everything I could about welding stainless steel. part of what I learned was that not only is the sugaring a real danger of breaking off as the headers heat cycle, but the sugaring also causes the welds themselves to be weaker too.
there was just no way to grind this all out without cutting them apart, & at that point the exact turbo positioning will change & the way I placed these things they need to be exactly where they are. I went to great lengths to get these positioned exactly symmetrical & even & straight, cutting the headers apart & re-welding them would change that exact positioning, I don't even have enough space for them to move back or down even a few millimeters, the clearances are all just that tight. plus the welds would still be weaker than they should be because they weren't back purged to begin with,
I'm a little bit of a nut & if something isn't right then I'm not going to want it, I don't believe in moving on to the next step until the step your at is 100%, remember I wanted to build something that is better than any kit & I don't think headers based on questionable welds is a good way to reach that goal. this happening to my headers was just like hitting a brick wall, I considered all my options & I decided to just replace all the tubes while reusing the collectors & turbo/wastegate head part of these headers, because that part he did not get enough penetration really to do any damage, plus there accessible to the inside, especially with the tubes all cut off.
I don't have the luxury of building these things on the motor anymore & I need them to fit exactly the same as they did, so I built a jig to position the header heads relative to the head flange in a way that i could cut them apart & redo them while keeping the same fitments
this is the part that will need to be replaced. I'm using the head flanges from the stillen headers this time cause there thicker & there stainless steel instead of the mild steel flanges I used the first time
and more of the jig
ok, so I decided no choice but to redo them, but honestly like I said the chop saw cutting & grinding of all this stainless steel the first time was just a friggin nightmare to me, I mean yeah, I was able to do it the first time but the angles were not really 100% & the cuts were rough, took a lot of grinding & straightening out after, plus they were just a bitch to cut in the first place, you wind up almost burning threw rather than cutting threw, kept jambing up & breaking blades, even had a few pieces wind up jambing & throwing a piece of stainless clear across the shop. when I finished these the first time I was so relieved & I just couldn't see myself even thinking of trying to do it that way again. I was lucky I didn't loose a finger the first time & I decided that I'd rather spend some $$ to just get the right tool for the job to cut these weld el's & pipe.
well then I started looking around & researching what the best way would be to do all these stainless weld el cuts easily. I searched around a bit trying to see what everyone else was doing but did not come up with all that much, seems a lot of guys also just struggle to get these cut really, nothing just seemed to be the best obvious choice. in the end I came down to 3 choices, first was a band saw, which is what a few guys recommended, could just push them through a vertical band saw with a block of wood or something. I looked around to buy one but the ones I wanted were just so huge, not having that much space to play with I started looking else ware. I then considered carbide blade dry saws, I guess that might have worked but at the same time I also started looking into cold saws. the cold saw idea was cool, I mean they just cut awesome, def the cleanest cut, a cut from a cold saw is like a milled finish, this just turned me on, & even though I was told it wouldn't work because it wouldn't be able to clamp the little elbows well enough I decided that this was what I really wanted to use, so I bought a baileigh cold saw.
I got the cold saw & I built a jig to clamp the weld el's, it works awesome & really makes these cuts go from being a nightmare into being a very simple effortless way to cut any angle I needed
heres the jig I built
I made it in a way to be easy & quick to put it on & off the saw, worked out very well
now I can get almost effortless angle cuts, was worth every penny for this tool to me
I also talked to a few other guys about welding these up for me, but after what happened the first time I was a bit Leary & did not want to take any chance of getting anything but a good weld. I talked to another race car builder I know but was not comfortable with the amount of experience he had with welding stainless either, I then found out about a guy who does air craft welding & considered seeing what he would want to do it for me but figured it would be expensive anyway, then I started thinking that maybe I should just get my own tig welder & learn how to just do it myself, I mean I always wanted a tig welder anyway, but just never wanted it or needed it bad enough to spend the cash for one, & a good tig welder was pretty expensive but maybe this was the time for me to get one.
at first I started looking at cheaper Chinese units, the ones that had built in plasma cutters seemed cool but like I said I'm a little bit of a nut & I just don't like to just settle, so little by little I kept working my way up & up to the point of just wanting to get a kick *** tig welder. after looking at a lot of units I decided to get a miller dynasty 200dx inverter tig, nice little machine & being a high end miller I knew it would wind up being something that will last, plus getting my own tig would mean that I could also do all my own aluminum welding & open up a lot of other uses for things that I couldn't do myself before, having my own tig I figured I could now finish my FX 100% all by myself rather than having to rely on any one else for anything.
so now I get this tig & start playing with it, but let me tell you that just having a tig welder & being able to actually tig weld these stainless tubes 100% correctly are 2 very different things, since I got it I've been practicing & practicing like crazy, finally getting a bit better now & closer to being confident enough in my consistency to attempt to redo these headers but it's been a long road to this point taking a whole lot of patience & dedication, but I'm not the kind to give up so eventually I have to get it done the way I want it to be.
part of the reason I joined here is to get some advice & seek some opinions on certain things about tiging this thing... I've been reading a lot & now realize that a proper weld will have full penetration without really overheating the stainless causing carbide precipitation. I've been reading & learning about sanitary welds & I'm determined to be able to do not just adiquate welds, but to actually do good welds.
10-16-2010, 07:53 AM
#6
0.0 BAR
Join Date: Oct 2010
Posts: 19
good for you man.go to weldingtipsandtricks.com .you will find it very helpfull.buy one of his tig fingers they are great and only $10.00.saves alot of burns.if you need any help just ask.i am a welder/fabricator and yes i can weld stainless.lol .good luck man and keep a tight arc.use a 2% thoriated tungsten use argon at 13-15.


 11-13-2010, 12:19 PM
#10
0.0 BAR

Join Date: Nov 2010
Posts: 5
there should be no slag with tig welding.sugar yes but not slag.you should be able to get to most of them with a carbide cutter(the long ones are available) and a porting tool (aka die grinder) you may have to live with some of them looking bad on the inside but just make sure the ---- isn't loose and you should be fine.i mean it isn't a formula car and if it is not significantly blocked you should be ok.if you have to redo them just cut them apart with a zip wheel and then clean up the welds and put it back together and weld properly.have your buddy do it.after all it was his screwup.good luck and post some pics of the bad welds please before you fix it.


